Sage CRM allows us to create simple dashboards for key insight into the business and to track performance. Aggregated data from Sage CRM like databases and spreadsheets can be easily shown on the dashboards with visual representation. In this blog, we would like to explain how to create simple dashboards using Saved Searches.
GUMU Sage 100 Integration: Mobile Order Entry for Sage 100 ERP (No App Needed)
Let’s say you need to show ‘my cases’ which are in progress.
1) First of all you need to create a ‘Saved Search’ Module using Find screen. To do the same, navigate to Find > Case.
2) Since you need to show all cases assigned to you, select ‘Current User’ in the Assigned To field and select the status as ‘In Progress’. Then click on Find button to get all cases that are assigned to you.
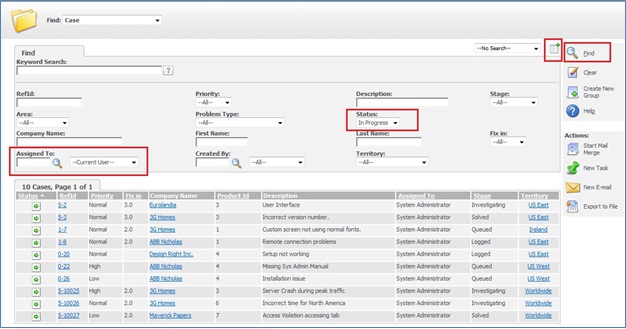
3) Click on a button as shown above (near Find button) to create a Saved Search.
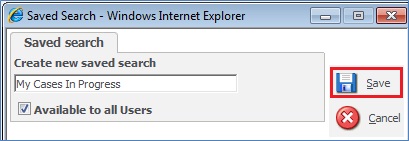
4) You will get a popup to create a new saved search. Enter relevant information and click on ‘Save’ button.
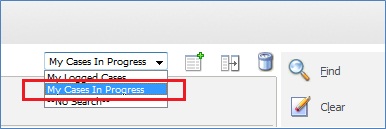
Once saved, same will be available in the Saved Search dropdown on Case find (screen as shown below).
Using this Saved Search, you need to follow below steps to create a dashboard gadget to view data in future.
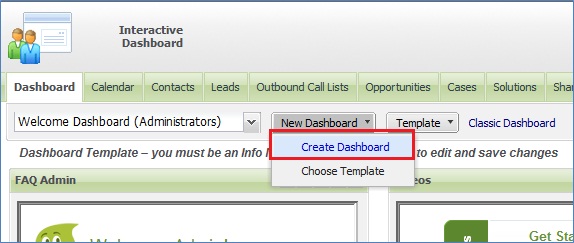
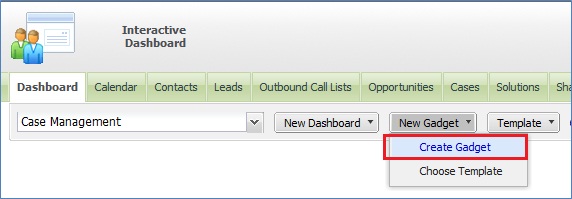
1) Create a dashboard by navigating to My CRM | Dashboard tab | New Dashboard button as shown below.
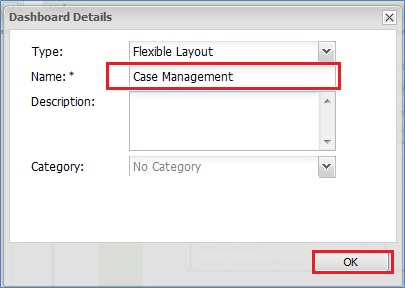
2) A pop up screen will come up prompting to fill the Dashboard Details. Fill the Dashboard details and click on OK button.
3) Once Dashboard is created, now you need to add dashboard gadgets which will show case information. To do the same, click on the New Gadget button to add gadget as shown below.
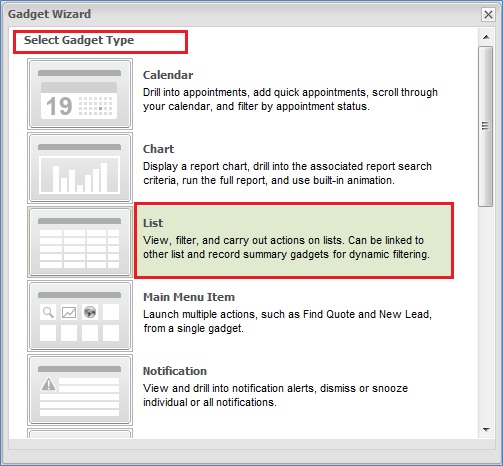
4) Gadget Wizard screen will open, asking to select the Gadget Type. Select the desired display from the list. (Refer screenshot below)
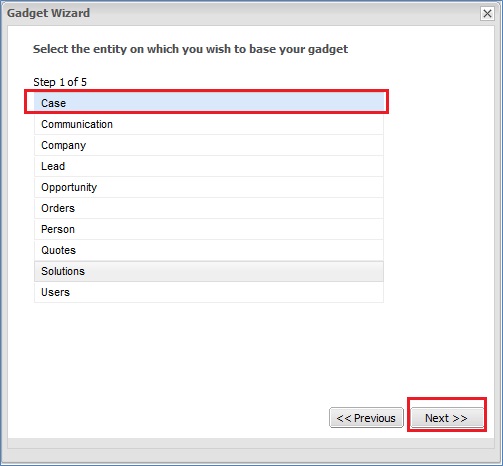
5) Then you will be navigated to the screen to select an entity for the Gadget. Select the Case entity from the list and click on Next button as shown below.
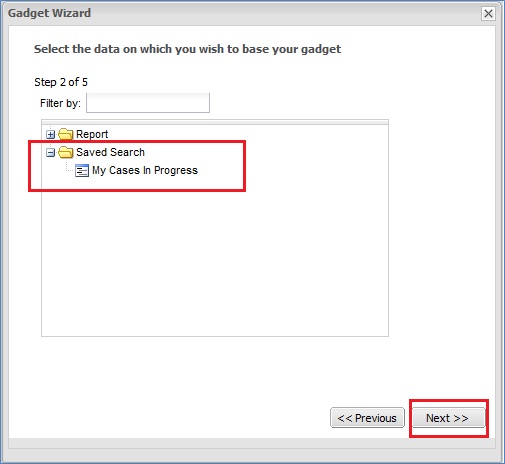
6) A screen will then open asking to select the data for dashboard list. Select Saved Search from the Saved Search node and click on Next button as shown below.
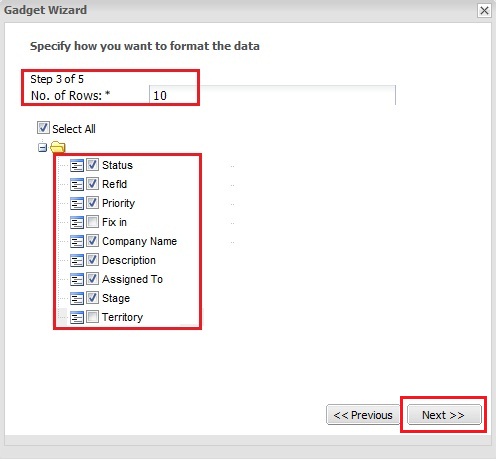
7) Then you will get a screen to format your list. i.e. configure number of rows that needs to be visible on the list. You will also get an option to select columns that needs to be available in the list.
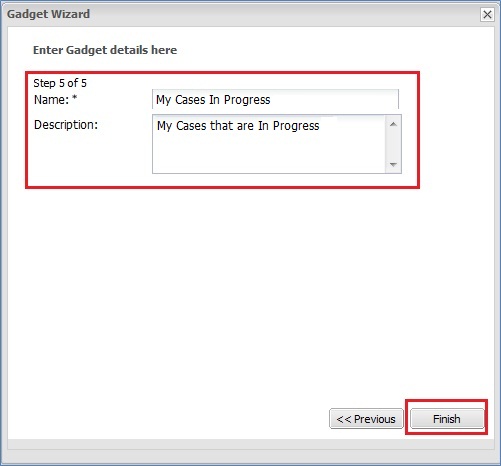
8) Click on Next button to get Gadget Details (screen as shown below) and fill the Gadget Name and Description. Finally click on Finish button.
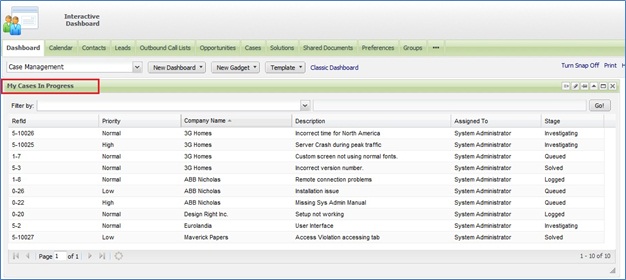
Once done, you will get all cases that are assigned to you.
We hope this will help you to remain updated on the latest cases making the best use of the most effective tool “DashBoards”.
Other Dashboard Related Posts:
1) Market Trend Right On Your Dashboard
2) Main Menu Items Gadget On Interactive Dashboard
3) Show Chart Block On Classic Dashboard
4) Sales Funnel on Dashboard Sage CRM 7.2
5) Handling Blog feeds in Sage CRM
6) Progressing workflows through Interactive Dashboard
Sage CRM – Tips, Tricks and Components
Greytrix is one of the oldest Sage Development Partner of two decades for Sage CRM and has been awarded "Sage Development Partner of the Year" three times in the past years. Greytrix has been working on customization and configuration of products in Sage CRM since decades and have accumulated hundreds of man years of experience. In these blogs, Greytrix will endeavour to share its knowledge and expertise and save upto 90% of project cost for Sage CRM users by presenting a list of useful small components, tools and add-ons for Sage CRM! Contact us at sage@greytrix.com
Greytrix is one of the oldest Sage Development Partner of two decades for Sage CRM and has been awarded "Sage Development Partner of the Year" three times in the past years. Greytrix has been working on customization and configuration of products in Sage CRM since decades and have accumulated hundreds of man years of experience. In these blogs, Greytrix will endeavour to share its knowledge and expertise and save upto 90% of project cost for Sage CRM users by presenting a list of useful small components, tools and add-ons for Sage CRM! Contact us at sage@greytrix.com


Iconic One Theme | Powered by Wordpress