In today’s world information exchange has become immensely easy with the help of World Wide Web. At the same time companies are also thinking of saving costs on server maintenance through Cloud Computing. Sage has helped this trend by making fully functional Sage CRM available on cloud through www.sagecrm.com. Anyone who follows the standard processes of Sales, Marketing and Services can easily configure Sage CRM cloud for day to day use.
GUMU Sage CRM Integrations : Sage ERP X3 | Sage 100 | Sage 500 | Sage 300
Dont miss this video – Adapt & Extend Sage CRM to manage any area of your business
Cloud CRM also allows creation of new fields, configuration of parameters and adding these fields on screen, list blocks. However one thing people find difficult to deal with is capturing related details through Custom entities. This works beautifully on On-Premise version through “Advanced Customization Wizard”. Sage CRM Builder now addresses this shortcoming on cloud version in very effective manner. Now custom entities can be built on the fly and used on dot com platform along with related workflows.
Let’s consider that you want to capture details of the jobs done against a sales opportunity. Here is how you can create simple Jobs entity against Opportunity context on SageCRM.com through Sage CRM builder. For simplicity let’s limit job entity to just couple of fields like Description and Details.
1. Well first and most important step is, you have to have a sagecrm.com account. If not, you can register for a free trial from sagecrm.com. Below is the website link.
http://www.sagecrm.com/
2. Once your account is ready, you can login to the same using above portal.
3. Click on the user icon on top and Select Administration option.
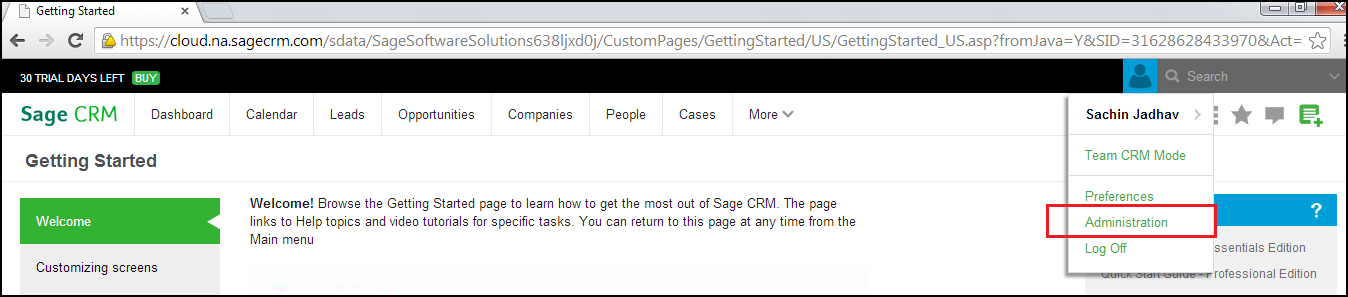
4. On the screen that appears, select “Sage CRM Builder” under Administration menu.
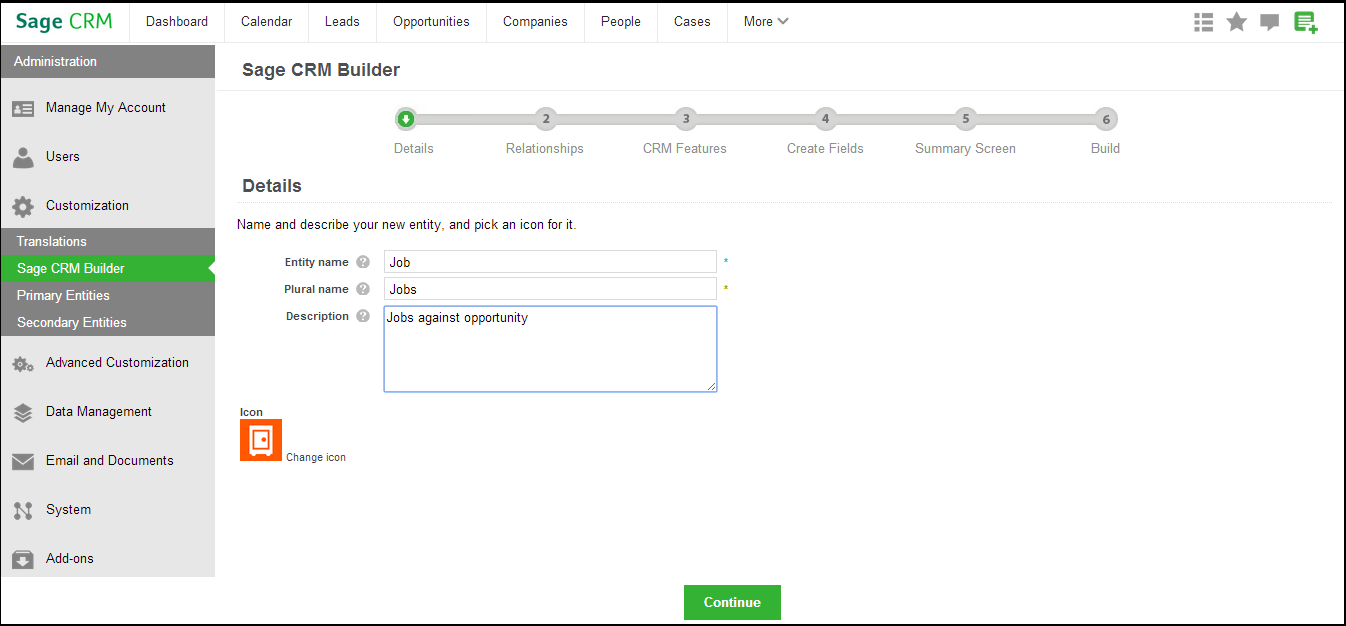
As a first step of entity creation that is “Details”, enter basic details of your entity. And click “Continue”.
5. In second step i.e. “Relationships” now it becomes more technical where you have to define relationship of new entity with the “Opportunity” entity. Now as I mentioned there will be multiple Jobs against one opportunity, we have to set Job to Opportunity relationship as “Many to One” i.e. “M-1”. You can also define whether your new entity will have Notes, addresses etc.
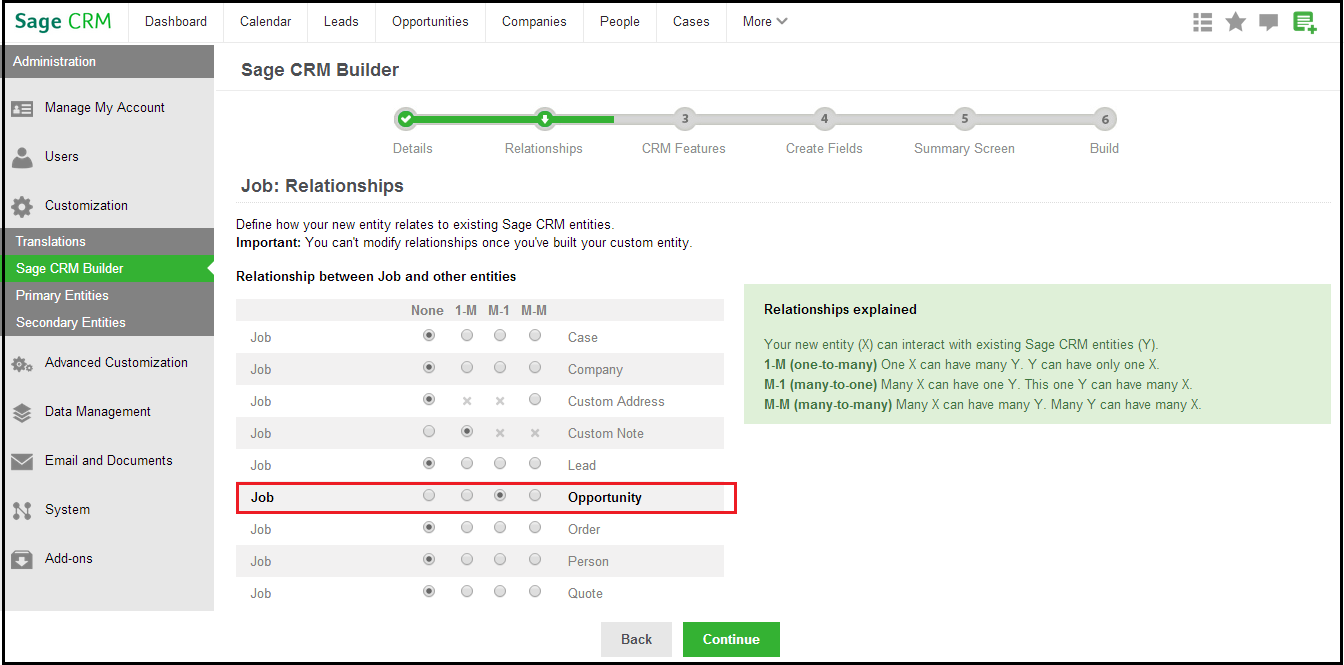
Once necessary relationships are set, click “Continue”.
6. In third step i.e. “CRM Features” you can specify in what all areas of CRM you want your new entity to appear. You can specify if Mail merge or document upload will happen against the entity. For now, I will keep everything ticked by default.
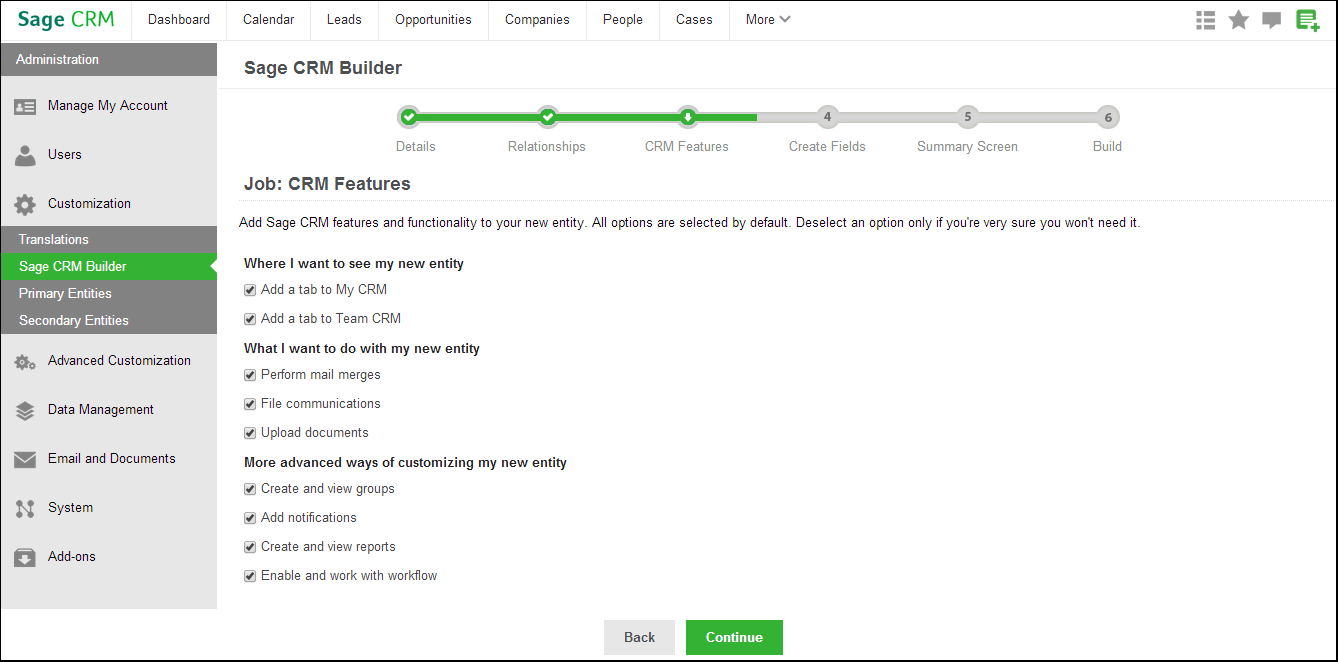
Click “Continue” when you are done adding CRM features required.
7. In fourth step “Create Fields” now we will create the fields that are required. As I said for now we will create 2 fields Description (Text) and Details (Multiline Text). Some fields are also created by default.
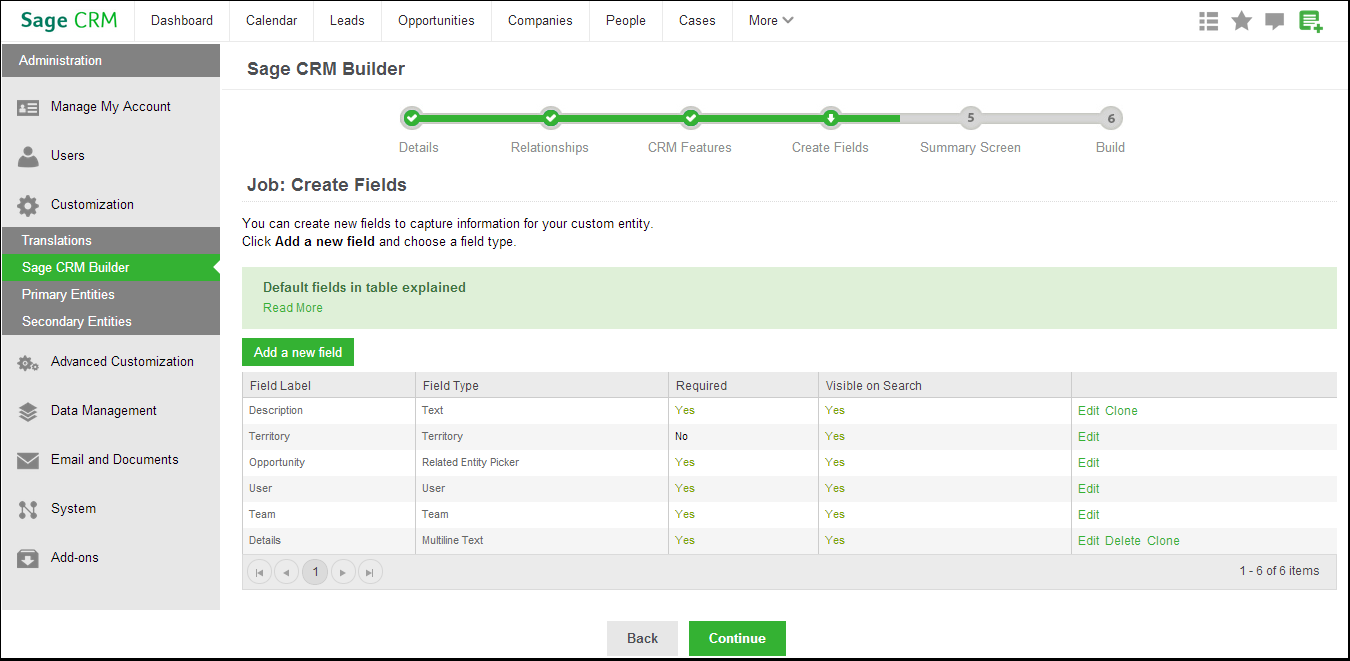
Once field creation is completed, click “Continue”.
8. In fifth stage that is “Summary Screen” we have to arrange the fields on the screen that will be displayed as summary and new entry screen wherever data addition happens to our new entity.
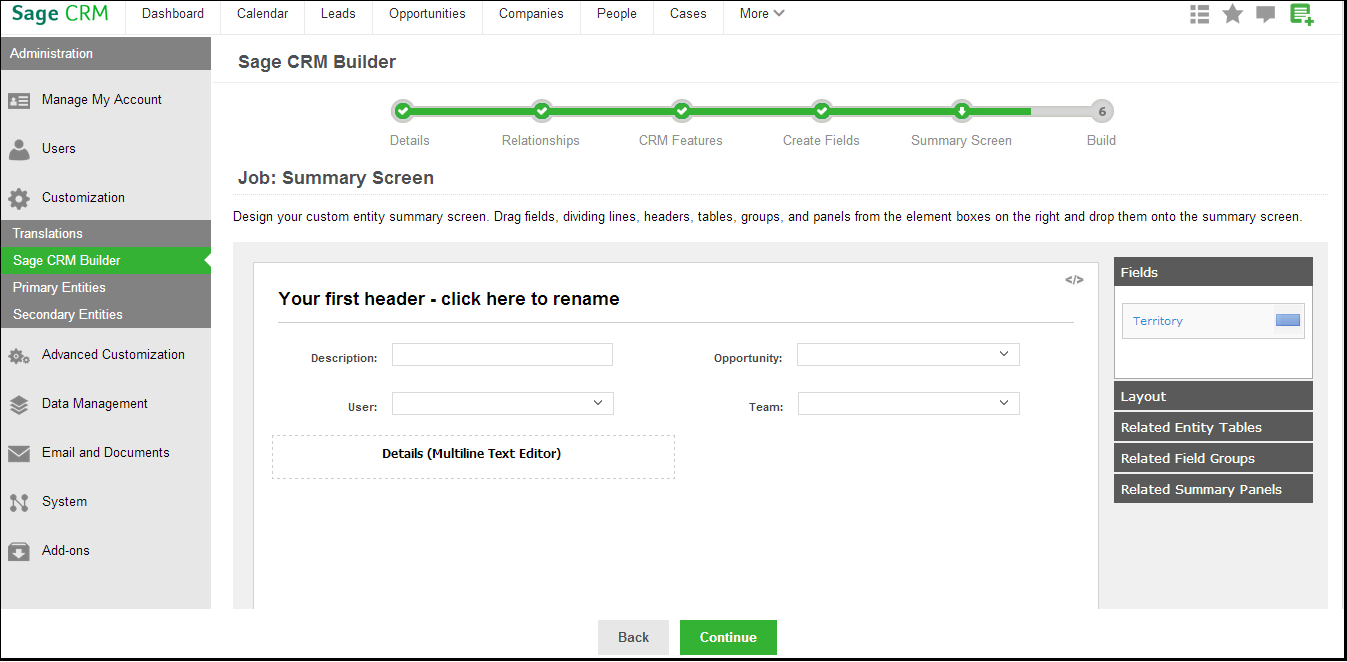
Once you are done editing your summary screen, click “Continue”.
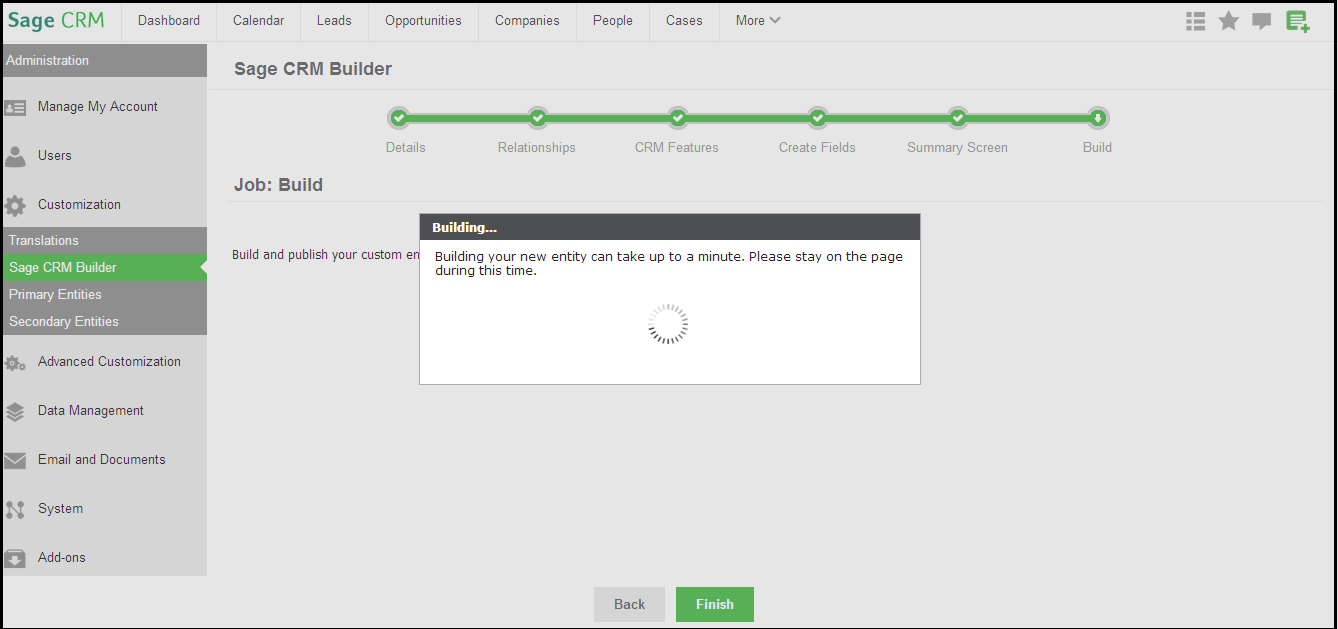
9. In the last step that is “Build” click on “Finish” button and wait for entity generation to complete
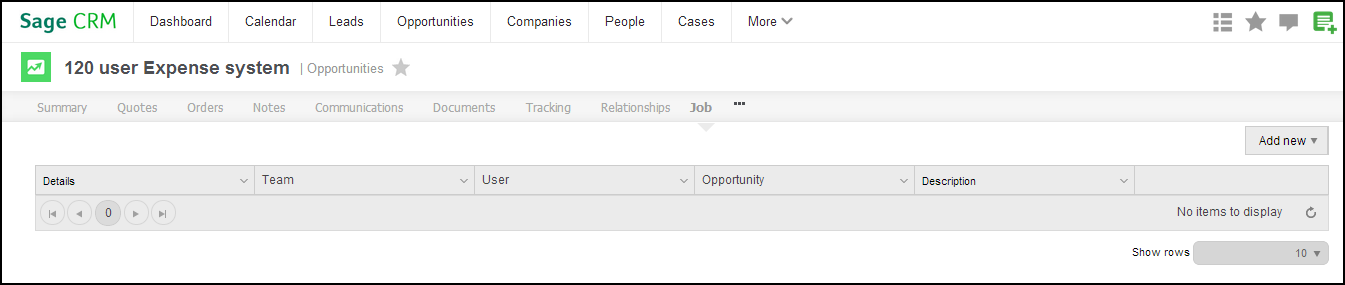
10. Now we have our new entity ready, find any opportunity in the system and click on the “Job” tab.

You can see the list screen.
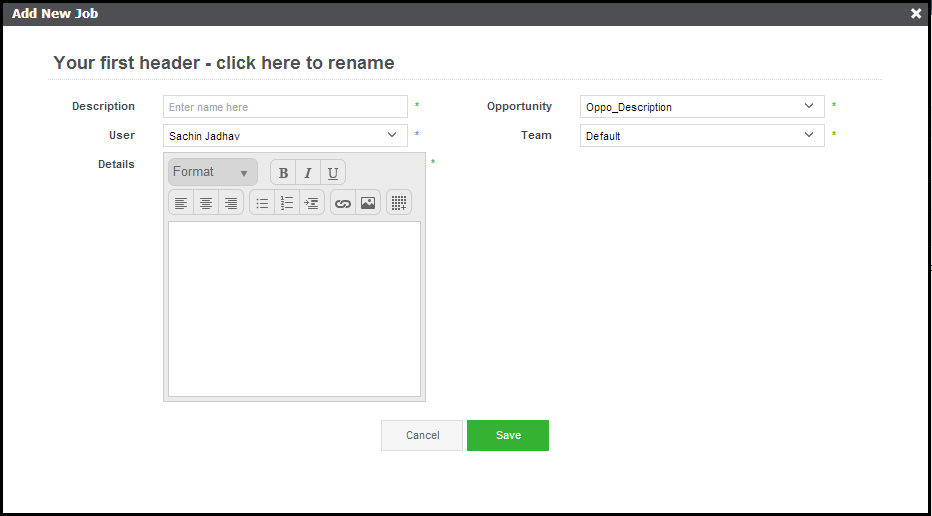
When you select “Add New Item” from “Add New” menu, New job screen opens up as follows. You can fill in the necessary details and click on Save button.
In similar manner multiple jobs can be added against an opportunity.
You are done! I know that this post was lengthy, but surely going through it once will get you started for any of custom works you are planning on Sage CRM cloud.
Also Read:
1) Codeless Customization: Add Custom Entity New Screen when accessed through iPhone
2) Promote Customer from Sage CRM to Sage ERP X3
3) Importing Customization for Real time changes from Sage 500 to Sage CRM
4) Tracking your custom fields in SageCRM
5) Sage CRM 7.2 Tomcat Setting for EC2 Amazon Server’s Elastic IP
Sage CRM – Tips, Tricks and Components
Greytrix is one of the oldest Sage Development Partner of two decades for Sage CRM and has been awarded "Sage Development Partner of the Year" three times in the past years. Greytrix has been working on customization and configuration of products in Sage CRM since decades and have accumulated hundreds of man years of experience. In these blogs, Greytrix will endeavour to share its knowledge and expertise and save upto 90% of project cost for Sage CRM users by presenting a list of useful small components, tools and add-ons for Sage CRM! Contact us at sage@greytrix.com
Greytrix is one of the oldest Sage Development Partner of two decades for Sage CRM and has been awarded "Sage Development Partner of the Year" three times in the past years. Greytrix has been working on customization and configuration of products in Sage CRM since decades and have accumulated hundreds of man years of experience. In these blogs, Greytrix will endeavour to share its knowledge and expertise and save upto 90% of project cost for Sage CRM users by presenting a list of useful small components, tools and add-ons for Sage CRM! Contact us at sage@greytrix.com


Iconic One Theme | Powered by Wordpress