Creatio is a powerful low-code platform designed to help businesses streamline and automate their sales, marketing, and customer service processes. It’s packed with tools that make managing relationships and workflows much simpler.
If you’re thinking about installing Creatio on your own local server instead of using the cloud, this easy-to-follow guide will walk you through the entire setup step by step.
While the cloud version is quicker to get started with and requires less technical setup, the on-premises version gives you greater control over your data, stronger security, and more flexibility. This makes it an ideal choice for organizations that prefer local hosting or need to meet strict data protection policies.
Before starting, make sure your system meets the following requirements:
- Prerequisites/Checklist:
- OS: Windows Server Windows 10/11
- Database: Microsoft SQL Server (Express/Standard/Enterprise).
- Redis caching server: recommended for performance (Creatio uses Redis for caching).
Link to download – https://github.com/tporadowski/redis/releases - IIS + Windows features (ASP.NET, ISAPI, WCF, WebSockets, WebSocket Protocol, WebSocket support, etc.) and the .NET / Hosting bundle required by your Creatio version (.NET 8 for recent Creatio builds).
- OS: Windows Server Windows 10/11
- Steps:
- Check if your system already has .NET 8 SDK and .NET Framework SDK v4.7.2 installed. If not, download and install them using the links provided below.
- Set up and install the Creatio caching server (Redis). Redis caching server: recommended for performance (Creatio uses Redis for caching).
Link to download – https://github.com/tporadowski/redis/releases - Creatio on-site installation package (web files + DB backup) and license/company ID.
- Go to the Creatio support portal or contact your Creatio account manager.
- Download the on-premises installation package.
Note: Download the zip file and save it to any drive. Before extracting it, make sure the file is unblocked.
- Create a Microsoft SQL database for Creatio:
- Open SQL Server Management Studio, log in, then right-click on “Databases” and select “New Database.”
- After the database is successfully created, restore it using the .bak file from the downloaded files in the above #3 step. The .bak file can be found in the db folder.
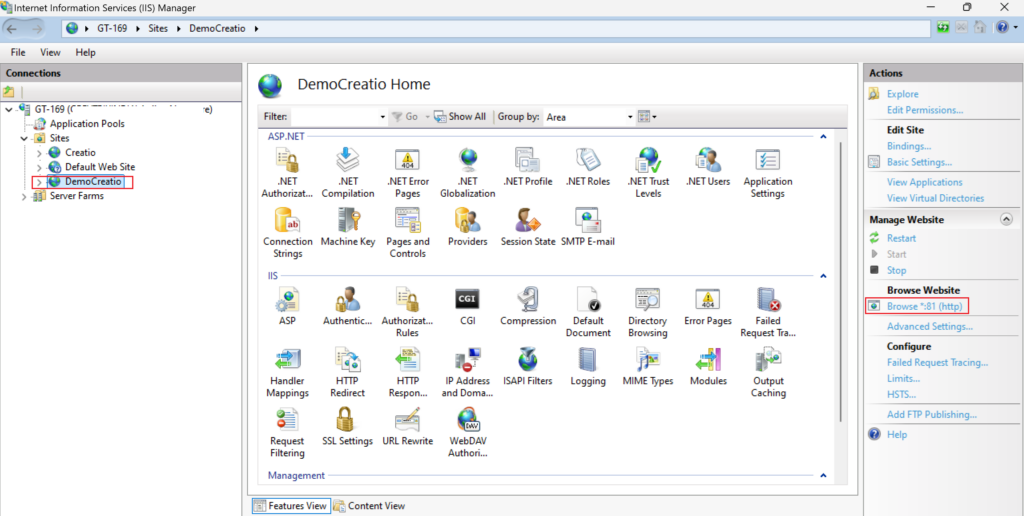
- Create and set up the application website using IIS.
- Refer link below for detailed step-by-step instructions.
Set up Creatio application server on IIS | Creatio Academy
Note: Create a suitable folder on the drive and copy the files from the downloaded package (step #3) into it, rather than placing the entire folder directly. When configuring paths in IIS while creating the site or application (as described in the link above), ensure that Creatio has the necessary permissions and that the drive is accessible.
- Refer link below for detailed step-by-step instructions.
- Modify the ConnectionStrings.config file. Note: that this step is DBMS-dependent.
- Navigate to the ConnectionStrings.config file located in the Creatio directory you specified, or in the directory configured in IIS as described in Step 5.
- Open the ConnectionStrings.config file in a text editor. Specify the connection parameters (connectionStrings) of your site. Refer to the sample screenshot.
- Check if your system already has .NET 8 SDK and .NET Framework SDK v4.7.2 installed. If not, download and install them using the links provided below.

Note: Edit only above highlighted values.
Kindly select the relevant option from the link below, depending on the SQL service you are using, such as MS SQL, Oracle, or PostgreSQL.
For more detailed information refer below link:
Modify ConnectionStrings.config for SQL Server | Creatio Academy
Once above steps are completed user can navigate to IIS and browse Creatio easily.
Note: Once you’ve successfully accessed the Creatio local URL for the first time, use the default login credentials: Username – Supervisor and Password – Supervisor.
Setting up Creatio on-premises may seem complicated at first, but it becomes straightforward when you follow the steps carefully. Once the installation is complete, you’ll have full control over your CRM system, complete access to your data, and the flexibility to customize workflows to fit your business needs. You’ll also gain better security, easier system integration, and the freedom to manage updates and configurations on your own schedule.
About Us
Greytrix is a globally recognized consulting and development partner with 25+ years of expertise in delivering industry-relevant CRM and ERP solutions tailored to business needs. Over the years, we have built strong proficiency in providing end-to-end services, including consultation, implementation, migration, integration, and custom development for Sage ERP, Salesforce, and Sage CRM. With our native cloud integration framework, GUMU™, we power seamless real-time connectivity between leading ERPs and CRMs, helping organizations unlock efficiency and scale. Our solutions have supported businesses across industries, enabling them to modernize legacy systems and keep pace with fast-changing digital demands.
Expanding our capabilities, Greytrix is also a trusted Creatio CRM Consulting and Implementation Partner. Creatio is a leading AI-native, no-code CRM platform that enables businesses to streamline workflows, enhance customer experiences, and accelerate digital transformation. Leveraging our industry experience and in-house innovation, including GUMU™ Copilot AI, we help organizations adopt Creatio CRM with confidence. We ensure the platform supports automation, compliance, and scalability, while tailoring it to unique business needs to deliver measurable results.
Our commitment goes beyond technology; we believe in being a long-term partner. From designing CRM roadmaps to delivering analytics and automation, we help businesses simplify operations, drive growth, and achieve tangible outcomes.
For more information on our Creatio CRM services and solutions, contact us at creatio@greytrix.com. We will be glad to assist you.