Managing leads efficiently is critical for any sales-driven organization. Salesforce provides two powerful automation tools to streamline lead management and ensure faster follow-ups:
- Lead Assignment Rules – Automatically assign leads to the right users or queues
- Auto-Response Rules – Automatically send confirmation emails to leads
In this blog, you’ll learn what these rules are, why they matter, and how to configure them step by step to optimize your Salesforce lead management process.
What Are Lead Assignment Rules?
Lead Assignment Rules determine who owns a lead when it is created in Salesforce.
Why Use Lead Assignment Rules?
Lead Assignment Rules help organizations:
- Automatically route leads to the correct sales rep or team
- Reduce manual effort for sales admins
- Ensure faster response times
- Improve overall lead conversion rates
Common Use Cases for Lead Assignment Rules
Lead Assignment Rules are commonly used to:
- Assign leads based on Country or State
- Assign leads based on Lead Source
- Route high-value leads to senior sales representatives
- Assign unqualified or generic leads to a queue
How to Configure Lead Assignment Rules in Salesforce
Step 1: Navigate to Lead Assignment Rules
To begin configuration:
- Go to Setup
- Search for Lead Assignment Rules
- Click Lead Assignment Rules
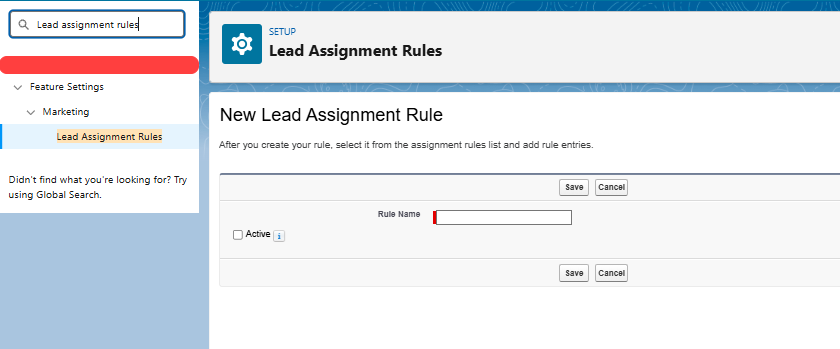
Step 2: Create a New Assignment Rule
When creating a new rule:
- Click New
- Enter a Rule Name (e.g., India Leads Assignment)
- Mark it as Active
- Click Save
Important: Only one Lead Assignment Rule can be active at a time.
Step 3: Create Rule Entries
To define how leads are assigned:
- Open the assignment rule
- Click New Rule Entry
- Define criteria such as:
- Field: Country
- Operator: Equals
- Value: India
- Choose a User or Queue as the assignee
- Set the Rule order (lower order = higher priority)
- Save the rule entry

Step 4: Assign a Default Owner (Optional)
To avoid unassigned leads:
- Add a final rule entry without criteria
- This rule will capture all unmatched leads
This is a best practice to ensure every lead always has an owner.
What Are Lead Auto-Response Rules?
Auto-Response Rules send automatic emails to leads immediately after they’re created.
Why Use Auto-Response Rules?
Auto-Response Rules help you:
- Instantly acknowledge lead submissions
- Build trust with prospects
- Confirm successful form submissions
- Improve customer experience and engagement
How to Configure Auto-Response Rules in Salesforce
Step 1: Navigate to Auto-Response Rules
To access auto-response settings:
- Go to Setup
- Search for Auto-Response Rules
- Click Lead Auto-Response Rules
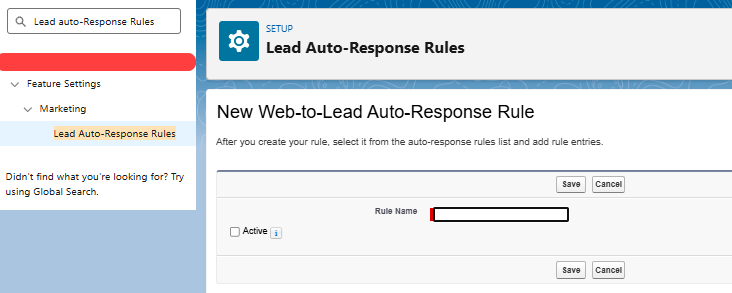
Step 2: Create a New Auto-Response Rule
To create the rule:
- Click New
- Enter a Rule Name
- Mark it Active
- Save
Important: Only one auto-response rule can be active at a time.
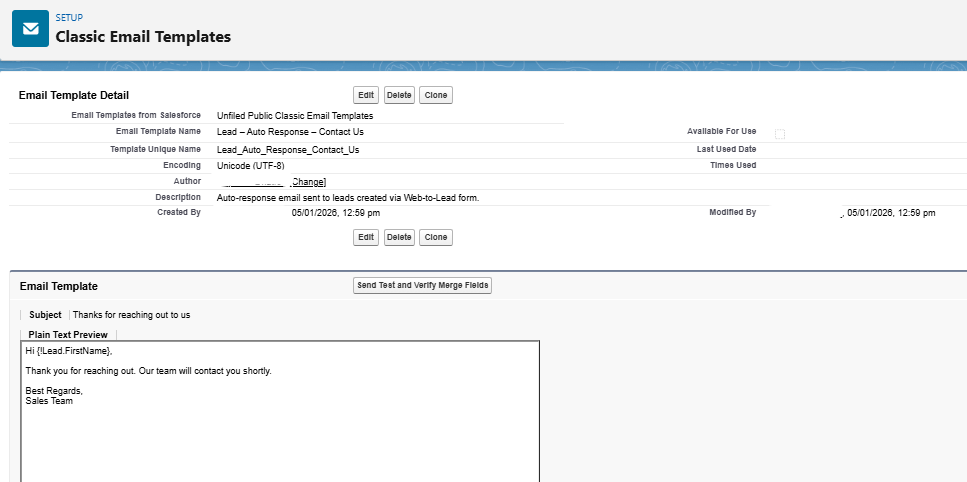
Step 3: Create an Email Template
Before adding rule entries, create an email template:
- Go to Setup → Email Templates
- Create a Classic or Lightning Email Template
Step 4: Add Rule Entries
- Open the Auto-Response Rule
- Click New Rule Entry
- Define criteria if required, such as:
- Lead Source = Web
- Select the Email Template
- Save
Conclusion
Lead Assignment Rules and Auto-Response Rules are essential Salesforce automation tools that help sales teams respond faster, stay organized, and improve lead conversion rates. By automating lead ownership and instant communication, businesses can ensure that no opportunity is missed and every lead receives timely attention.
By following the above blog instructions, you will be able to learn “How to Configure Lead Assignment & Auto-Response Rules in Salesforce“. If you still have queries or any related problems, don’t hesitate to contact us at salesforce@greytrix.com. More details about our integration products are available on our website and Salesforce AppExchange.
We hope you find this blog resourceful and helpful. However, if you still have concerns or need further assistance, please contact us at salesforce@greytrix.com.
About Us
Greytrix – a globally recognized and one of the oldest Sage Development Partner and a Salesforce Product development partner offers a wide variety of integration products and services to the end users as well as to the Partners and Sage PSG across the globe. We offer Consultation, Configuration, Training and support services in out-of-the-box functionality as well as customizations to incorporate custom business rules and functionalities that require apex code incorporation into the Salesforce platform.
Greytrix has some unique solutions for Cloud CRM such as Salesforce Sage integration for Sage X3, Sage 100 and Sage 300 (Sage Accpac). We also offer best-in-class Cloud CRM Salesforce customization and development services along with services such as Salesforce Data Migration, Integrated App development, Custom App development and Technical Support business partners and end users. Salesforce Cloud CRM integration offered by Greytrix works with Lightning web components and supports standard opportunity workflow. Greytrix GUMU™ integration for Sage ERP – Salesforce is a 5-star rated app listed on Salesforce AppExchange.
The GUMU™ Cloud framework by Greytrix forms the backbone of cloud integrations that are managed in real-time for processing and execution of application programs at the click of a button.
For more information on our Salesforce products and services, contact us at salesforce@greytrix.com. We will be glad to assist you.
Related Post