When integrating Salesforce with external systems, secure and authenticated HTTP callouts are crucial. Traditionally, developers had to manage this using Remote Site Settings, custom Apex code for handling tokens, and manual credential storage. This method introduced multiple risks, including hardcoded secrets, maintenance challenges, and security vulnerabilities.
To address these issues, Salesforce introduced Named Credentials a streamlined and secure way to handle callouts and authentication in a declarative, manageable fashion.
What Are Named Credentials?
Named Credentials simplify external API integrations by encapsulating both the endpoint URL and its associated authentication method. This not only enhances security but also reduces the complexity of maintaining code and credentials across environments.
In this blog, we’ll cover:
- How Named Credentials work
- Why they’re more secure than traditional approaches
- A step-by-step configuration guide
- A practical use case
Why Named Credentials Are the Preferred Security Model
Compared to Remote Site Settings, which merely allow outbound calls to specific domains, Named Credentials provide a complete solution by managing both the endpoint and authentication in one place.
Key advantages over traditional methods:
- No hardcoded credentials: Tokens and secrets are not exposed in Apex.
- Centralized configuration: Easier to audit, manage, and reuse.
- Support for OAuth and External Identity Providers: Seamless integration with AWS, Azure AD, Okta, etc.
- Aligned with zero-trust policies: Promotes secure, policy-driven identity handling.
Named Credentials also support metadata-driven deployment, meaning configurations can be promoted across environments using change sets or unlocked packages, maintaining consistency and reducing manual errors.
Ultimately, if you’re working with integrations in Salesforce, Named Credentials are the recommended and scalable path forward, offering better control, built-in security, and easier maintenance over time. Here are some of the Key Advantages for the Named Credentials.
Key Advantages of Named Credentials:
- Simplified Authentication: Supports OAuth 2.0, basic authentication, and more.
- Improved Security: Prevents credentials from being exposed in Apex.
- Metadata-Driven Deployment: Easily deploy across environments using change sets or unlocked packages.
- Reusable: Use across Apex, Flows, External Services, and more.
- Supports External Identity Providers: Integrate with Azure AD, AWS, Okta, etc., through Auth Providers and External Credentials.
Step-by-Step: Configuring Named Credentials in Salesforce
Step 1: Creation of Connected App
To create a Connected App in Salesforce, follow the steps below:
- Enable the Option to Create Connected Apps
- Navigate to Setup.
- In the Quick Find search box, type Apps.
- Go to App Settings and enable the option: “Allow users to create connected app”.
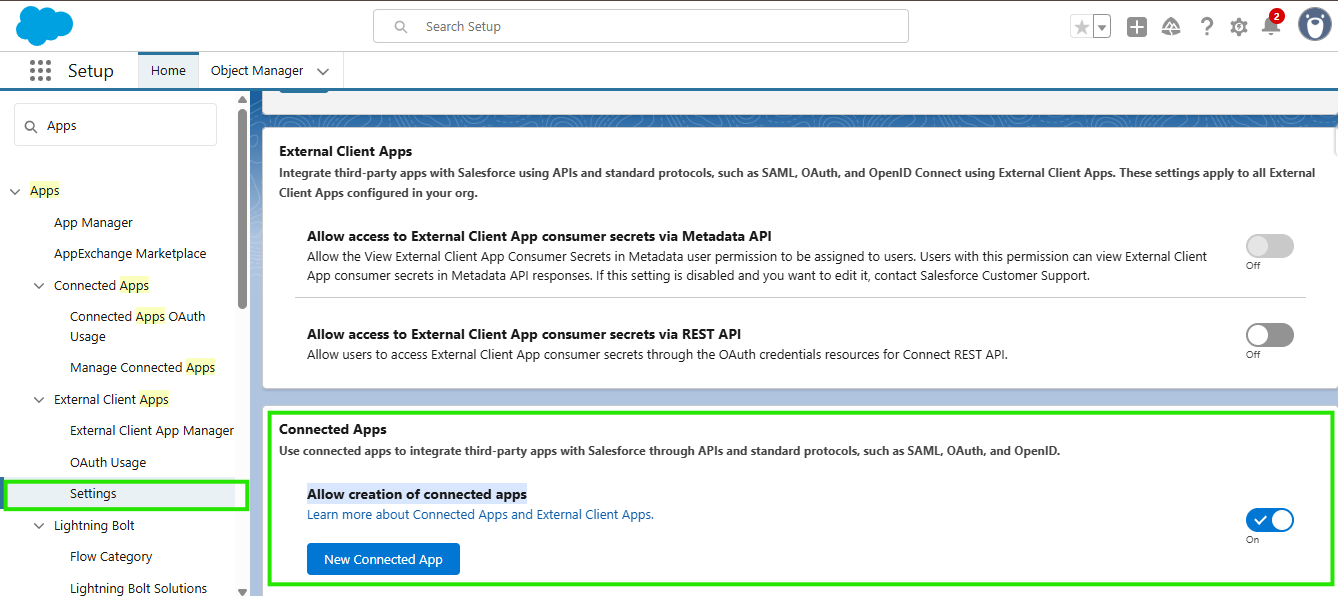
- Create a New Connected App
- Click on New Connected App and fill in the required app details as specified.
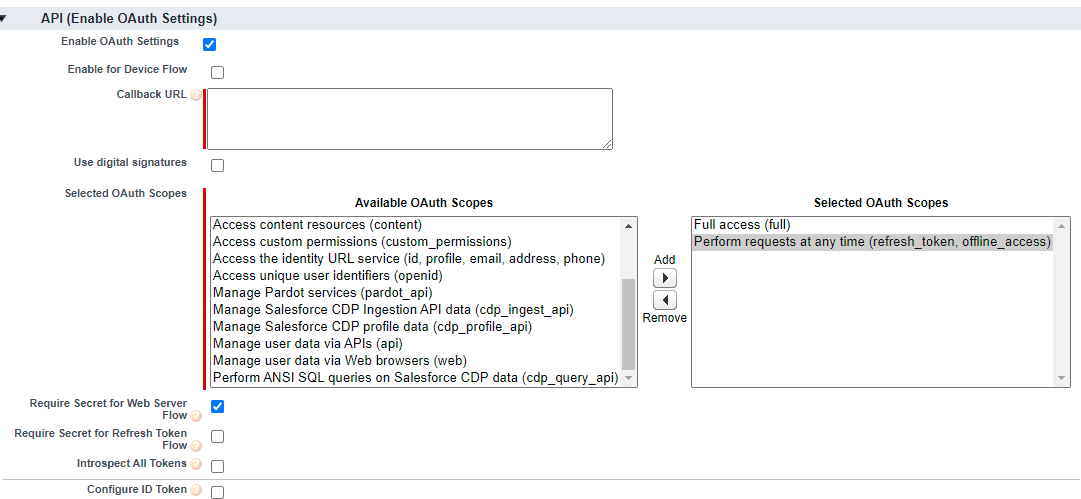
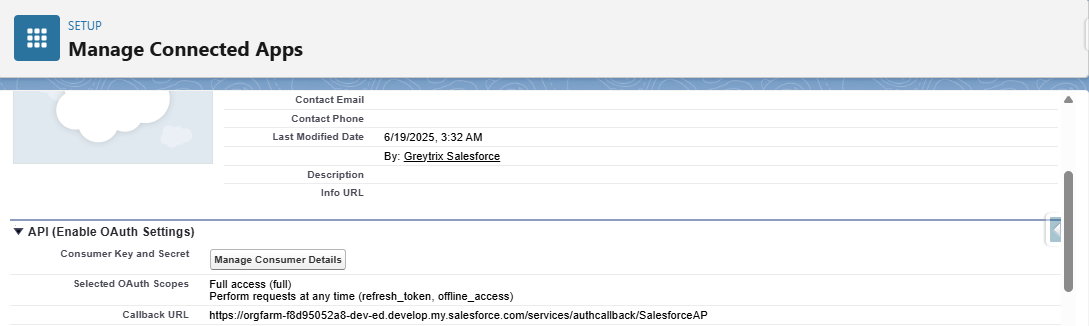
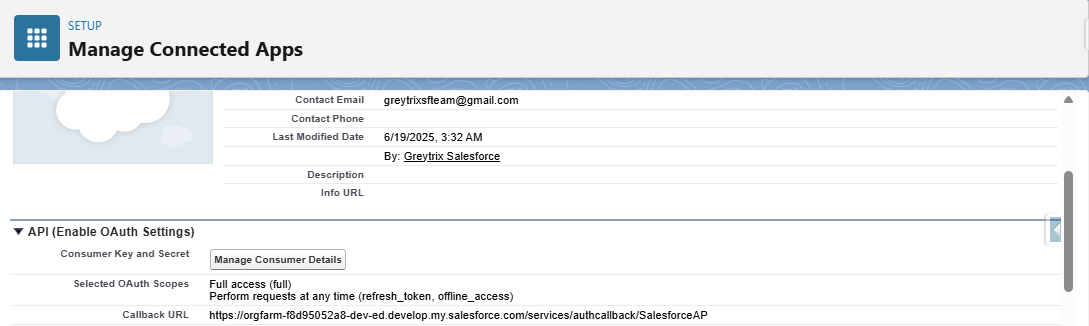
- Configure OAuth Settings
- Check the box for Enable OAuth Settings under the API section.
- For the Callback URL, temporarily provide your browser URL (this will be updated in Step 2 of the process).
- In the Selected OAuth Scopes, add:
- Full Access (Full)
- Perform requests at any time (refresh_token, offline_access)
- Enable Require Secret for Web Server Flow.

Step 2: Creation of Auth. Provider
After completing the Connected App setup in Step 1, follow the instructions below to configure the Auth. Provider:
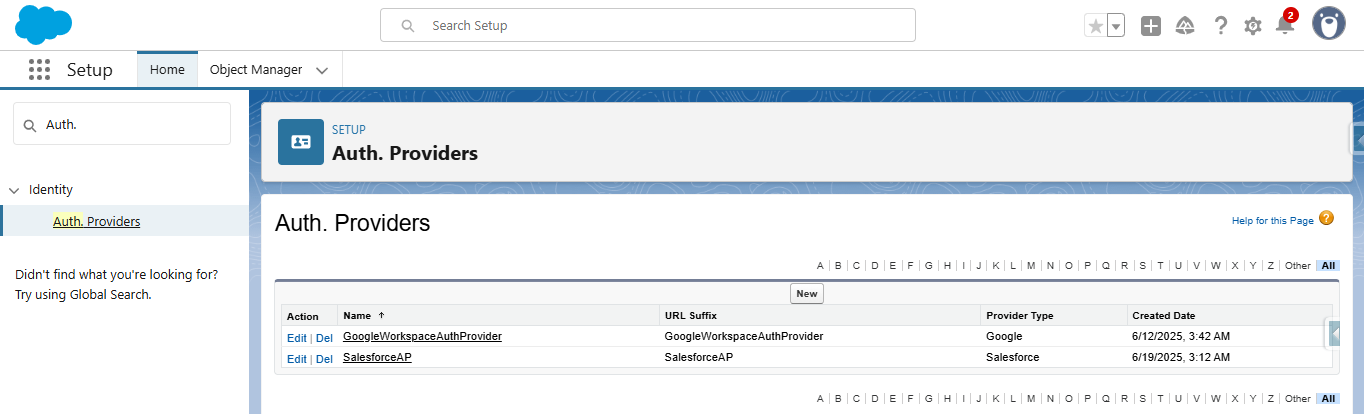
- Navigating to Auth. Provider
- Go to Setup.
- In the Quick Find search box, type Identity and select Auth. Providers.
- Click the New button.
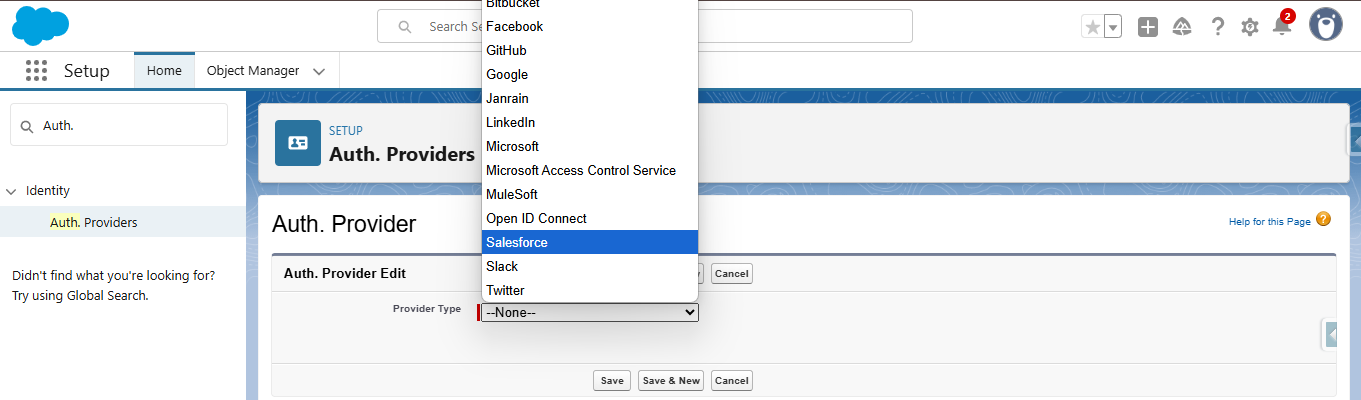
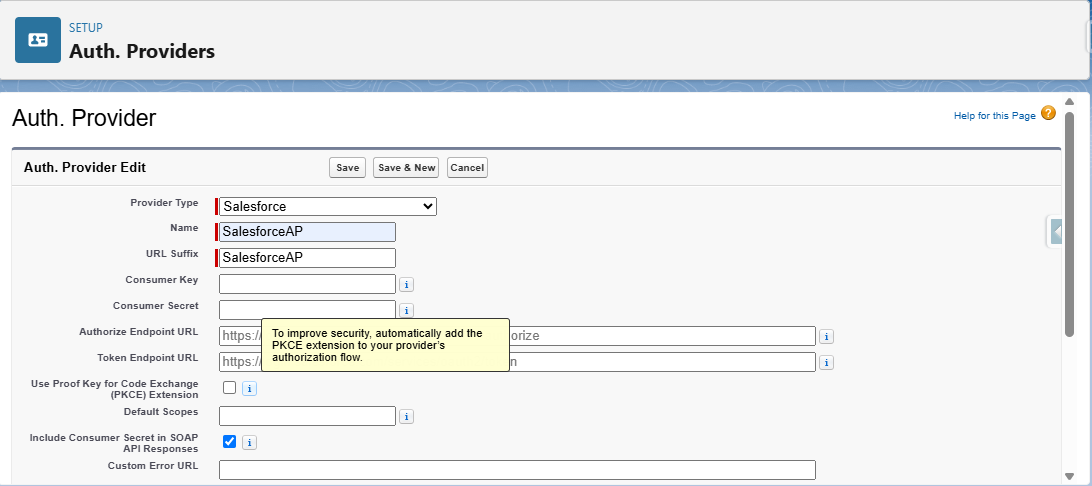
- Select Provider Type
- Set the Provider Type to Salesforce
- Retrieve Consumer Key & Secret
- Open App Manager in Setup.
- Locate the Connected App (SalesforceSelf) created in Step 1.
- Click the dropdown arrow and select View.
- Click on Manage Consumer Details under the API (Enable OAuth Settings) section.
- Provide the verification code sent to your registered email.
- Copy the Consumer Key and Consumer Secret.
- Configure the Auth. Provider
- Paste the Consumer Key and Consumer Secret into the respective fields in the new Auth. Provider form.
- Set the Default Scopes to:
refresh_token full - Click the Save button.
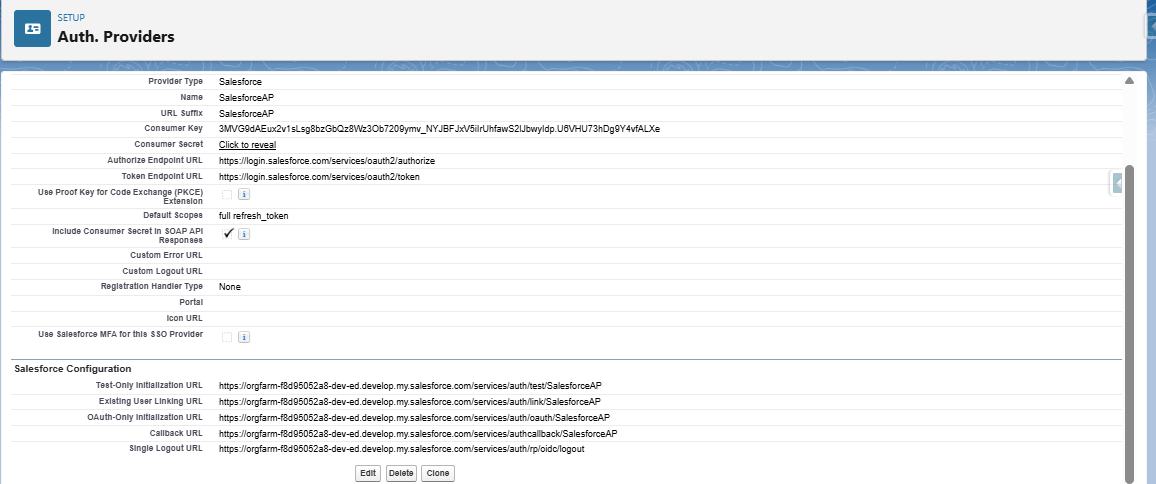
- Update Callback URL in Connected App
- After saving, copy the Callback URL generated in the Auth. Provider.
- Return to the Connected App (via App Manager).
- Edit the app and update the Callback URL in the API (Enable OAuth Settings) section with the new value from the Auth. Provider.
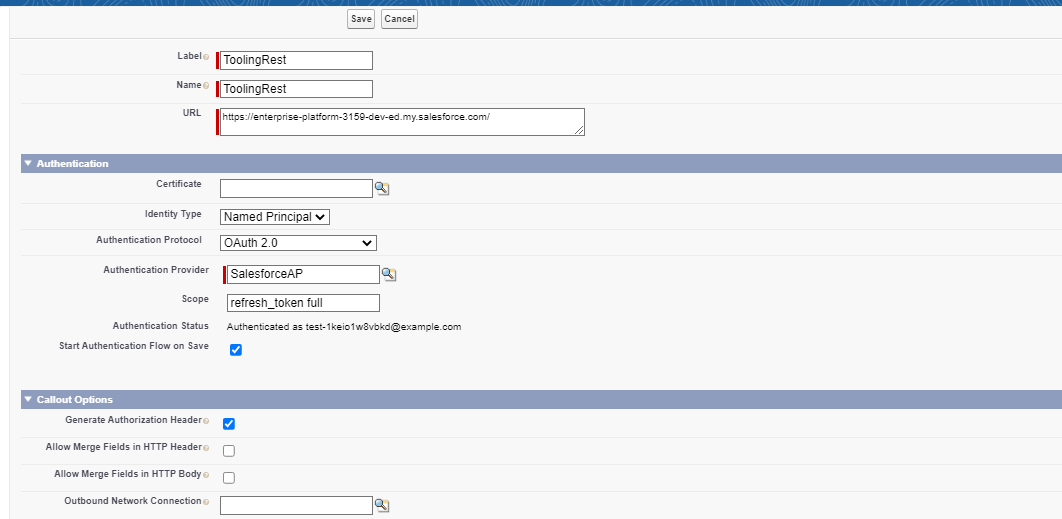
Step 3: Creation Of Named Credentials
- Switch to Salesforce Classic
- Switch to the Classic interface, as the creation of Named Credentials is currently easier in Classic view.
- Create a New Named Credential
- Navigate to Setup.
- In the Quick Find box, search for Named Credentials.
- Click on the New button.
- Configure Named Credential Details
- Provide a suitable Label and Name.
- For the URL, enter your org’s base URL as:
https://orgfarm-f8d95052a8-dev-ed.develop.my.salesforce.com - Set the Identity Type to Named Principal.
- Choose OAuth 2.0 as the Authentication Protocol.
- Select the Authentication Provider.
- Enter the Scope if Created during the Creation Authentication Provider.
- Check the boxes for:
- Start Authentication Flow on Save
- Generate Authorization Header
- Click Save.
- Authenticate the Named Credential
- After saving, click Edit on the newly created Named Credential.
- Then click Save again to initiate the authentication flow.
- You will be redirected to the Salesforce login page.
- Log in using your credentials and allow all requested permissions.
Once the authentication is successful, your Named Credential is ready for use.
Use Case Example
Let’s say you’re integrating with a custom REST API for syncing vendor data. Instead of writing complex code to insert bearer tokens manually and worrying about expiring credentials, you can simply create a Named Credential and use:
Apex code
HttpRequest req = new HttpRequest();

req.setEndpoint('callout:My_Named_Credential/vendors');

req.setMethod('GET');

Salesforce handles the token and header insertion automatically.
Conclusion
Named Credentials represent a modern, secure, and declarative approach to building external integrations in Salesforce. They eliminate the pitfalls of hardcoded authentication, reduce development effort, and bring your org closer to Salesforce’s zero-trust security model.
Whether you’re connecting to any RESTful service, Named Credentials help you build smarter, safer integrations—with minimal overhead and maximum flexibility.
If you haven’t adopted them yet, now is the time to make the switch.
By following the above blog instructions, you will be able to Configure a “Secure API Integrations in Salesforce Using Named Credentials”. If you still have queries or any related problems, don’t hesitate to contact us at salesforce@greytrix.com. More details about our integration product are available on our website and Salesforce AppExchange.
We hope you may find this blog resourceful and helpful. However, if you still have concerns and need more help, please contact us at salesforce@greytrix.com.
About Us
Greytrix – a globally recognized and one of the oldest Sage Development Partner and a Salesforce Product development partner offers a wide variety of integration products and services to the end users as well as to the Partners and Sage PSG across the globe. We offer Consultation, Configuration, Training and support services in out-of-the-box functionality as well as customizations to incorporate custom business rules and functionalities that require apex code incorporation into the Salesforce platform.
Greytrix has some unique solutions for Cloud CRM such as Salesforce Sage integration for Sage X3, Sage 100 and Sage 300 (Sage Accpac). We also offer best-in-class Cloud CRM Salesforce customization and development services along with services such as Salesforce Data Migration, Integrated App development, Custom App development and Technical Support business partners and end users. Salesforce Cloud CRM integration offered by Greytrix works with Lightning web components and supports standard opportunity workflow. Greytrix GUMU™ integration for Sage ERP – Salesforce is a 5-star rated app listed on Salesforce AppExchange.
The GUMU™ Cloud framework by Greytrix forms the backbone of cloud integrations that are managed in real-time for processing and execution of application programs at the click of a button.
For more information on our Salesforce products and services, contact us at salesforce@greytrix.com. We will be glad to assist you.