When businesses customize Salesforce Leads with additional fields they unlock valuable insights about prospects. But here’s the challenge: when a Lead is converted into an Account, Contact, or Opportunity, these custom fields don’t automatically carry over. Without proper mapping, your team risks losing key data at the most critical stage of the sales cycleg.
That’s where Lead Field Mapping comes in. By mapping custom Lead fields to their corresponding fields in Accounts, Contacts, or Opportunities, you ensure a seamless flow of information during lead conversion.
In this blog, we’ll walk you through how to set it up, test it, and apply best practices to safeguard your data.
Why Mapping Custom Lead Fields is Key to Ensuring Data Integrity in Salesforce
- Preserve critical data → No risk of losing valuable lead-specific insights during conversion.
- Streamline workflows → Ensure automation, reporting, and scoring mechanisms continue to function post-conversion.
- Enhance visibility → Sales reps and managers see the full customer journey, from lead to opportunity.
Example: If you track “Preferred Product” on Leads but forget to map it, that information vanishes after conversion. With mapping in place, it flows directly into the Opportunity for your sales team to act on.
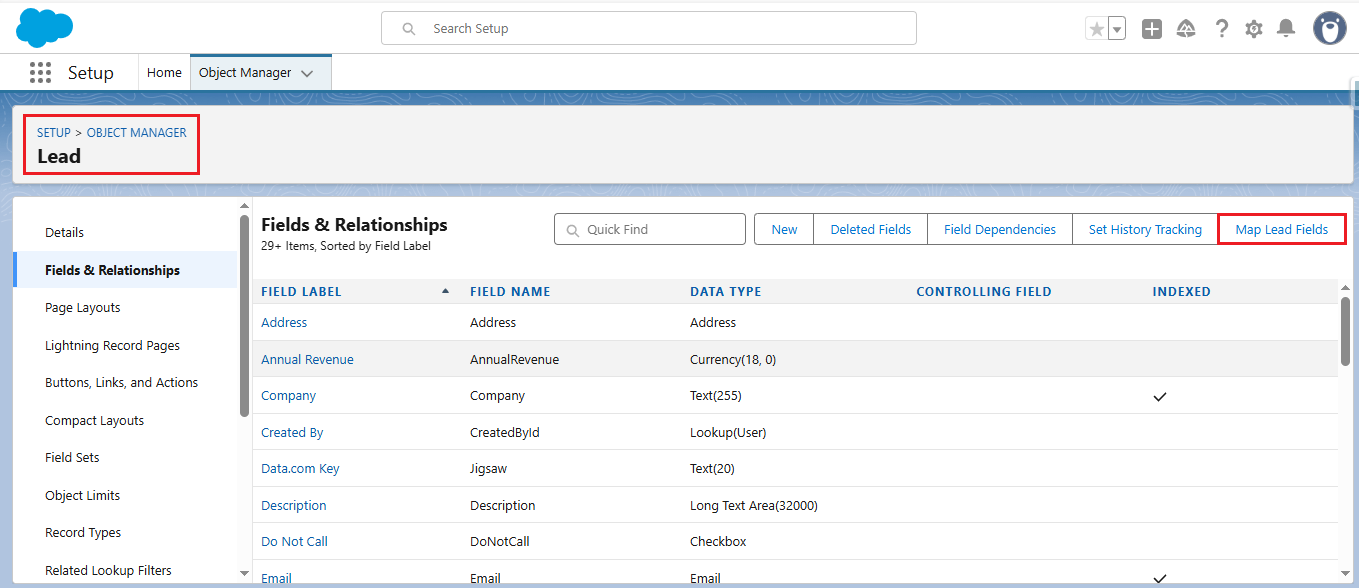
Step 1: Identify Custom Lead Fields
- Go to Setup → Object Manager → Lead → Fields & Relationships.
- Review your custom fields (e.g., Region__c, Lead_Score__c).
- Make note of which objects (Account, Contact, Opportunity) they should map to.
Step 2: Create Matching Fields in Target Objects
- Navigate to Object Manager → Account / Contact / Opportunity → Fields & Relationships.
- Create fields with the same data type as the Lead field.
- Example: If Lead Score is a Number field, create a Number field on Account/Contact/Opportunity as well.
- Example: If Region is a Picklist, create the same picklist values on Account.
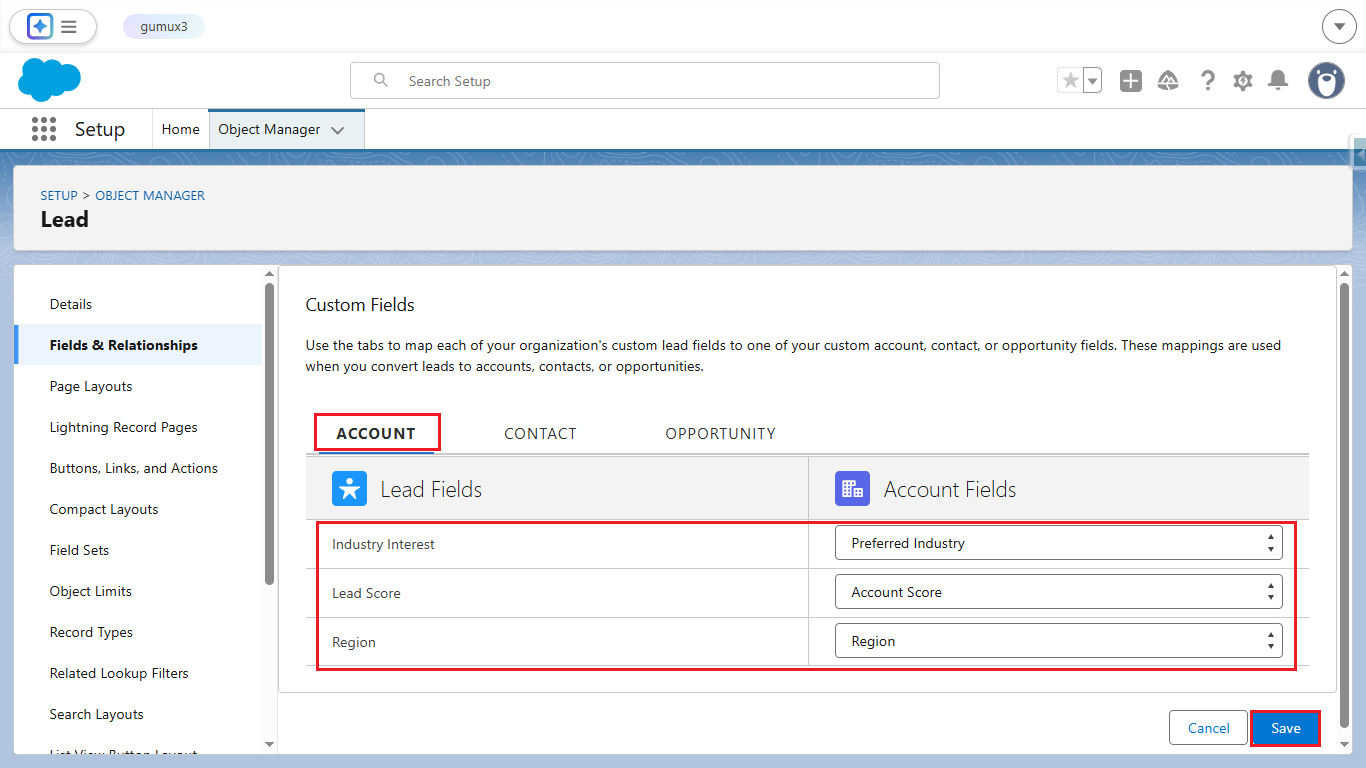
Step 3: Map Custom Lead Fields
- Go to Setup → Object Manager → Lead → Fields & Relationships.
- Click Map Lead Fields.
- For each custom Lead field, select the corresponding field on Account, Contact, or Opportunity.
- Save your mappings.
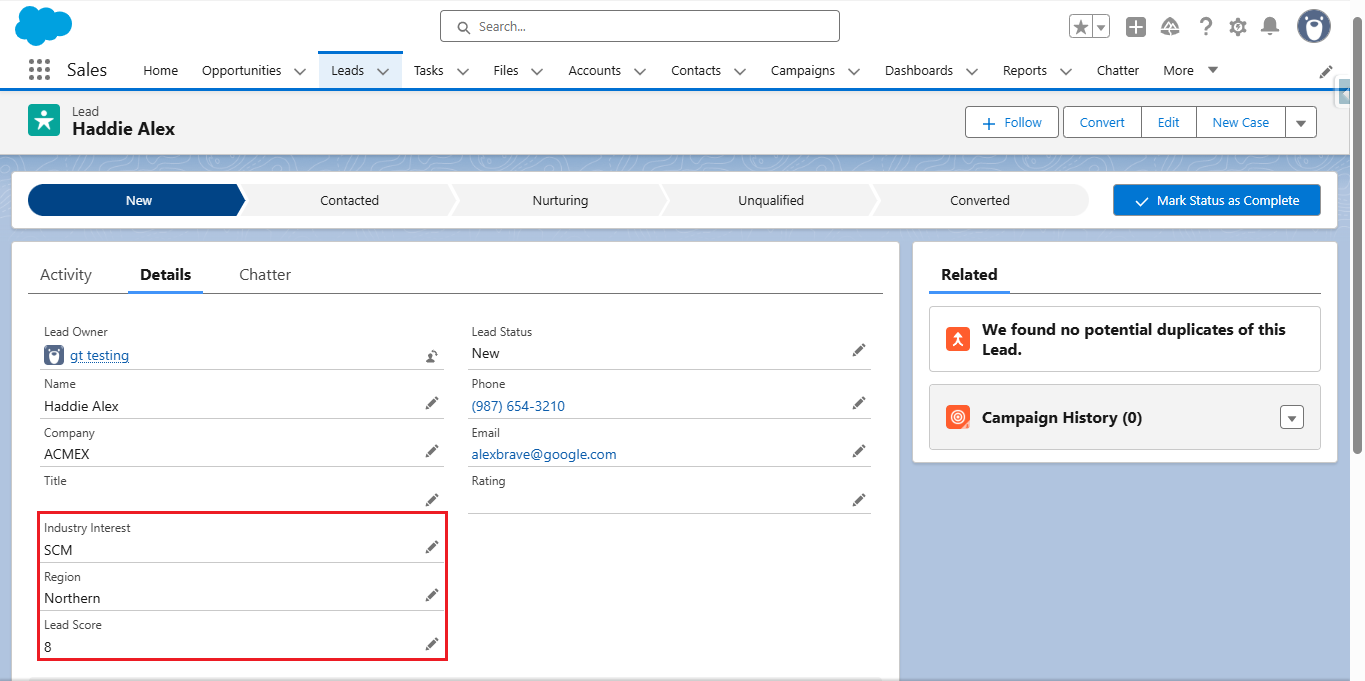
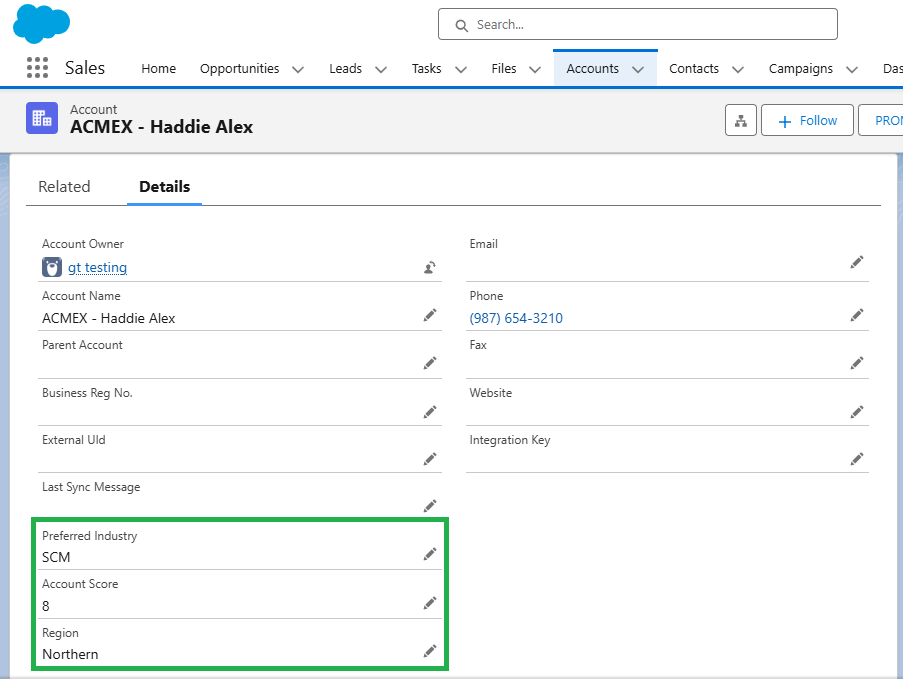
Step 4: Test the Mapping
- Create a Lead record and populate your custom fields.
- Click Convert Lead.
- Open the new Account, Contact, or Opportunity created.
- Verify that the mapped fields carried over correctly.
Best Practices for Lead Field Mapping
- Match Data Types Carefully → Text fields map to text, picklists to picklists, numbers to numbers.
- Avoid Field Overload → Map only the fields that are truly needed in downstream objects.
- Check for Duplicate Records → When converting into existing Accounts/Contacts, understand whether mapped fields overwrite existing data.
- Review Regularly → As new custom fields are added to Leads, ensure mappings are updated.
- Leverage Automation → If direct mapping isn’t feasible, consider Flows or Process Builder to update fields after conversion.
Business Benefits
- No Data Loss → Every detail captured at the Lead stage remains accessible.
- Better Customer Insights → Teams can track preferences, lead sources, or product interests throughout the sales process.
- Improved Automation → Workflows, validation rules, and reports stay accurate with consistent field values.
Conclusion
Mapping custom Lead fields to Accounts, Contacts, or Opportunities is a small step with a huge impact. It ensures critical lead intelligence isn’t lost, keeps Salesforce data consistent, and empowers your sales teams with the insights they need to close deals faster.
By following the steps above, you’ll learn how to map custom Lead Fields for Lead Conversion in Salesforce . If you still have queries or any related problems, don’t hesitate to contact us at salesforce@greytrix.com. More details about our integration product are available on our website and Salesforce AppExchange.
We hope you find this blog resourceful and helpful. However, if you still have concerns and need more help, please contact us at salesforce@greytrix.com.
About Us
Greytrix – a globally recognized and one of the oldest Sage Development Partner and a Salesforce Product development partner offers a wide variety of integration products and services to the end users as well as to the Partners and Sage PSG across the globe. We offer Consultation, Configuration, Training and support services in out-of-the-box functionality as well as customizations to incorporate custom business rules and functionalities that require apex code incorporation into the Salesforce platform.
Greytrix has some unique solutions for Cloud CRM such as Salesforce Sage integration for Sage X3, Sage 100 and Sage 300 (Sage Accpac). We also offer best-in-class Cloud CRM Salesforce customization and development services along with services such as Salesforce Data Migration, Integrated App development, Custom App development and Technical Support business partners and end users. Salesforce Cloud CRM integration offered by Greytrix works with Lightning web components and supports standard opportunity workflow. Greytrix GUMU™ integration for Sage ERP – Salesforce is a 5-star rated app listed on Salesforce AppExchange.
The GUMU™ Cloud framework by Greytrix forms the backbone of cloud integrations that are managed in real-time for processing and execution of application programs at the click of a button.
For more information on our Salesforce products and services, contact us at salesforce@greytrix.com. We will be glad to assist you.
Related Posts