• Who We Are
    • About Us
    • Factor - D
    • Our Networks
    • Accolades
  • What We Do

    SERVICES

    • Consulting / Implementation
    • Migration
    • Development

    OUR SOLUTIONS

    • GUMU Integration
    • BPortaly
    • Sales Commission
    • Shipping
    • IOT

    COMPREHENSIVE SERVICES FOR

    ERP

    • Acumatica
    • Sage Intacct
    • Sage X3
    • Sage 300
    • Sage 100
    • Sage 500

    CRM

    • Salesforce
    • D365 CRM
    • Sage CRM
    • Creatio
    •  

    Other Solutions

    • E-commerce
    • EDI
    • POS
    •  
    •  
  • Resources
    • Case Study
    • Blogs
    • Videos
    • Ebooks
    • News
  • +1 888 221 6661
Contact us
Career |
  • Africa
  • Middle East

Acumatica – Tips, Tricks and Components

Step into the world of Acumatica through our insightful blogs and empower your businesses with the capabilities of Acumatica ERP. As a trusted Acumatica consulting & implementation partner, Greytrix brings you all the expert knowledge, expertise, and resources to unlock Acumatica’s full potential. Our blogs cover expert tips, tricks, market trends, guides, and best practices to empower you on Acumatica ERP. Stay ahead of the curve with our regular updates and expert insights.

How to add the company Logo on the printed form in Acumatica

By greytrix | May 27, 2024
0 Comment

Acumatica is a software system that helps businesses manage various aspects of their operations, like finances, inventory, and customer relationships. One of its features allows users to customize the appearance of printed forms, such as invoices or purchase orders, by adding their company’s logo.

Here’s a step-by-step guide on how to add your company logo to a printed form in Acumatica:

Step 1: Open the Configuration Menu

Start by accessing the Configuration menu within Acumatica. This menu is usually located under the “More” option in the main navigation bar.

Configuration Option

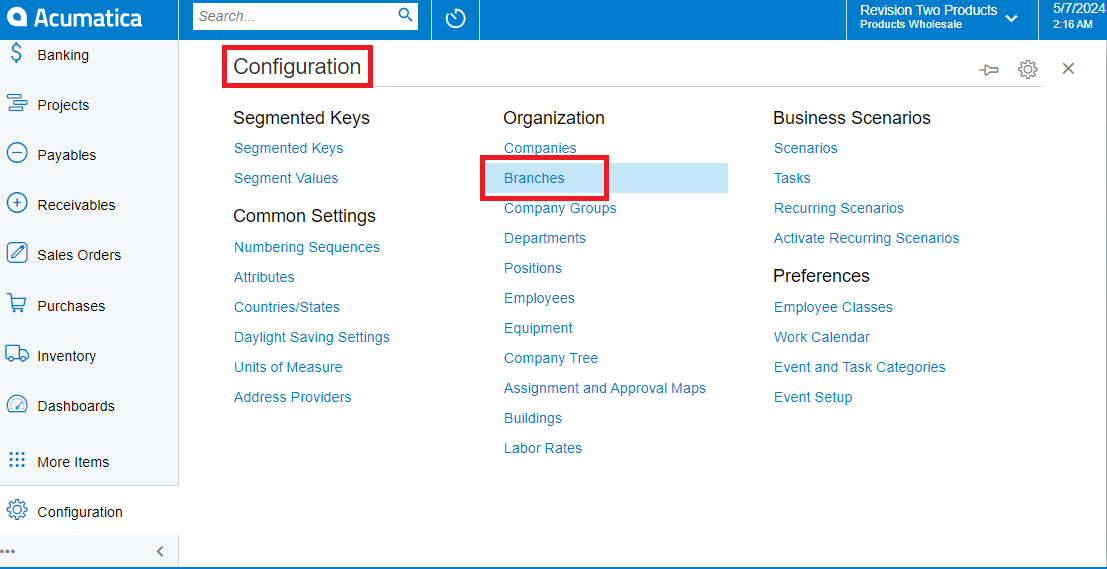
Step 2: Select the Branch Configuration Option

Within the Configuration menu, look for the “Organization” section. Under this section, you’ll find various configuration options related to your company’s organizational structure.

Choose the “Branch” option. This is where you can manage information about different branches or divisions within your organization.

Step 3: Choose a Branch or Create a New One

In the Branch configuration screen, you’ll see a list of existing branches or divisions in your organization. Select the branch for which you want to add the logo. If you don’t find the branch you need, you can create a new one by clicking on the “+” button or the “Add New” option.

Step 4: Navigate to the Visual Appearance Tab

Once you’ve selected the branch, navigate to the “Visual Appearance” tab. This tab contains settings related to the visual presentation of various elements in Acumatica.

Step 5: Upload Your Company Logo

In the Visual Appearance tab, you’ll find a section labeled “Report Logo” or something similar.

Here, you’ll have the option to upload your company’s logo file. Click on the “Upload” or “Browse” button to select the logo file from your computer. After selecting the logo file, make sure to save your changes. This will ensure that the logo is added to the printed forms associated with the selected branch.

logo update


Related Posts

  • Add a customized field to the selector/lookup of Acumatica
  • Add standard field to the selector/lookup of Acumatica
  • Various Date Function in Acumatica
  • Custom weblink field in Acumatica
  • Automate Schedule in Acumatica
Category: Acumatica Acumatica Product Acumatica Services Tags: Acumatica, Branches, Companies, ERP, Logo
Post navigation
← Enable Upload Action for Grid in Acumatica Auditing History in Acumatica →

Categories

  • Acumatica
  • Acumatica Customization
  • Acumatica ERP
  • Acumatica Product
  • Acumatica Services
  • Greytrix Event
  • GUMU Integration
  • Uncategorized

Greytrix Websites and Blogs

  • Greytrix
  • Greytrix Africa
  • Sage X3 – Tips, Tricks and Components
  • Sage 100 & 500 ERP Tips and Tricks
  • Sage CRM – Tips, Tricks and Components
  • Salesforce.com Tips and Tricks by Greytrix
  • Sage Intacct– Tips, Tricks and Components

Recent Posts

  • Navigating the ERP Maze: Finding the Perfect Fit Between Acumatica and NetSuite 
  • Legacy to Future-Ready: Why Manufacturing Businesses Must Migrate from SAP B1 to Acumatica
  • Navigating Recent Tariff Changes with Acumatica
  • Adapt to Acumatica and Render your Retail Business – The Integration you need
  • Seamless TDS Management for India in Acumatica
  • na.sales@greytrix.com
  • +1 888 221 6661
  • B301, 3rd Floor, Everest Nivara Infotech Park, MIDC, Turbhe,
    Navi Mumbai 400 705. India

Our Global Locations >>

Who We Are

  • About Us
  • Factor - D
  • Our Network
  • Accolades
  • Career
  •  
  •  

Services

  • Consultation & Implementation
  • Migration
  • Development

Solutions

  • GUMUTM Integration
  • BPortaly
  • Sales Commission
  • Shipping
  • IOT
  •  
  •  

ERP

  • Acumatica
  • Sage Intacct
  • Sage X3
  • Sage 300
  • Sage 100
  • Sage 500

CRM

  • Salesforce
  • D365 CRM
  • Sage CRM
  • Creatio
  •  
  •  
  •  

Other Solutions

  • E-commerce
  • EDI
  • POS

Resources

  • Case Study
  • Blogs
  • Videos
  • E-books
  • News
  •  
  •  

Connect

  • Contact Us
  • Privacy Policy
  • Terms Of Use
  •  

© 2025. Greytrix, All Rights Reserved