Salesforce Authenticator is one of the most secure methods for Multi-Factor Authentication (MFA), helping protect user accounts and sensitive business data. Since a user can have only one Salesforce Authenticator app connected to their account at a time, replacing or losing a mobile device requires disconnecting the existing authentication before connecting a new device.
If the Salesforce Authenticator app stops working or a user changes their phone, the easiest solution is to disconnect the current device and complete the setup process again.
It’s also a recommended security practice to remove all verification methods from a user’s account when they leave the organization, ensuring that no unauthorized access remains.
In this blog, we’ll walk through the complete process of disconnecting Salesforce Authenticator and connecting a new device.
Why Reset Salesforce MFA?
Resetting Multi-Factor Authentication (MFA) helps maintain the security and integrity of your Salesforce organization.
Benefits of Resetting MFA
- Protects user accounts from unauthorized access
- Keeps company data secure
- Ensures secure login verification when changing devices
- Removes outdated or lost mobile devices from user accounts
- Supports compliance with Salesforce security best practices
Salesforce MFA Reset Process Overview
Resetting Salesforce Authenticator involves two simple steps:
- Disconnect the old device (Admin action)
- Connect the new device (User action)
Step 1: Disconnect the Existing Salesforce Authenticator Device
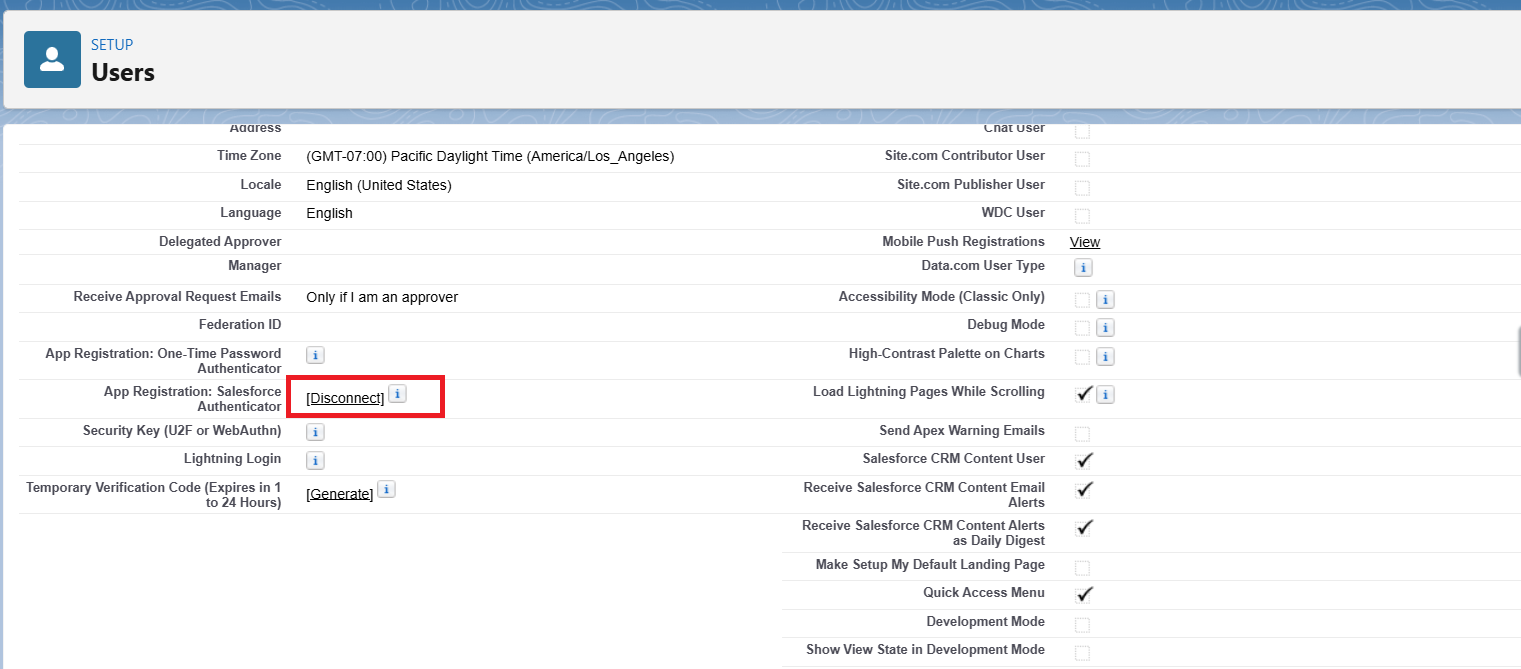
Navigation
Setup → Users → Users → Select the User
Steps
- Open the required user record.
- Scroll down to the App Registration section.
- Locate Salesforce Authenticator.
- Click Disconnect.
Result
After disconnecting:
- The old mobile device is removed.
- The user’s MFA registration is reset.
- The user can now register a new authenticator device.
Step 2: User Logs In After MFA Reset
Once the old device has been disconnected:
- The user logs in using their Username and Password.
- Salesforce automatically redirects them to the Connect Salesforce Authenticator setup screen.
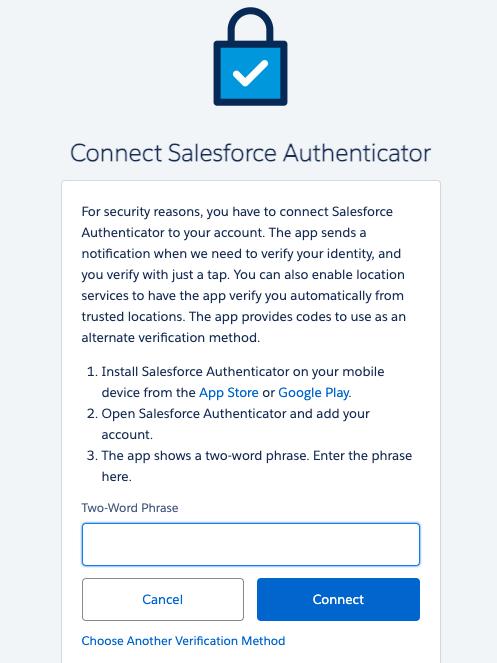
Step 3: Connect a New Salesforce Authenticator Device
Follow these steps to register the new device:
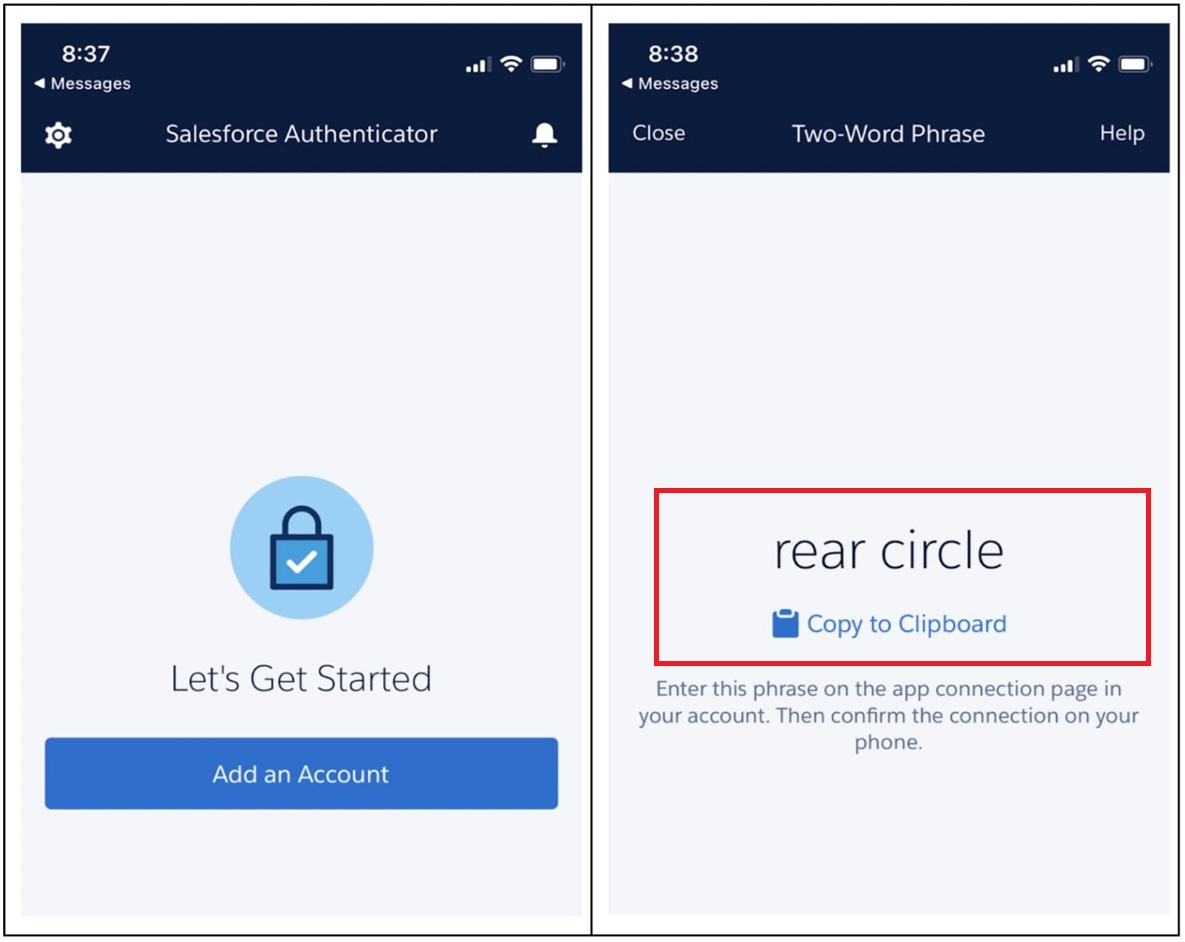
- Install the Salesforce Authenticator app on your mobile device.
- Open the app and select Add Account.
- The app displays a Two-Word Phrase.
- Enter the same phrase on the Salesforce setup screen.
- Click Connect.
Step 4: Complete Device Verification
After connecting:
- A verification notification is sent to the mobile device.
- The user approves the login request.
- The new device is successfully linked to the Salesforce account.
Alternative Verification Methods
If Salesforce Authenticator is unavailable, users can choose another verification method by selecting Choose Another Verification Method.
Supported options include:
- Google Authenticator
- Microsoft Authenticator
- SMS Verification
Important Notes
Keep the following points in mind:
- Only Salesforce Administrators can disconnect an MFA device.
- Disconnecting a device does not disable MFA – it only removes the registered device.
- Always configure a backup verification method whenever possible.
- Users must complete MFA setup again after the device has been disconnected.
MFA Reset Process Flow
The complete workflow is:
Disconnect Old Device
→ User Login
→ MFA Setup Screen
→ Enter Two-Word Phrase
→ Connect Device
→ Approve Verification
→ Login Successful
Conclusion
Resetting Salesforce Authenticator is a simple yet essential administrative task whenever users replace, lose, or encounter issues with their mobile devices. By disconnecting the old device and registering a new one, organizations can maintain strong account security without disabling Multi-Factor Authentication.
Following this process ensures uninterrupted access for users while protecting your Salesforce environment from unauthorized access and maintaining compliance with Salesforce security best practices.
By following the above blog instructions, you will be able to learn “How to Disconnect Salesforce Authenticator and Set Up a New Device in Salesforce“. If you still have queries or any related problems, don’t hesitate to contact us at salesforce@greytrix.com. More details about our integration product are available on our website and Salesforce AppExchange.
We hope you may find this blog resourceful and helpful. However, if you still have concerns and need more help, please contact us at salesforce@greytrix.com.
About Us
Greytrix – a globally recognized and one of the oldest Sage Development Partner and a Salesforce Product development partner offers a wide variety of integration products and services to the end users as well as to the Partners and Sage PSG across the globe. We offer Consultation, Configuration, Training and support services in out-of-the-box functionality as well as customizations to incorporate custom business rules and functionalities that require apex code incorporation into the Salesforce platform.
Greytrix has some unique solutions for Cloud CRM such as Salesforce Sage integration for Sage X3, Sage 100 and Sage 300 (Sage Accpac). We also offer best-in-class Cloud CRM Salesforce customization and development services along with services such as Salesforce Data Migration, Integrated App development, Custom App development and Technical Support business partners and end users. Salesforce Cloud CRM integration offered by Greytrix works with Lightning web components and supports standard opportunity workflow. Greytrix GUMU™ integration for Sage ERP – Salesforce is a 5-star rated app listed on Salesforce AppExchange.
The GUMU™ Cloud framework by Greytrix forms the backbone of cloud integrations that are managed in real-time for processing and execution of application programs at the click of a button.
For more information on our Salesforce products and services, contact us at salesforce@greytrix.com. We will be glad to assist you.