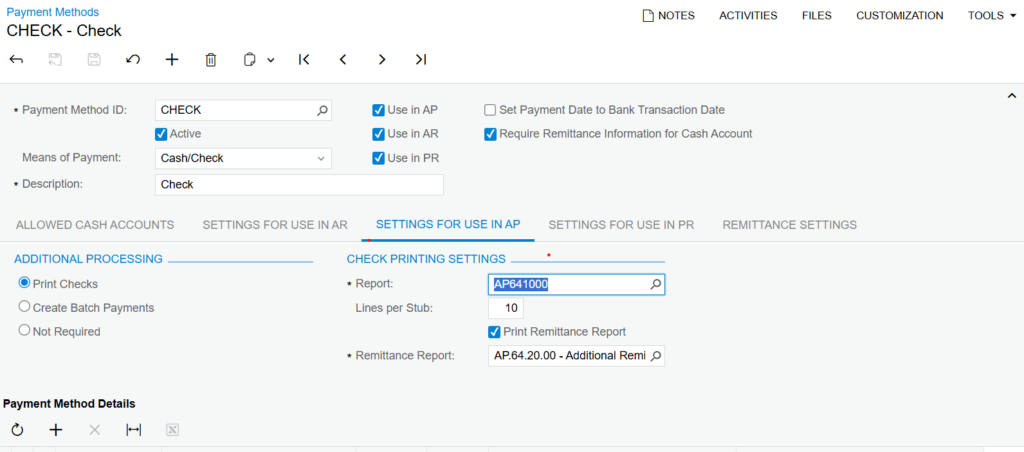
In Acumatica, setting up the Check Payment Method is what tells the system how to handle vendor payments made by check. To do this, you go to the Payment Methods (CA204000) screen. First Start by defining the desired configuration for Accounts Payable, then link the payment method to the required cash account to ensure payments are drawn from the correct source. Next, assign the defined remittance report by default from the system: the stub report (AP641000) , you can also select the report developed using custom requirement for the primary check stub, and the additional remittance report (AP642000) to handle overflow when multiple invoices exceed the available stub space available beneath and above of check alignment. Once configured, Acumatica automatically prints both the check and complete remittance details each time you issue a payment, providing vendors with a detailed breakdown of paid invoices.
When processing vendor payments, many organizations perform ‘Process Payments’ using ‘Print Check’ functionality available with button with remittance details to clearly communicate which invoices are being paid. The check stub gives a quick summary, but when paying several invoices, there’s not enough space to list all the details on one line. That’s why a remittance report is important—it helps make sure the vendors get a full breakdown of the payment.
Acumatica streamlines this procedure by producing two reports automatically in the browser you are running the procedure of application for vendor payment. The Additional Remittance Report (AP642000) and the Check Stub Report (AP641000), if necessary. When combined, these reports guarantee that vendors receive a thorough list of all the invoices covered by the payment in addition to the check. This lessens problems with payment reconciliation and enhances vendor communication.
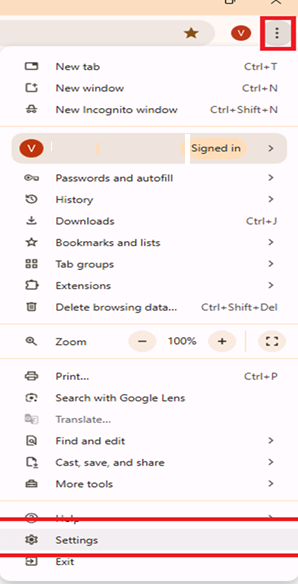
To set up the extra remittance form settings, we are seeing that you only need to open your browser where your Acumatica application is running. As per the requirement, locate the three vertical dots menu icon in the top-right corner of your browser window and click on it. This will open the dropdown menu regarding browser options. From the menu, we are seeing many options – scroll down until you find “Settings” which is only at the bottom of the list. Surely, you must click on “Settings” to reach your browser’s settings page. Moreover, this action will give you access to all configuration options. Moreover, once you enter the settings, navigate further to the section where you can configure additional remittance form settings for your Acumatica application. This section itself allows you to adjust PDF viewing preferences, download settings, and other browser configurations that affect remittance form display and processing.
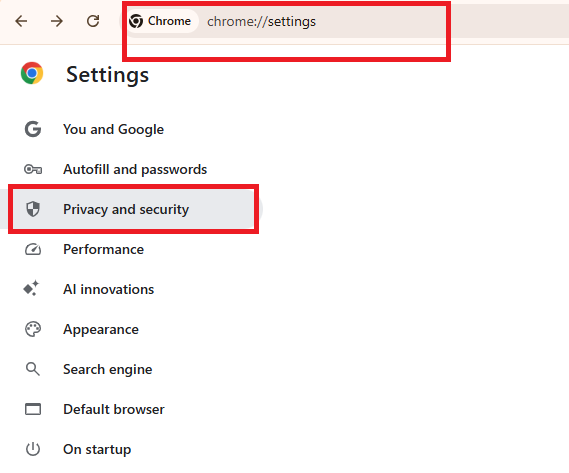
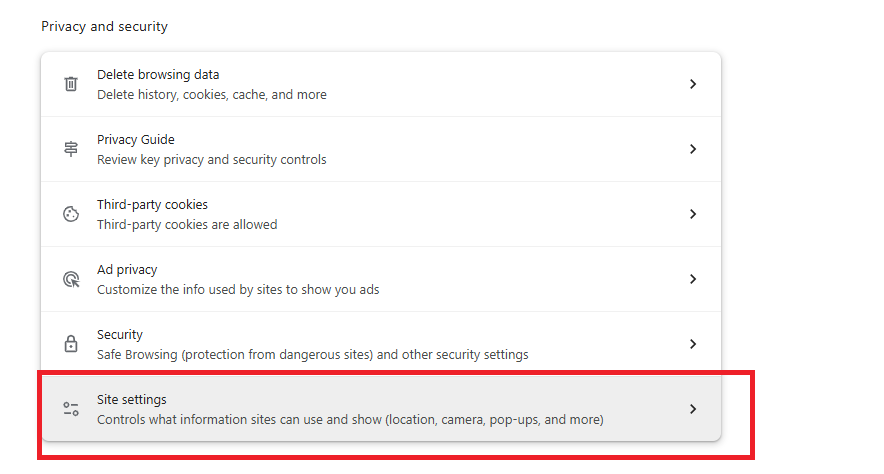
Moreover, once you reach the settings page, you will actually see different setting categories in the left sidebar menu. You can definitely find various options listed there. As per the requirement, locate “Privacy and security” option and click on it regarding accessing privacy settings. When you click on Privacy and security, several options will surely appear on the right side of the screen. Moreover, these options provide access to various security settings. Moreover, basically, you need to scroll down through all the options until you reach “Site settings” which is the same as being at the bottom of the list. We are seeing that clicking on “Site settings” will open the control panel where you can manage what websites can access and display, including only permissions for location, camera, pop-ups and other features. These site settings are surely important for setting up how your browser works with PDF files, downloads, and other features needed for handling remittance forms in Acumatica. Moreover, proper configuration ensures smooth operation of all document management functions.
After opening site settings, go to the “Content” section itself where you will find further permission options. Actually scroll down in content settings and find “Pop-ups and redirects” option. This option definitely shows “Don’t allow sites to send pop-ups or use redirects” by default. Click on “Pop-ups and redirects” to further access the configuration settings itself. Basically, you need to change the settings here to allow pop-ups for your Acumatica domain, since remittance forms open in new windows the same way pop-ups do. This actually makes sure that when you create or check more payment forms in Acumatica, they will definitely show up properly without getting blocked by your browser’s pop-up blocker. You should actually check the “Additional content settings” section below to set up other permissions. These settings will definitely affect how your documents and forms work.
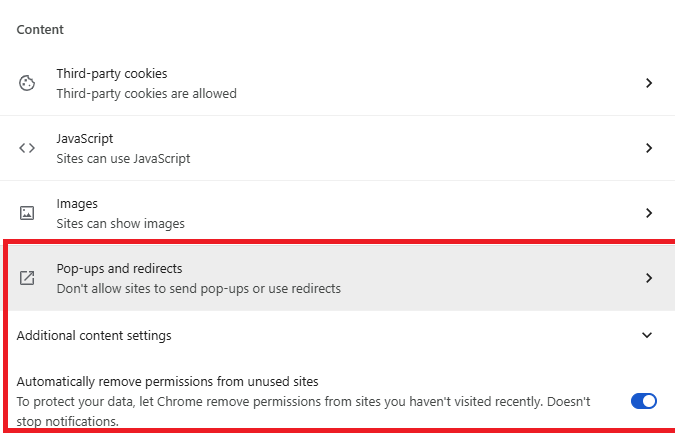
Go carefully to the “Content” section and locate the “Pop-ups and redirects” option.
Click on “Pop-ups and redirects” to open the pop-up configuration page.
On this page, you’ll see two sections: “Default behavior” and “Customized behaviors”.
Scroll down to the “Customized behaviors” section and look for “Allowed to send pop-ups and use redirects”.
Click the “Add” button next to “Allowed to send pop-ups and use redirects”.
A popup window titled “Add a site” will appear with a text field labeled “Site”.
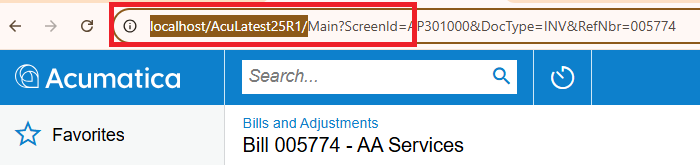
Go back to your Acumatica application and look at the URL in the address bar.
Copy only the portion of the URL up to your Acumatica instance name. For example, if your URL shows “localhost/AcuLatest25R1/Main? ScreenId=…” copy only the highlighted link
Paste this copied URL into the “Site” field in the “Add a site” popup window.
Click the “Add” button to save this setting.
This will allow your Acumatica application to open pop-ups and redirects, which is necessary for displaying additional remittance forms and other documents that open in new windows.
Now, while printing the check stub, Additional Remittance Form will be automatically loaded in the new tab of your browser.