
In the previous blogs, we explored Query-wise and Table-wise Dynamic Grid Configuration and how Sync Data can be used to bring Sage 100 data into Sage CRM.
In this blog, we will take a practical example of creating an Inventory Details Dynamic Grid using Table-wise Configuration.
Unlike Query-wise configuration, where administrators define a SQL query to retrieve data, Table-wise configuration allows administrators to select a Sage 100 table and choose the required columns directly from the Dynamic Grid Query Manager.
This example demonstrates the configuration process, from selecting the Sage 100 table and columns to mapping the fields and displaying inventory information in Sage CRM.
Inventory Details Dynamic Grid – Example
The requirement is to display inventory information from Sage 100 in Sage CRM.
The grid will display the following information:
- Item Code
- Warehouse Code
- Quantity On Hand
- Quantity on Purchase Order
- Quantity on Sales Order
- Average Cost
The example uses the Sage 100 table IM_ItemWarehouse. Confirm the exact table and field names available in your Sage 100 installation before configuring the grid.
Implementation flow: Select Company → Configure Show Grid → Select Table → Add Columns → Configure Titles and Mapping → Select CRM Context → Save and Validate
Step 1 – Open Dynamic Grid Query Manager
Log in to Sage CRM with an account that has the required administrative permissions.
Navigate to: Administration → Sage 100 Administration → Dynamic Grid Query Manager
Select the appropriate Sage 100 company for which the inventory details need to be displayed.
Step 2 – Configure the Show Grid Option
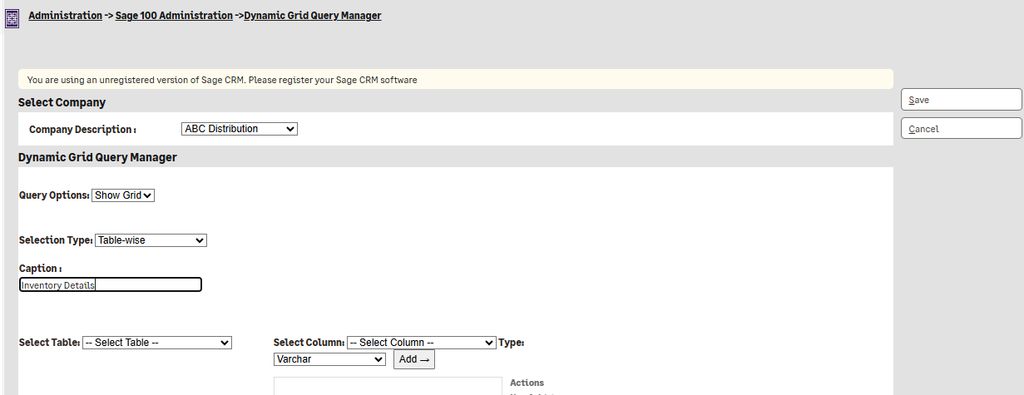
In the Dynamic Grid Query Manager, configure the following fields:
| Field | Configuration |
| Query Options | Show Grid |
| Selection Type | Table-wise |
| Caption | Inventory Details |
The Show Grid option is used to configure the grid displayed in Sage CRM. The Table-wise selection type allows you to select a Sage 100 table and configure its columns through the interface. The Caption defines the name displayed for the grid.
Step 3 – Select the Sage 100 Table
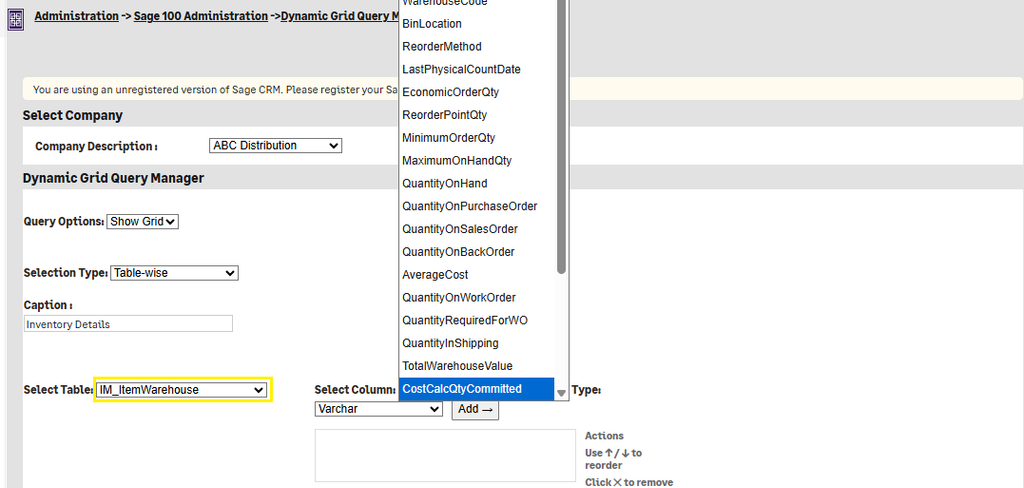
In the Select Table dropdown, choose IM_ItemWarehouse.
This table is used in the example to retrieve inventory information by item and warehouse. After selecting the table, use the Select Column dropdown to choose the fields required for the grid.
Step 4 – Select Columns and Configure Their Types
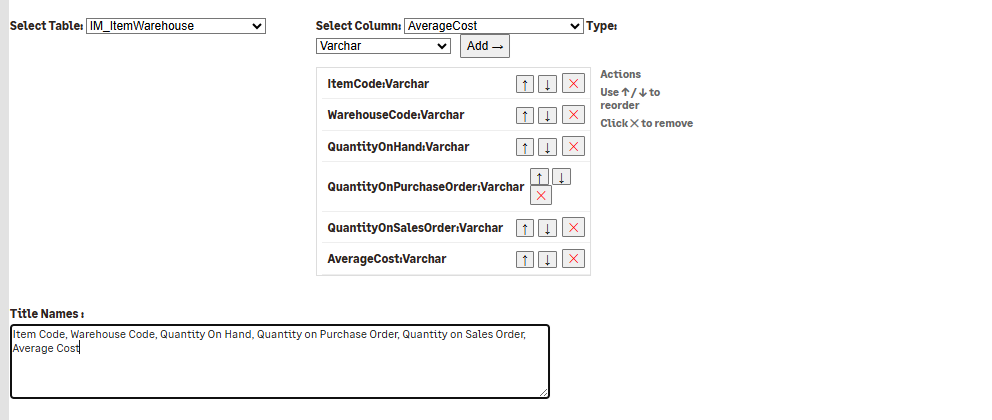
The Table-wise configuration screen provides Select Column, Type, and Add controls. Choose a column from the selected table, select the appropriate data type from the available options, and click Add. Repeat until all required columns have been added.
- Select Column: Choose a source column from the selected Sage 100 table.
- Type: Select the appropriate available data type. The screenshot shows Varchar as an example; do not use it for every field if another type is appropriate.
- Add: Add the selected column to the selected-column list.
Suggested display fields for the Inventory Details example:
| Display Field | Purpose |
| Item Code | Identifies the inventory item. |
| Warehouse Code | Identifies the warehouse associated with the item. |
| Quantity On Hand | Displays the on-hand quantity. |
| Quantity on Purchase Order | Displays the quantity on purchase order. |
| Quantity on Sales Order | Displays the quantity on sales order. |
| Average Cost | Displays the average inventory cost. |
The exact source field names and data types must be selected from the options available in your installed GUMU and Sage 100 environment. The display labels above are illustrative and may not match the underlying database column names.
Use the available up/down controls to reorder columns and the removal control to remove an unwanted column.
Step 5 – Configure Title Names
The Title Names field defines the user-friendly column captions displayed in the Dynamic Grid. Enter titles in the same order as the selected columns:
Item Code, Warehouse Code, Quantity On Hand, Quantity on Purchase Order, Quantity on Sales Order, Average Cost
Ensure that the title sequence matches the selected-column sequence. This keeps the displayed captions aligned with their corresponding data fields.
Step 6 – Configure Context to Show Grid
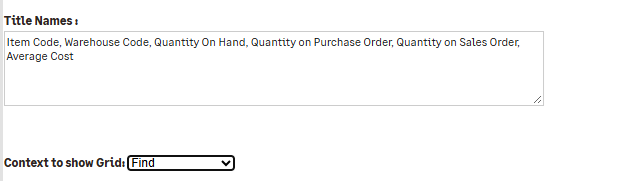
The Context to show Grid dropdown determines the Sage CRM context in which the grid should be displayed. For this example, select Customer if the Inventory Details grid is intended to appear in the Customer context. Choose the appropriate context based on the business requirement and available options.
Step 7 – Configure Sage CRM and Sage 100 Column Mapping (If Required)
The configuration screen also contains Sage CRM Column Name and Sage 100 Column Name fields.
- Identify the Sage 100 field that needs to be associated with a Sage CRM field.
- Enter the appropriate field in Sage CRM Column Name.
- Select the corresponding field from the Sage 100 Column Name dropdown.
- Click Add to add the mapping to the list.
- Repeat for any additional mappings required by the implementation.
Use valid field names from the actual CRM and Sage 100 configuration. A display caption such as Item Code is not necessarily the database field name. Configure only the mappings required for your implementation.
Step 8 – Save the Configuration
Review the configuration before saving:
- Query Options is set to Show Grid.
- Selection Type is set to Table-wise.
- The correct Sage 100 company and table are selected.
- All required columns have been added and their types are appropriate.
- The column order matches the Title Names sequence.
- The intended CRM context is selected.
- Any required Sage CRM and Sage 100 column mappings are configured.
Save the Dynamic Grid Query configuration.
Step 9 – Verify the Inventory Details Grid in Sage CRM
After saving the configuration and completing any required synchronization, navigate to the Sage CRM context selected in Step 6. For this example, navigate to the appropriate Customer record and open the configured Dynamic Grid location.
Verify that the grid displays the configured columns and that the values correspond to the selected Sage 100 data.
| Test | Expected Result |
| Grid visibility | Inventory Details appears in the configured CRM context. |
| Column captions | The configured Title Names are displayed correctly. |
| Column order | Columns appear in the configured sequence. |
| Item Code | Displays the correct item identifier. |
| Warehouse Code | Displays the correct warehouse identifier. |
| Quantity fields | Display values corresponding to the selected Sage 100 fields. |
| Average Cost | Displays the corresponding cost value in the expected format. |
| Data consistency | Displayed values match the source data, subject to the configured synchronization behavior. |
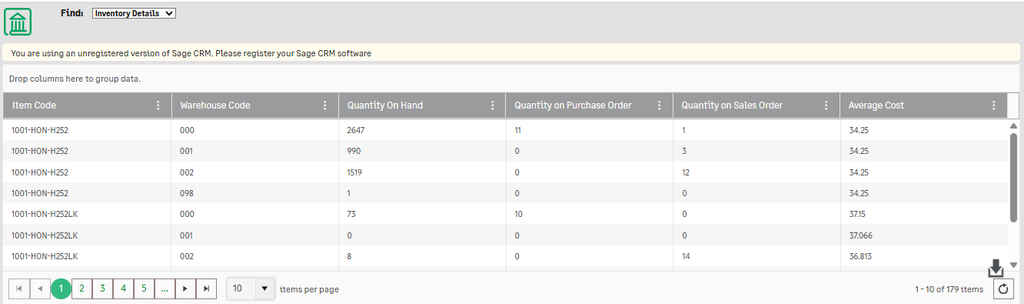
The Inventory Details example demonstrates how to configure a Table-wise Dynamic Grid in GUMU by selecting a Sage 100 table, adding the required columns, defining user-friendly titles, choosing the Sage CRM context, and configuring field mappings where required.
This approach is useful when the required information can be configured using the available table and column selections without needing custom SQL query logic.
About Us
Greytrix – a globally recognized and one of the oldest Sage Development Partners is a one-stop solution provider for Sage ERP and Sage CRM organizational needs. Being acknowledged and rewarded for multi-man years of experience and expertise, we bring complete end-to-end assistance for your technical consultations, product customizations, data migration, system integrations, third-party add-on development, and implementation competence.
Greytrix has some unique integration solutions developed for Sage CRM with Sage ERPs namely Sage X3, Sage Intacct, Sage 100, Sage 500, and Sage 300. We also offer best-in-class Sage ERP and Sage CRM customization and development services to Business Partners, End Users, and Sage PSG worldwide. Greytrix helps in the migration of Sage CRM from Salesforce | ACT! | SalesLogix | Goldmine | Sugar CRM | Maximizer. Our Sage CRM Product Suite includes add-ons like Greytrix Business Manager, Sage CRM Project Manager, Sage CRM Resource Planner, Sage CRM Contract Manager, Sage CRM Event Manager, Sage CRM Budget Planner, Gmail Integration, Sage CRM Mobile Service Signature, Sage CRM CTI Framework.
Greytrix is a recognized Sage Champion Partner for GUMU™ Sage X3 – Sage CRM integration listed on Sage Marketplace and Sage CRM – Sage Intacct integration listed on Sage Intacct Marketplace. The GUMU™ Cloud framework by Greytrix forms the backbone of cloud integrations that are managed in real-time for the processing and execution of application programs at the click of a button.
For more information on our integration solutions, please contact us at sage@greytrix.com. We will be glad to assist you.