In this blog will show you how to How to Create Custom field in Salesforce using postman REST API. For this blog we take Opportunity object as reference.
Firstly, you have to create connected app in Salesforce.
Now let’s See How to Create Custom field in Salesforce using postman REST API. Before start take note of your Consumer Key and Consumer Secret present in the API (Enable OAuth Settings) as these would be required for authentication. The Consumer Key is visible directly but to get the consumer secret, click on the Click to Reveal link to see it. It will use to get Access token from your Salesforce org.
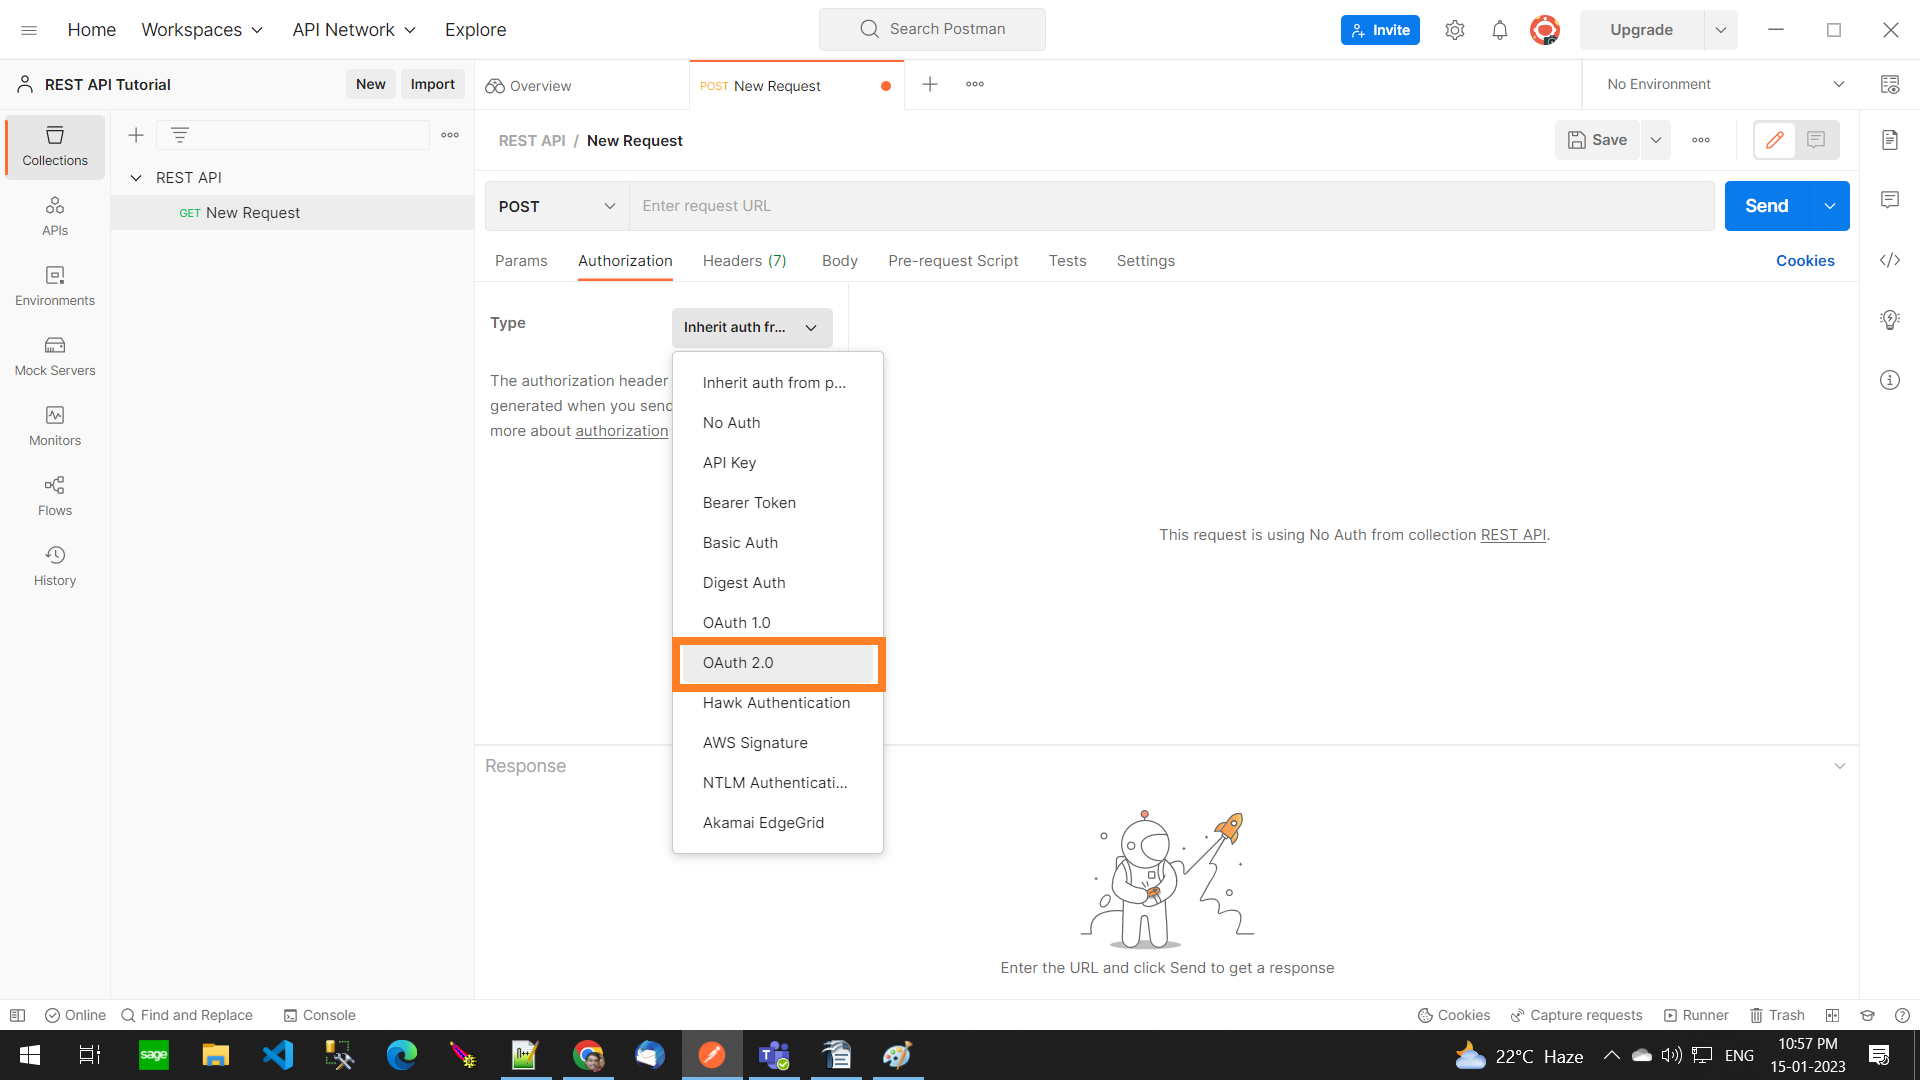
We have to connect our Salesforce org with Postman follow the below steps:-
- Open Postman and set Authorization type to OAuth 2.0.
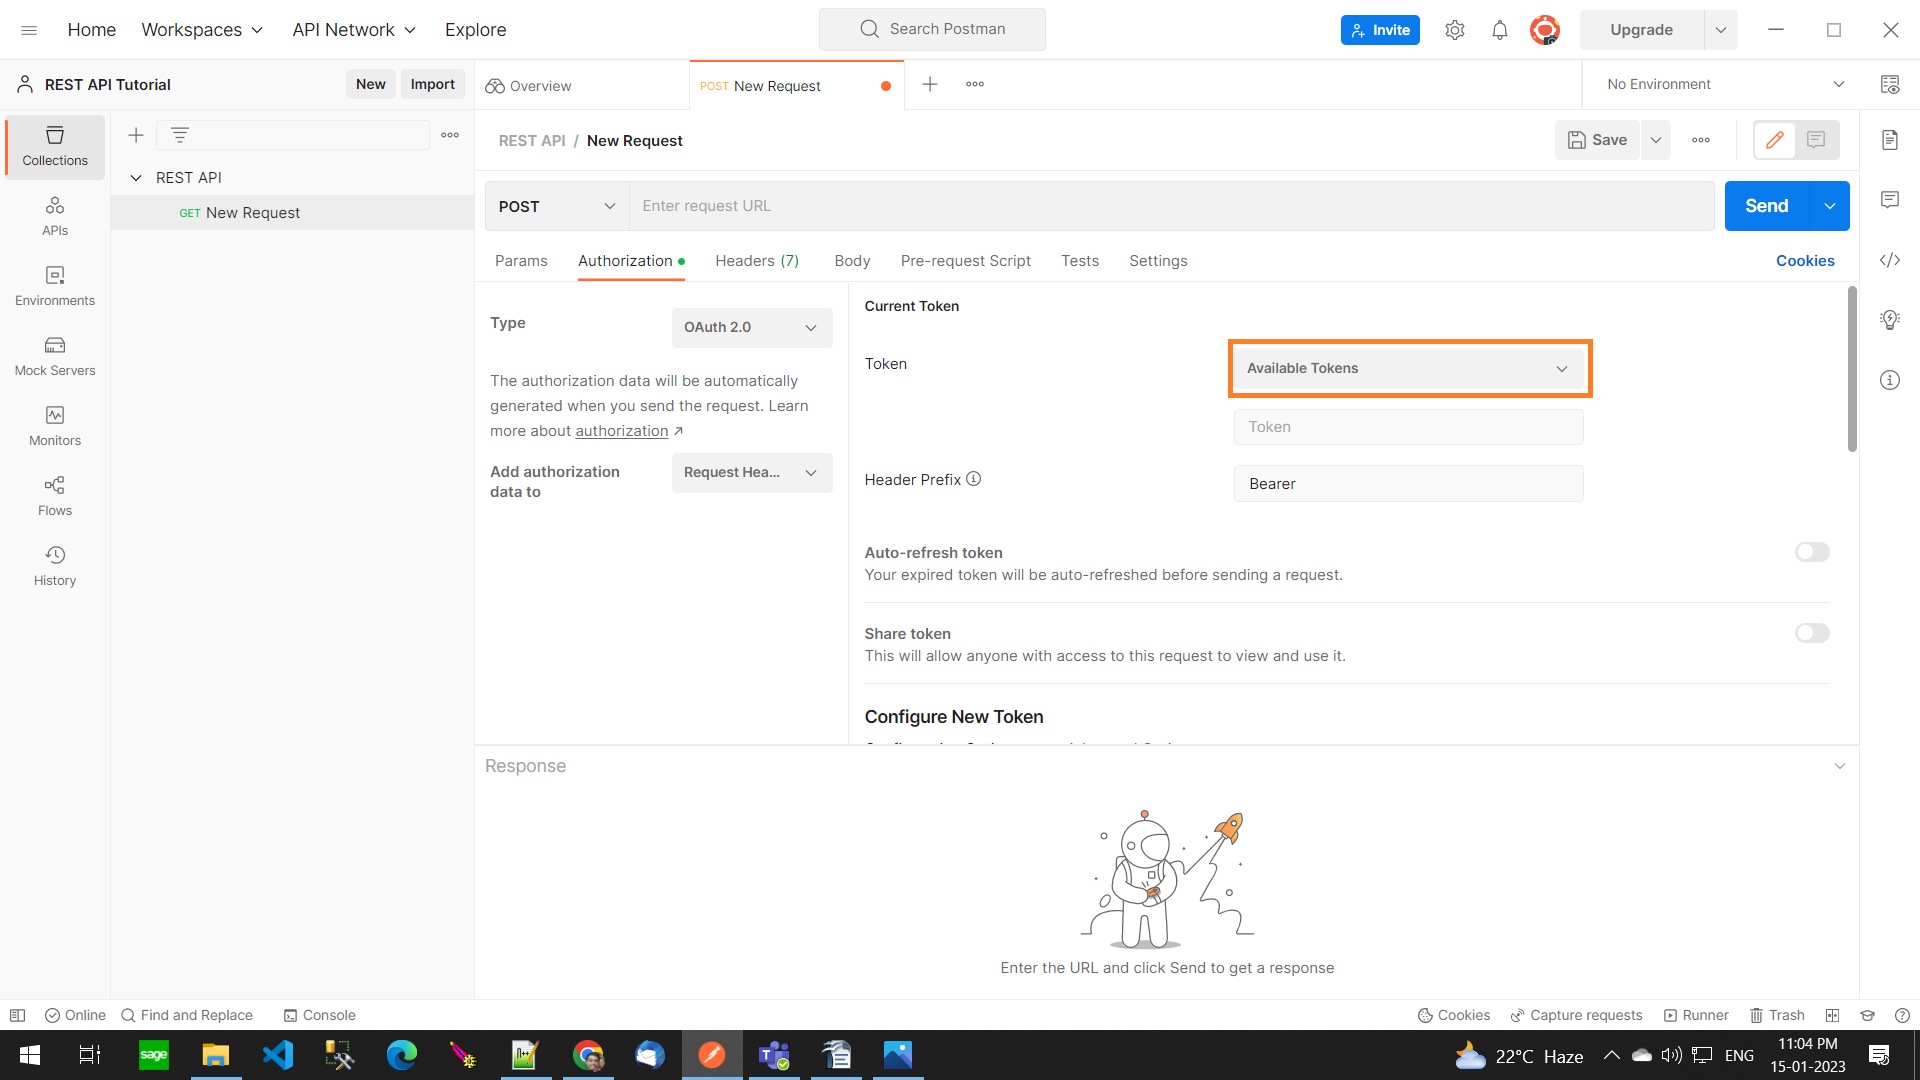
- Select Token as Available Token give a name to the token and Header Prefix remain as it is default.
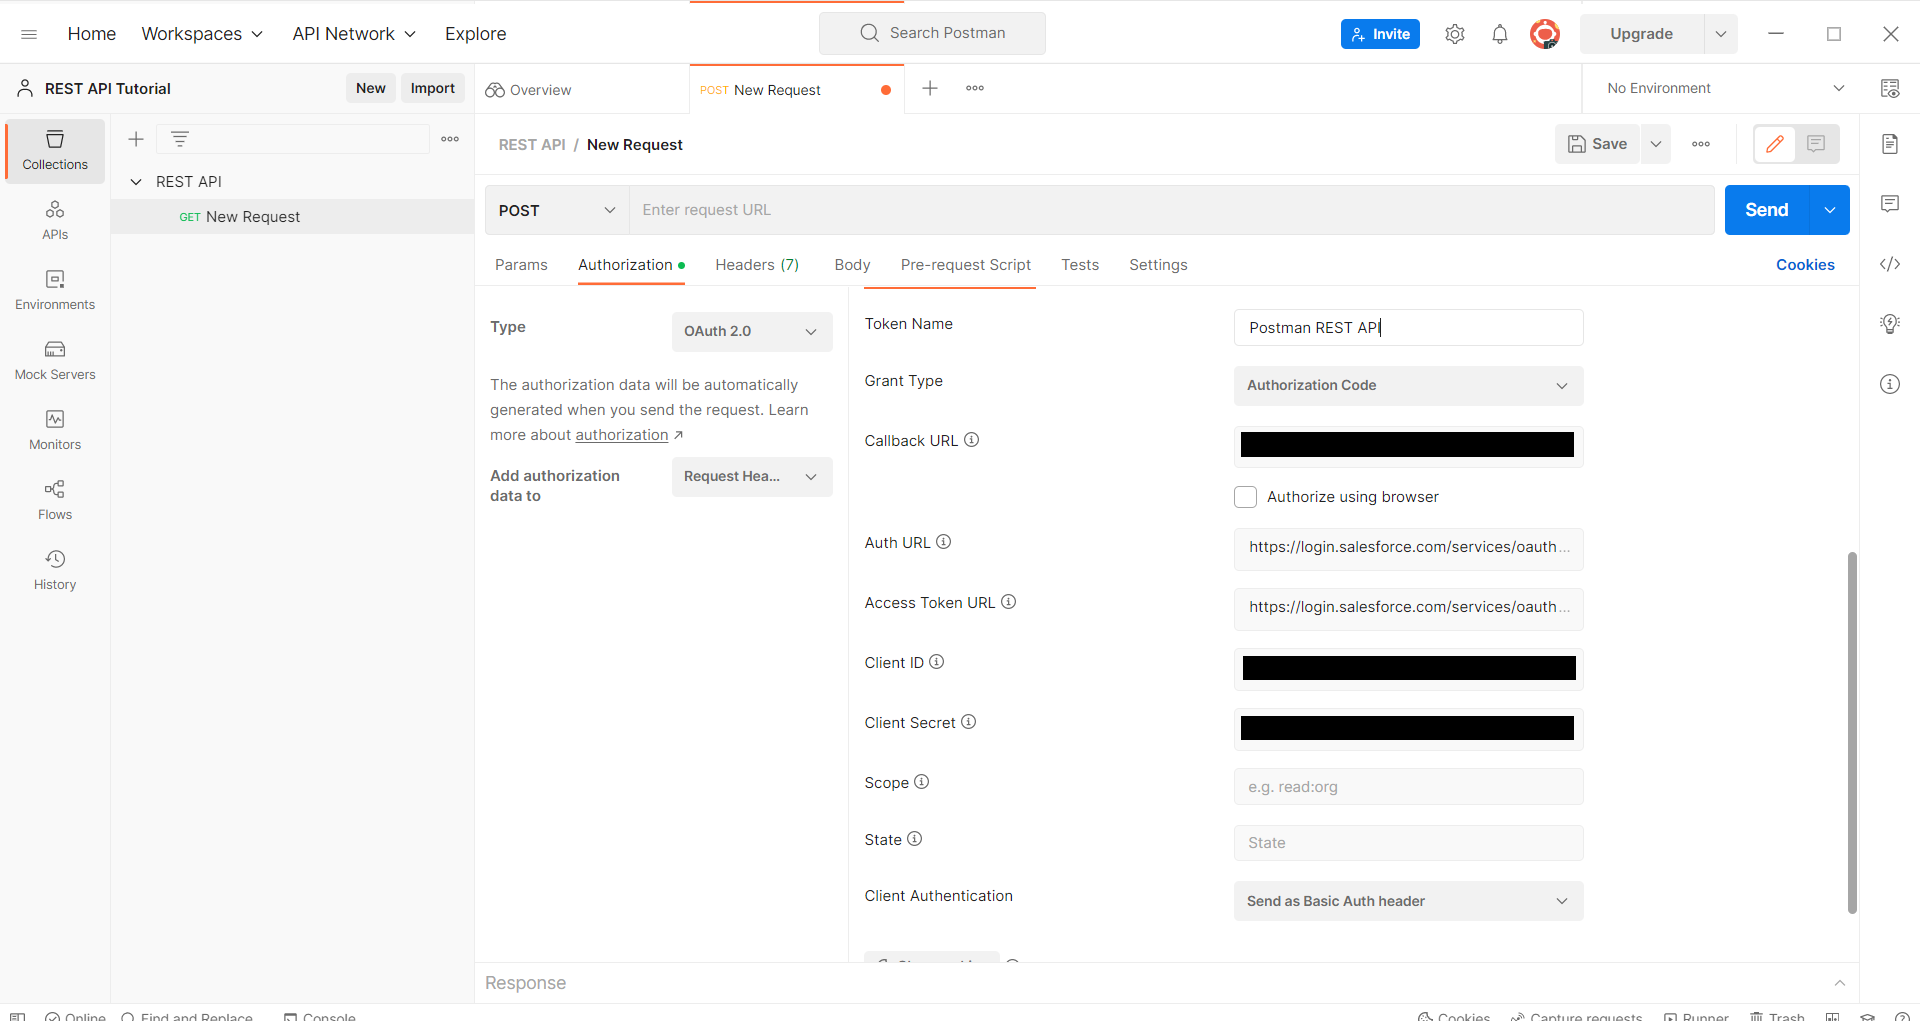
- Now we have to Configure a new token for Connection purpose. Go to Configure a new token Section click on Configuration Options then Enter a token Name, Select Grant Type as Authorization Code, For callback URL Enter URL which is added in Callback URL field while creating Connected app
- For Auth URL field If the org is production then “https://login.salesforce.com/services/oauth2/authorize” or for Test Org “https://test.salesforce.com/services/oauth2/authorize”
- For Access Token URL field If the org is production then “https://login.salesforce.com/services/oauth2/token” or for Test Org
- In Client Id field enter Consumer Key and in Client Secret enter Consumer Secret. After that leave remaining as it is.
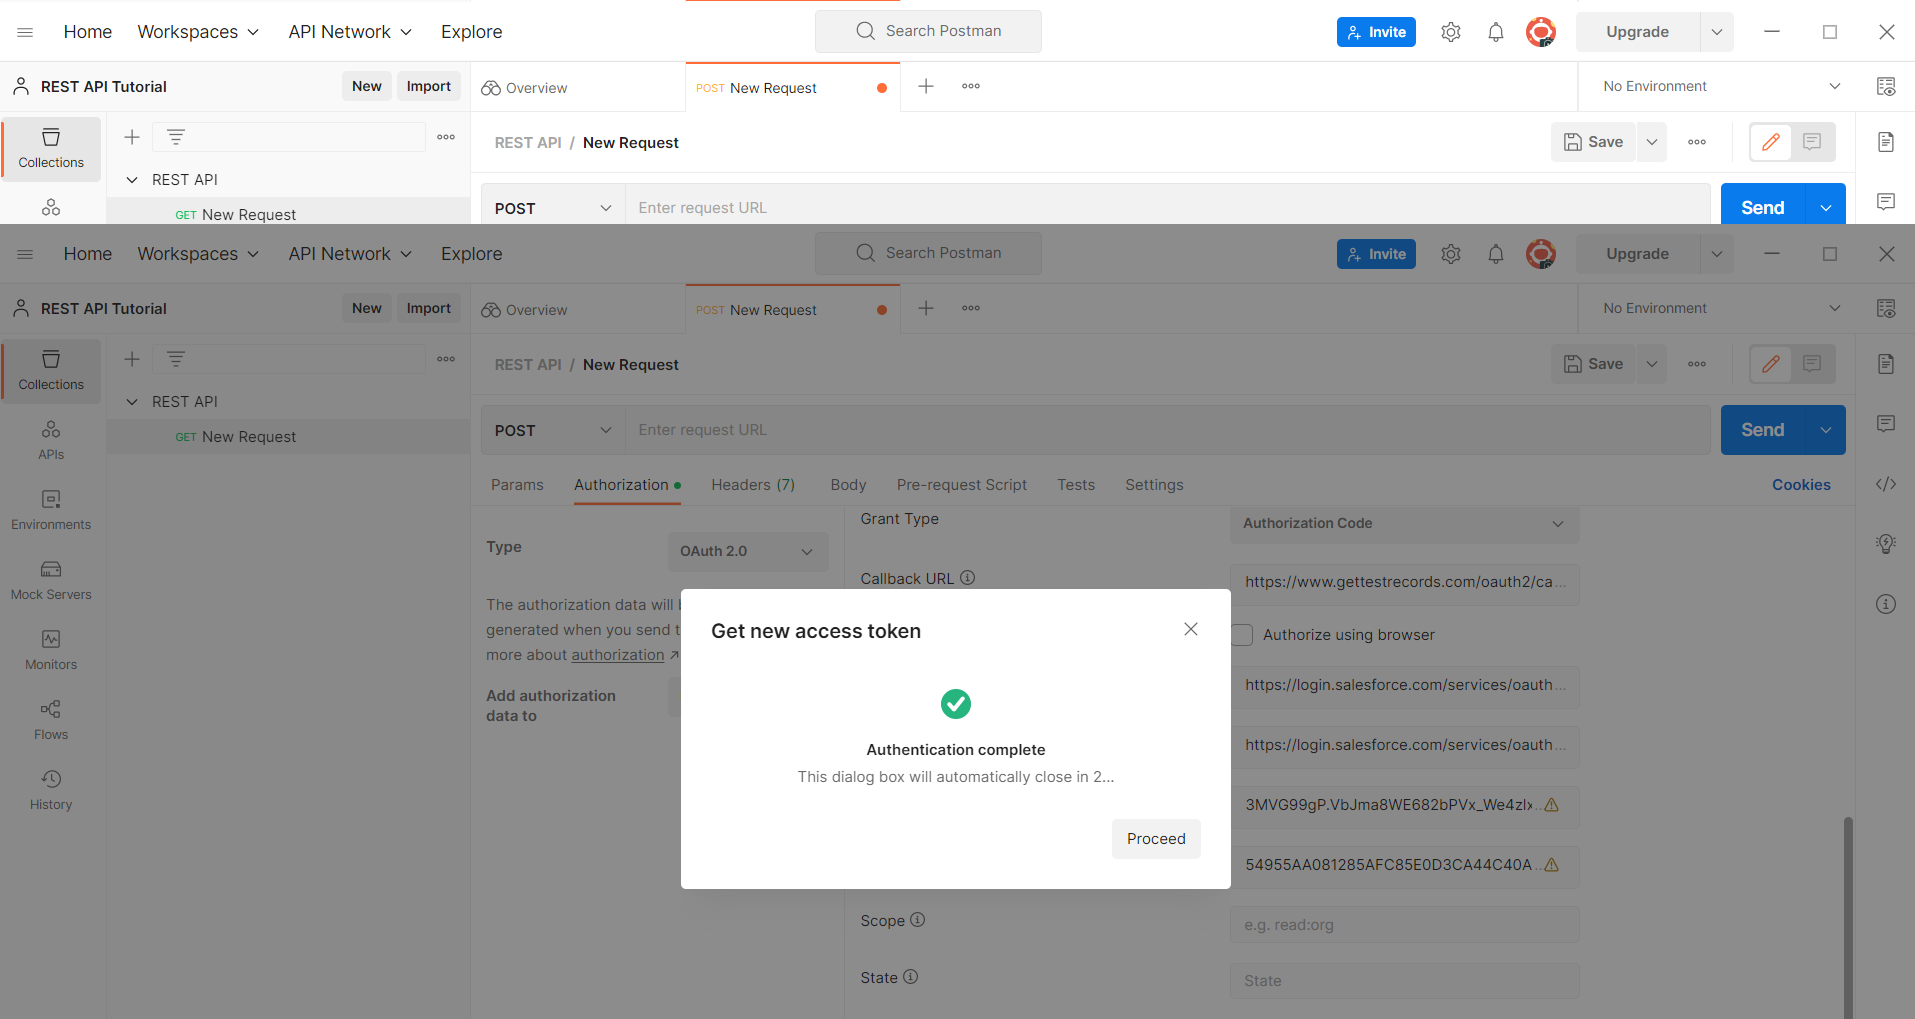
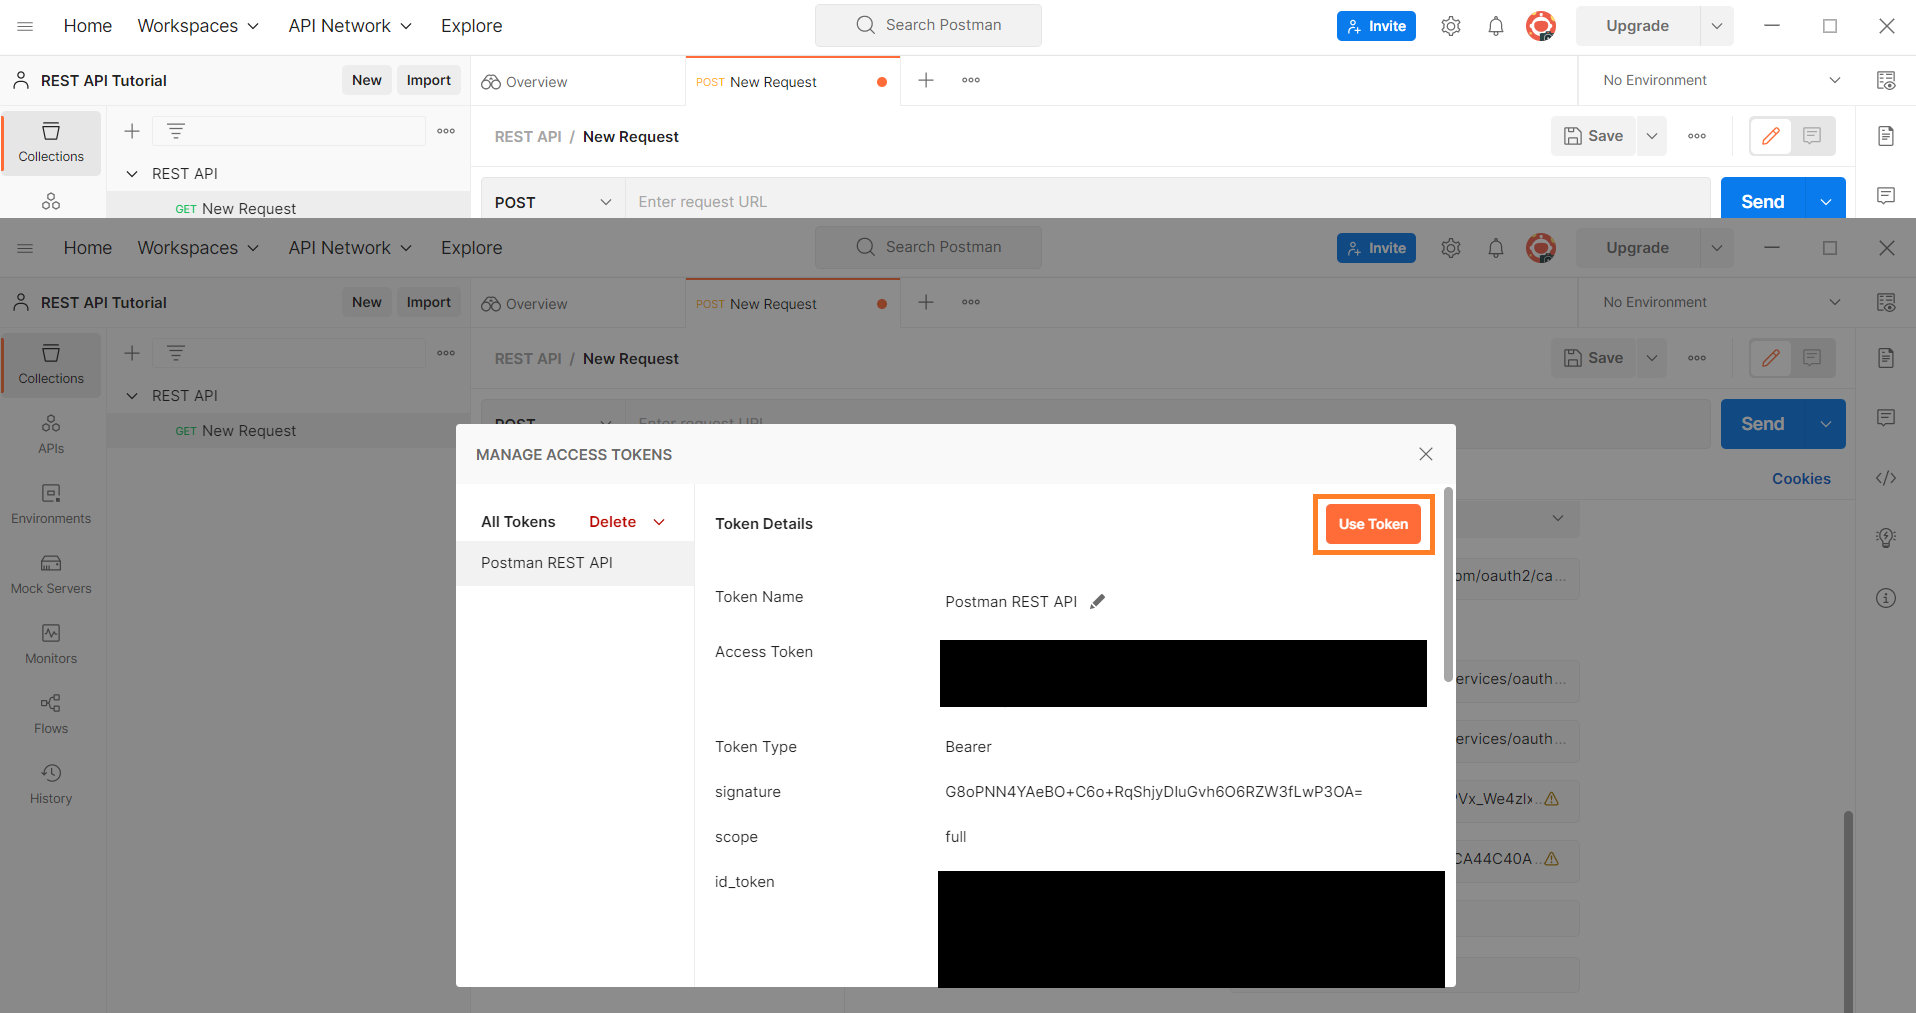
- Click on Get New Access Token Button on the bottom side of the Configuration Options Section. After that new prompt will open. In that prompt enter login user credentials and hit login. After that you got prompt on postman says Authentication Completed then hit on proceed.
- Then another prompt appear where you can see your Access token. Then click on Use Token button. Now you successfully Connected your Salesforce org
Let’s Create Custom field for Opportunity object
- Firstly we have to Create New RestResource Annotation enabled Apex Class in Salesforce Org. Please Referred below apex class
@RestResource(urlMapping = '/Customfields')
global class CreateCustomfields
{
    @HttpPost
    global static Map<String,String> GenerateCustomfields(String fieldType,String ObjectName,boolean Required,integer length,String label,String description,String inlineHelpText)
    {
  Map<String,String> Resp = new Map<String,String> ();
  HttpRequest request = new HttpRequest();
  request.setHeader('Authorization', 'Bearer ' + UserInfo.getSessionID());
        request.setHeader('Content-Type','application/json');
        request.setEndpoint(URL.getSalesforceBaseUrl().toExternalForm()+'/services/data/v56.0/tooling/sobjects/CustomField/');
  request.setMethod('POST');
        if(fieldType == 'Text')
        {
            request.setBody('{"Metadata" : {"type" : "'+fieldType+'","description" : "'+description+'", "inlineHelpText" : "'+inlineHelpText+'","label" : "'+label+'","length" : '+length+',"required" : '+Required+'}, "FullName" : "'+ObjectName+'.'+label.replace(' ','_')+'__c"}');
        }
        else
        {
            Resp.put('Error','Please provide field type');
            return Resp;
        }
        Http http = new Http();
        HTTPResponse res = http.send(request);
        if(res.getStatusCode()==200 || res.getStatusCode()==201)
        {
Resp.put('Success','status: '+res.getStatus()+' Status Code: '+res.getStatusCode());
Resp.put('StatusCode',''+res.getStatusCode());
Map<String, Object> m = (Map<String, Object>) JSON.deserializeUntyped(res.getBody());
            Resp.put('requestgetBody',URL.getSalesforceBaseUrl().toExternalForm()+'/lightning/setup/ObjectManager/'+ObjectName+'/FieldsAndRelationships/'+''+m.get('id')+'/view');
        }else
        {  String body=res.getBody();
            Resp.put('Error',''+res.getStatus());
            Resp.put('StatusCode',''+res.getStatusCode());
            body=body.substring( 1, body.length() - 1 );
            map<String,object> m = (map<String,object>) JSON.deserializeUntyped(body);
            Resp.put('ErrorMessage',''+m.get('message'));
            Resp.put('Endpoint',''+request.getEndpoint());
        }
        return Resp;
    }
}- Enter your Salesforce URL + /services/apexrest/Customfields in URL Section and Select method type as POST
- Now click on Body section select format as raw type as a JSON and enter following scrip in below section
{
    "fieldType" : "Text",
    "ObjectName" : "Opportunity",
    "Required" : false,
    "length": 255,
    "label" : "Comment",
    "description" : "Comment",
    "inlineHelpText" : "Opportunity Comment"
}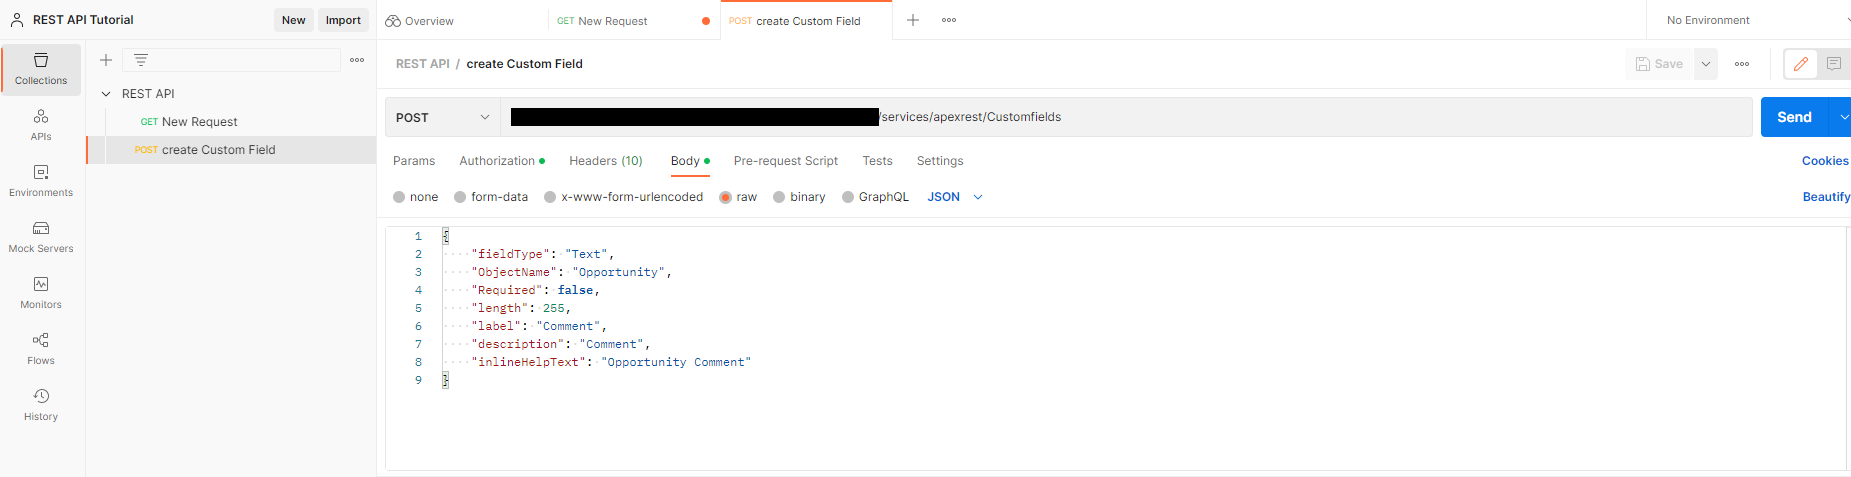
- In above script those are the parameters of the Above Apex class (field Type refers to type of Custom field, ObjectName refers to in which object field should be created, Required refers to field Should be required or not, Label is Custom field Label ,description is Custom field Description, inlineHelpText is Custom field help text).
- After that click Send button. Now you can see response contains of Custom field URL to verify Field as well as Status code and Success method
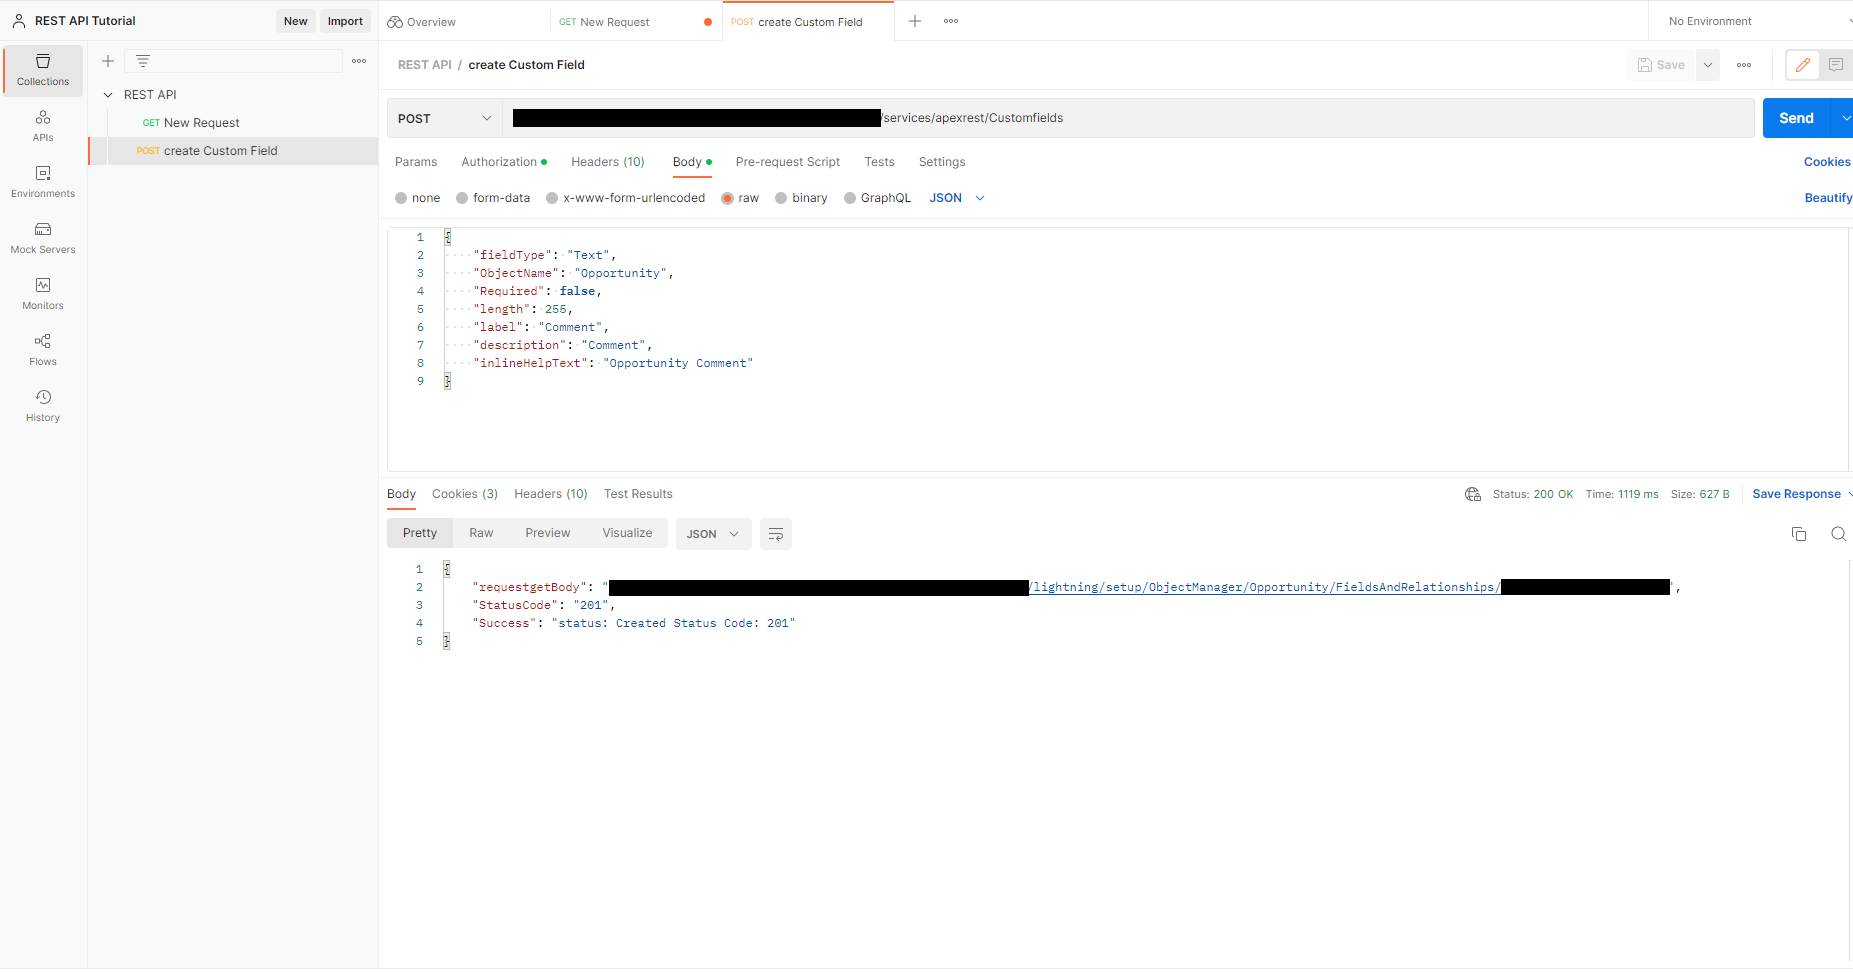
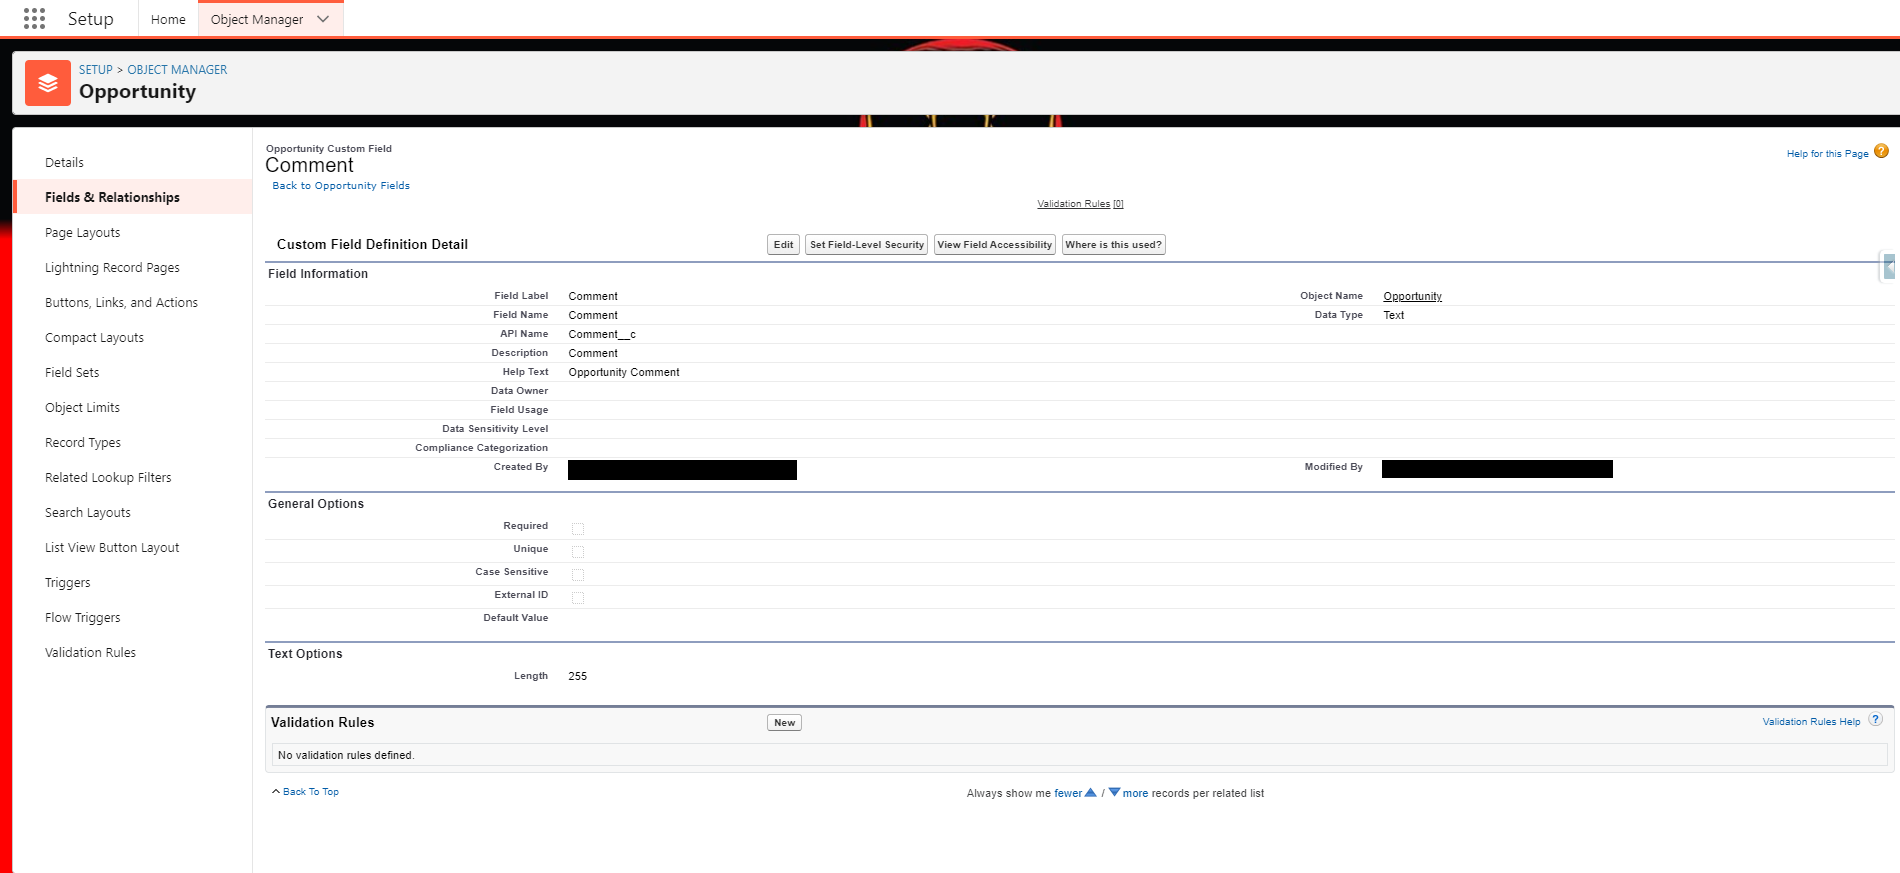
- Now you can see Custom field has been successfully created in your Salesforce org.
By following the above blog instructions, you will be able to “How to Create Custom field in Salesforce using postman REST API“. If you still have queries or any related problems, don’t hesitate to contact us at salesforce@greytrix.com. More details about the Product are available on our website and Salesforce AppExchange.
We hope you may find this blog resourceful and helpful. However, if you still have concerns and need more help, please get in touch with us at salesforce@greytrix.com.
About Us
Greytrix – a globally recognized and one of the oldest Sage Development Partner and a Salesforce Product development partner offers a wide variety of integration products and services to the end users as well as to the Partners and Sage PSG across the globe. We offer Consultation, Configuration, Training and support services in out-of-the-box functionality as well as customizations to incorporate custom business rules and functionalities that require apex code incorporation into the Salesforce platform.
Greytrix has some unique solutions for Cloud CRM such as Salesforce Sage integration for Sage X3, Sage 100 and Sage 300 (Sage Accpac). We also offer best-in-class Cloud CRM Salesforce customization and development services along with services such as Salesforce Data Migration, Integrated App development, Custom App development and Technical Support business partners and end users. Salesforce Cloud CRM integration offered by Greytrix works with Lightning web components and supports standard opportunity workflow. Greytrix GUMU™ integration for Sage ERP – Salesforce is a 5-star rated app listed on Salesforce AppExchange.
The GUMU™ Cloud framework by Greytrix forms the backbone of cloud integrations that are managed in real-time for processing and execution of application programs at the click of a button.
For more information on our Salesforce products and services, contact us at salesforce@greytrix.com. We will be glad to assist you.
Related Posts: