Sage CRM has provided an inbuilt feature to modify its Themes, Report Formats and Button Color etc. Few days back, one of the Sage CRM user approached us with a requirement to modify Sage CRM Login screen with their Company Logo. In earlier blog, we had explained how it can be done when Sage CRM is accessed via Smartphone. So thought to document how it can be done for Sage CRM on premise/desktop version.
New Stuff: Sage CRM 2018R3: Mark MailChimp Campaign’s as “Closed”
Basically Sage CRM user approached for the below 2 enhancement requests.
- Add his own Company Logo instead of Sage CRM logo on Sage CRM Login screen.
- After Login into Sage CRM, add his own Company Logo at the left corner of the screen.
Let’s see how it can be done.
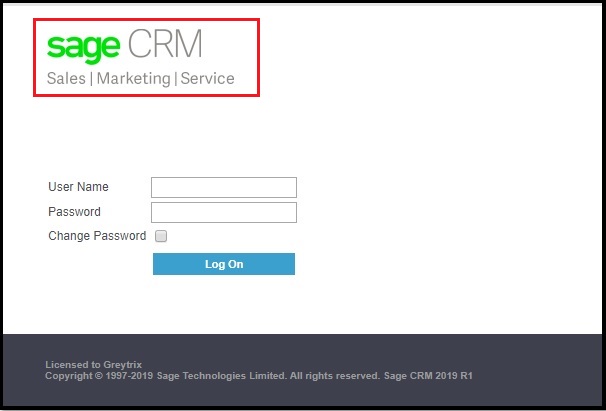
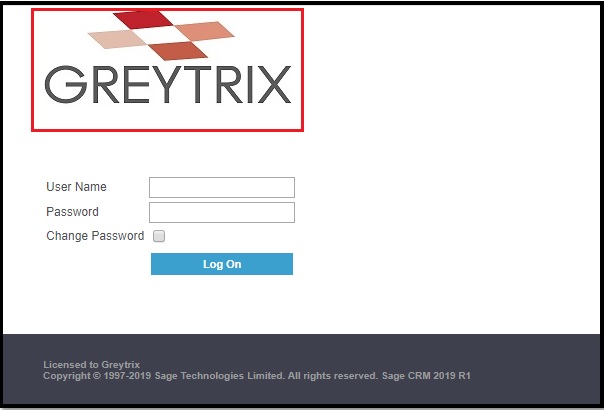
Adding your Company Logo instead of Sage CRM logo on Sage CRM Login screen
- In Sage CRM 2019, Sage CRM login screen is displayed as shown below.
- To add your own logo, user need to navigate to below directory on Sage CRM server.
<CRM Installation Directory>:\<CRM Instance>\WWWRoot\Img\Logon\gif\ - Take backup of all images before making any changes. Rename existing logon_left2.jpg file as logon_left2_old.jpg.
- Copy and Paste your logo into same directory. Name your logo file as logon_left2.jpg
That’s it. Sage CRM login screen will be replaced with your own company logo. Refer below screenshot.
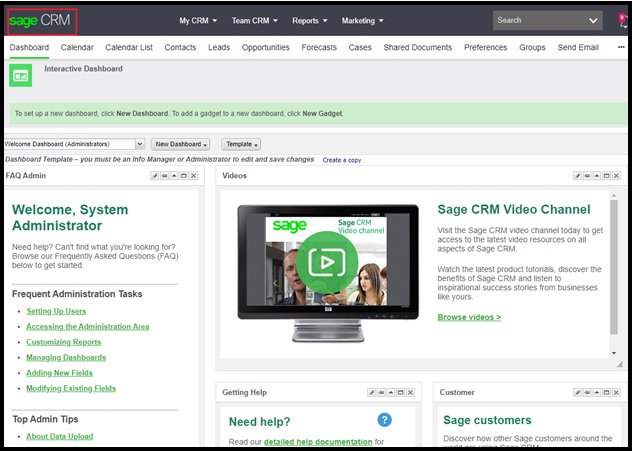
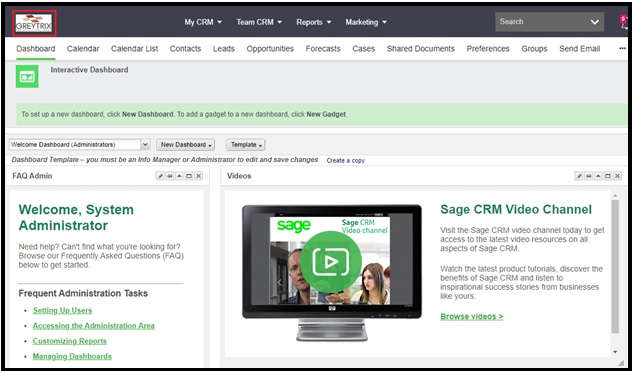
After Login into Sage CRM, add his own Company Logo at the Top left corner of the screen.
- After login into Sage CRM, below screen is visible based on user preferences and user wants to replace highlighted logo at the top left corner of screen.
- To add your own logo, user need to navigate to below directory on Sage CRM server.
<<Sage CRM Installation Directory>>:\<<CRM Instance>>\ WWWRoot\Themes\Img\Ergonomic\Icons\ - Take backup of all images before making any changes. Rename existing logo.jpg file as logo_old.jpg.
- Copy and Paste your logo into same directory. Name your logo file as logo.jpg
That’s it. Your own company logo will get updated as needed. Refer below screenshot.
Kindly note that, after installing a new Sage CRM patch, this change may be reverted. Be mindful that a future release may change the logo dimensions, background color etc. so you may have to redesign the default image for it to appear correct.
About Us
Greytrix – a globally recognized and one of the oldest Sage Development Partners is a one-stop solution provider for Sage ERP and Sage CRM organizational needs. Being acknowledged and rewarded for multi-man years of experience and expertise, we bring complete end-to-end assistance for your technical consultations, product customizations, data migration, system integrations, third-party add-on development, and implementation competence.
Greytrix has some unique integration solutions developed for Sage CRM with Sage ERPs namely Sage X3, Sage Intacct, Sage 100, Sage 500, and Sage 300. We also offer best-in-class Sage ERP and Sage CRM customization and development services to Business Partners, End Users, and Sage PSG worldwide. Greytrix helps in the migration of Sage CRM from Salesforce | ACT! | SalesLogix | Goldmine | Sugar CRM | Maximizer. Our Sage CRM Product Suite includes add-ons like Greytrix Business Manager, Sage CRM Project Manager, Sage CRM Resource Planner, Sage CRM Contract Manager, Sage CRM Event Manager, Sage CRM Budget Planner, Gmail Integration, Sage CRM Mobile Service Signature, Sage CRM CTI Framework.
Greytrix is a recognized Sage Champion Partner for GUMU™ Sage X3 – Sage CRM integration listed on Sage Marketplace and Sage CRM – Sage Intacct integration listed on Sage Intacct Marketplace. The GUMU™ Cloud framework by Greytrix forms the backbone of cloud integrations that are managed in real-time for the processing and execution of application programs at the click of a button.
For more information on our integration solutions, please contact us at sage@greytrix.com. We will be glad to assist you.