Sage CRM RESTful API is developed to connect Sage CRM with other applications. We can manipulate data in Sage CRM using standard HTTP Methods such as GET, POST, PATCH, and DELETE. REST API is easy to use in all programming languages, we can use it to transfer data between Sage CRM and external applications.
In previous blog, we discussed how to call RESTful API in ASP.NET project with the help of standard HTTP methods. Below is the link for the same.
Related Post: Using RESTful API in Sage CRM – Part 1
RESTful API is an excellent choice of technology to use with mobile applications and web projects or to build user interface (UI) for creating, reading, updating, and deleting records of an entity in Sage CRM.
In this blog, we are going to discuss how to host an ASP.NET project in IIS Server as well as how to display web form in Sage CRM system to perform insert, read, update, and delete operations. Once you are done with building UI using RESTful API now it is time to host the project and call web form in Sage CRM.
Refer following steps to achieve the same –
Host project in IIS Server:
- From windows run command, open the IIS server by typing inetmgr.
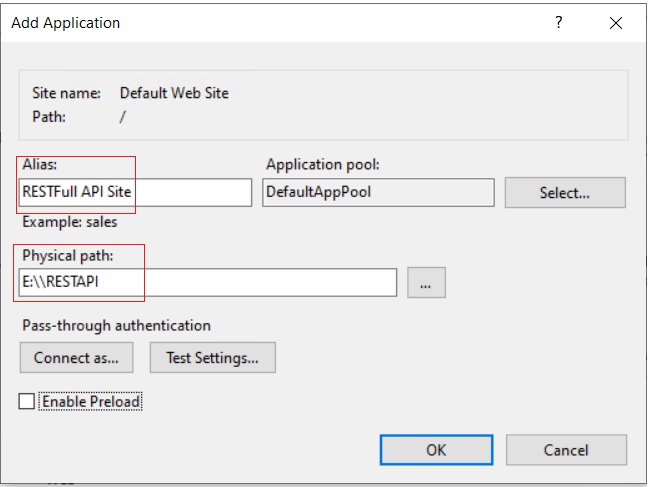
- In the Connections pane, expand the server, then expand Sites, and then right click on the Default Web site to which you want to add an application.
- In the Add Application dialog box, enter information in the Alias and Physical path text boxes, and then click OK. You can refer below screen shot for your reference.
4. Once you host an application, you can test whether the hosted application is working or not. To do the same, right click on the application and select “Manage application” and then click on browse.
Calling web form in Sage CRM:
- Once you are done with the application hosting in IIS Server, you have to call this application in Sage CRM. To do the same create ASP page and add below code.
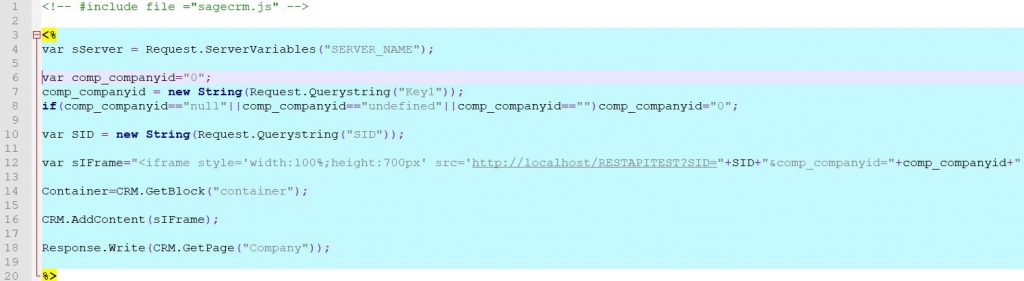
- Once you add code from step no. 1, save the ASP page at below path:
{drive}:\Program Files (x86)\Sage\CRM{installName}\WWWRoot\CustomPages
- Now login in Sage CRM with admin user. Here we are considering example of notes against company entity.
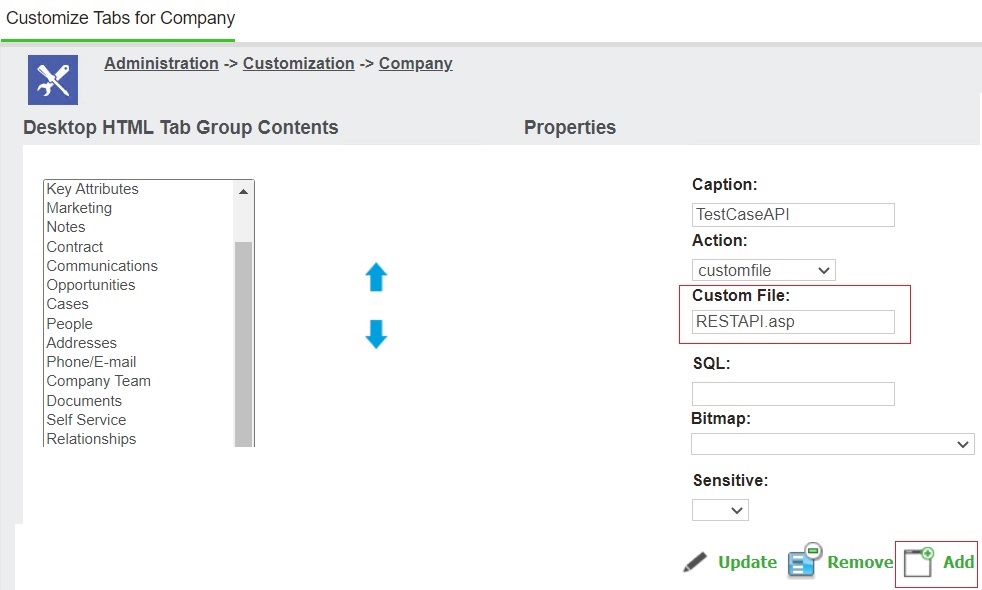
- Go to Administration –> Customization –> Company and click on Tabs.
- Now click on Company hyperlink from Tab Group Name.
- Add the new tab which display the application hosted in IIS Server. Enter the information like Caption, Action, and Custom File then click on Add icon button to add the new tab against the Company entity. You can refer the below screen shot.
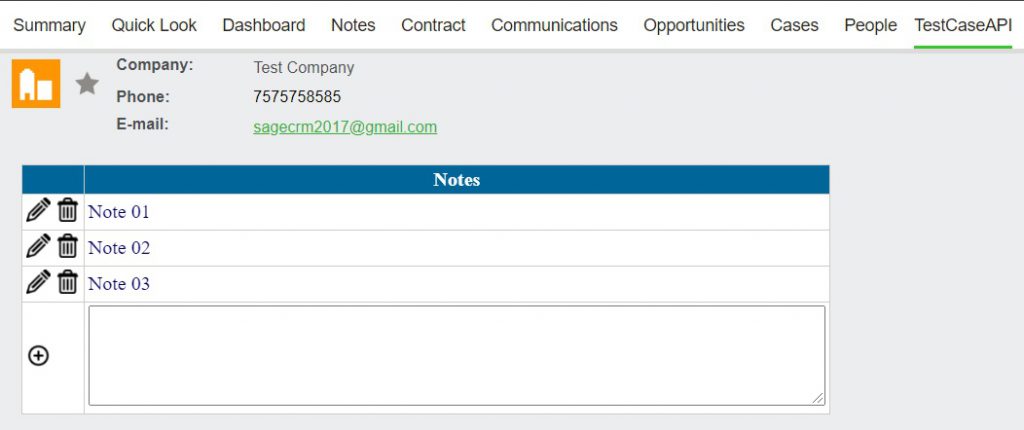
Once you are done with both the steps i.e., hosting application and calling web form in Sage CRM against the Company entity. Now go to the company summary and click on the newly added tab. You can see the application which is created for performing insert, read, update, and delete operation for an entity records in Sage CRM.
In this way you can easily use Sage CRM RESTful API and perform the insert, read, update, and delete operation for an entity records in Sage CRM. Also, with the help of this blog you can call the web form in Sage CRM application itself. Sage CRM RESTful APIs are available for primary entities as well as secondary entities.
About Us
Greytrix – a globally recognized and one of the oldest Sage Development Partners is a one-stop solution provider for Sage ERP and Sage CRM organizational needs. Being acknowledged and rewarded for multi-man years of experience and expertise, we bring complete end-to-end assistance for your technical consultations, product customizations, data migration, system integrations, third-party add-on development, and implementation competence.
Greytrix has some unique integration solutions developed for Sage CRM with Sage ERPs namely Sage X3, Sage Intacct, Sage 100, Sage 500, and Sage 300. We also offer best-in-class Sage ERP and Sage CRM customization and development services to Business Partners, End Users, and Sage PSG worldwide. Greytrix helps in the migration of Sage CRM from Salesforce | ACT! | SalesLogix | Goldmine | Sugar CRM | Maximizer. Our Sage CRM Product Suite includes add-ons like Greytrix Business Manager, Sage CRM Project Manager, Sage CRM Resource Planner, Sage CRM Contract Manager, Sage CRM Event Manager, Sage CRM Budget Planner, Gmail Integration, Sage CRM Mobile Service Signature, Sage CRM CTI Framework.
Greytrix is a recognized Sage Champion Partner for GUMU™ Sage X3 – Sage CRM integration listed on Sage Marketplace and Sage CRM – Sage Intacct integration listed on Sage Intacct Marketplace. The GUMU™ Cloud framework by Greytrix forms the backbone of cloud integrations that are managed in real-time for the processing and execution of application programs at the click of a button.
For more information on our integration solutions, please contact us at sage@greytrix.com. We will be glad to assist you.