Email is an efficient way to exchange information and documents. Email can be integrated with calendar tools, allowing you to schedule meetings and appointments with clients. In our previous blog we have explained, how to integrate Sage CRM with Microsoft Outlook using OAuth 2.0 for Email Inbound. In this blog, we will discuss how to Import Emails using OAuth 2.0.
Related Post: Integrate Sage CRM with Microsoft Outlook using OAuth 2.0
Earlier, we have explained how to get Client id and Client Secret. Now, we have to only add extra APP Permissions for our registered app. Follow below steps to do the same.
- Sign in to the Azure Active Directory Admin center as an administrator.
- Go to App Registrations and open the newly registered app.
- Go to APP Permissions -> Microsoft APIs -> Microsoft Graph -> Delegated permissions.
- Search for the following permission and add them.
- Contacts.Read
- Contacts.Read.Shared
- IMAP.AccessAsUser.All
- Mail.Read
- Mail.Read.Shared
- Mail.ReadWrite
- Mail.ReadWrite.Shared
- POP.AccessAsUser.All
- SMTP.Send
Once all the permissions are added, we need to grant admin consent for the added permissions by clicking on “Grant admin consent for” as shown in below screenshot.

Now, we will configure Client Id and Client secret in Sage CRM so that users could authenticate Azure Active directory and will connect to their Exchange Online accounts to import Contacts and Email. Follow below steps for the same.
- Login into Sage CRM.
- Go to Administration → Email and Documents → OAuth 2.0 Settings for Importing Contacts and Emails → Change.
- Enter the Client Id and Client Secret and save.
Now, every user should connect to their Exchange Online account as follows.
- Login into Sage CRM.
- Go to Preferences.
- If you are connecting to your email account for first time then select “Connect to Email Account” button.
- If you are already connected to an email account and would like to switch to a different account, then select “Switch Email Account” button.
- After clicking on the button, it will prompt for user name and password for the Exchange Online account from which we have to import data.
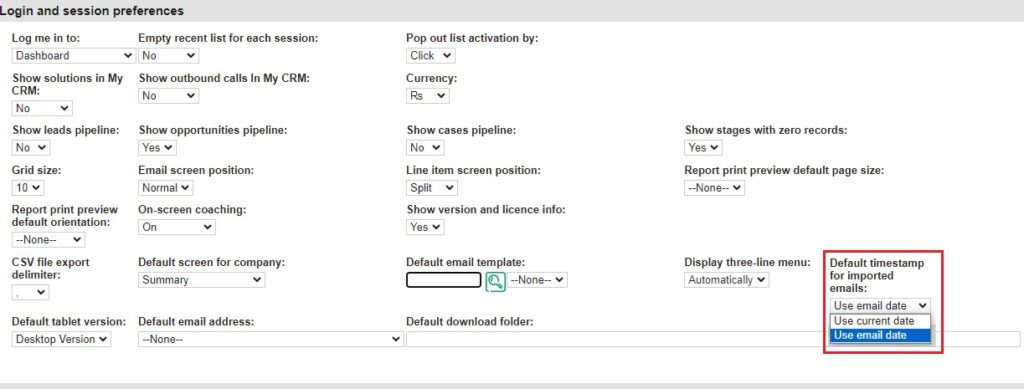
In previous version of CRM, whenever we import emails then the email received date used to be set as the date when email was imported and not the actual email date. But, now with this “Import Contacts and Emails” feature, we will get provision to set the actual email received date.
In the release of Sage CRM 2023 R2 version, one configuration is available in Preferences tab where we can set what email received date should be set. It can be either Current date or Actual email received date. Below are the steps to do the same.
- Login into Sage CRM.
- Go to Preferences.
- Set the “Default timestamp for imported emails” field to a value “Use email date” or “Use current date” as per your requirement.
Once the value is set in Preferences tab then that value will by default come on the import email screen as shown in below screenshot.
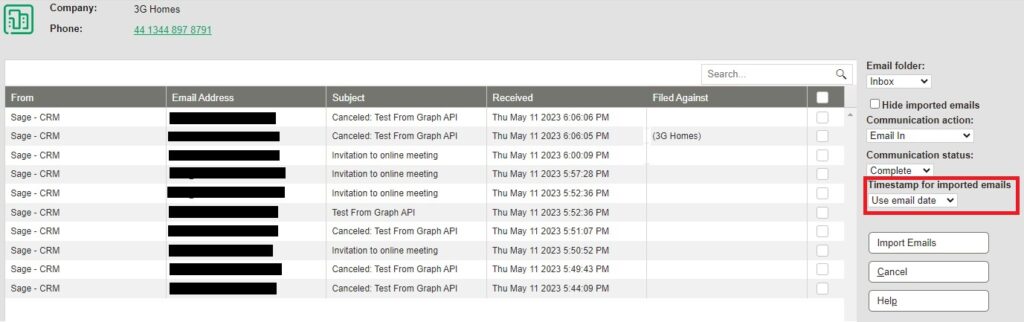
User can also change the “Timestamp for imported emails” to the required value on the above screen if needed and click on “Import Emails” button.
In this way, we can set the current date or actual email received date as the email date for imported emails in Sage CRM.
About Us
Greytrix – a globally recognized and one of the oldest Sage Development Partners is a one-stop solution provider for Sage ERP and Sage CRM organizational needs. Being acknowledged and rewarded for multi-man years of experience and expertise, we bring complete end-to-end assistance for your technical consultations, product customizations, data migration, system integrations, third-party add-on development, and implementation competence.
Greytrix has some unique integration solutions developed for Sage CRM with Sage ERPs namely Sage X3, Sage Intacct, Sage 100, Sage 500, and Sage 300. We also offer best-in-class Sage ERP and Sage CRM customization and development services to Business Partners, End Users, and Sage PSG worldwide. Greytrix helps in the migration of Sage CRM from Salesforce | ACT! | SalesLogix | Goldmine | Sugar CRM | Maximizer. Our Sage CRM Product Suite includes add-ons like Greytrix Business Manager, Sage CRM Project Manager, Sage CRM Resource Planner, Sage CRM Contract Manager, Sage CRM Event Manager, Sage CRM Budget Planner, Gmail Integration, Sage CRM Mobile Service Signature, Sage CRM CTI Framework.
Greytrix is a recognized Sage Champion Partner for GUMU™ Sage X3 – Sage CRM integration listed on Sage Marketplace and Sage CRM – Sage Intacct integration listed on Sage Intacct Marketplace. The GUMU™ Cloud framework by Greytrix forms the backbone of cloud integrations that are managed in real-time for the processing and execution of application programs at the click of a button.
For more information on our integration solutions, please contact us at sage@greytrix.com. We will be glad to assist you.