As you know GUMU Integration provisions the functionality of Promoting Address from Salesforce to Sage X3 whether it is Billing or Shipping Address. Previously we have seen that how a User can Promote Billing Address from Salesforce to Sage X3 using GUMU Lightning Components and in this blog we will understand how a User can Promote Shipping Address as Default Address from Salesforce to Sage X3.
In addition, Pre-requisite for promoting a “Shipping Address” the Account (the user has selected) should be Promoted or Linked to Sage X3 Customer. For more details on how a user can promote the Account from Salesforce to Sage X3, kindly refer the following blog: Promote Account from Salesforce to Sage X3.
By referring the above article user can now easily understand the functionality and necessity of it. It’s time for us to now look on how a User can Promote Shipping Address as default Address to Sage X3 from Salesforce. Follow the below exhibited steps:
Promoting a Shipping Address
- Firstly, login to your Salesforce Org and from the Accounts list select the Account for which you want to create Shipping Address and send as default.
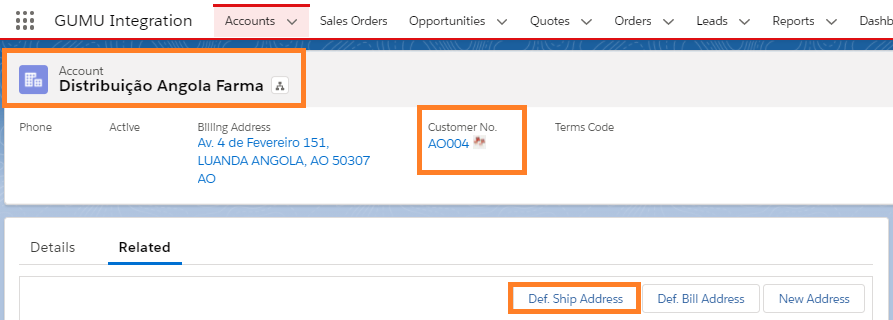
- Secondly, in order to create a Default Shipping Address for the Account, click on “Def. Shipping Address” button as highlighted in the above image.
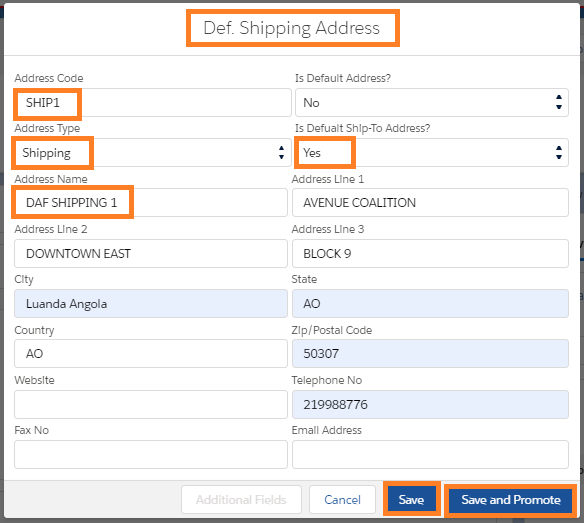
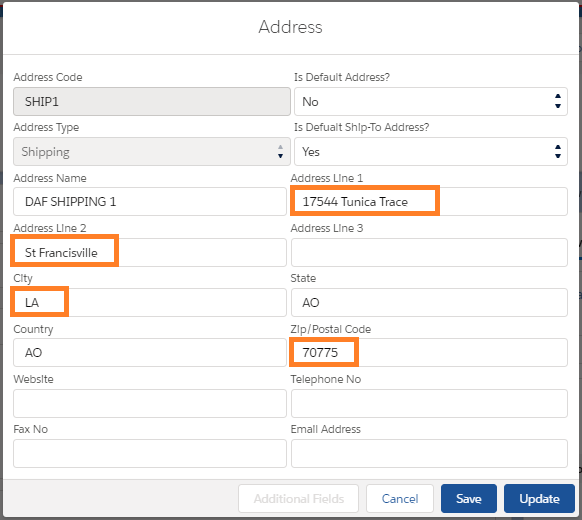
- Thirdly, on clicking the “Def. Shipping Address” button a new screen will populate where of “Def. Shipping Address”. User have to enter all the details for Shipping Address for that particular Account. Refer the below image:
Points to remember:
- When a User clicks on Def. Shipping Address button, by default the Address window title is “Def. Shipping Address”
- Also, the below stated fields have default value:
- Is Default Address: No
- Is Default Shipping Address: Yes
- Address Type: Shipping
- Address Code: For tranquil identification, the Address code should always be unique. Two addresses for the Account cannot have same Address Code.
- Address Name: Just as the Address Code, Address Name should also be unique.
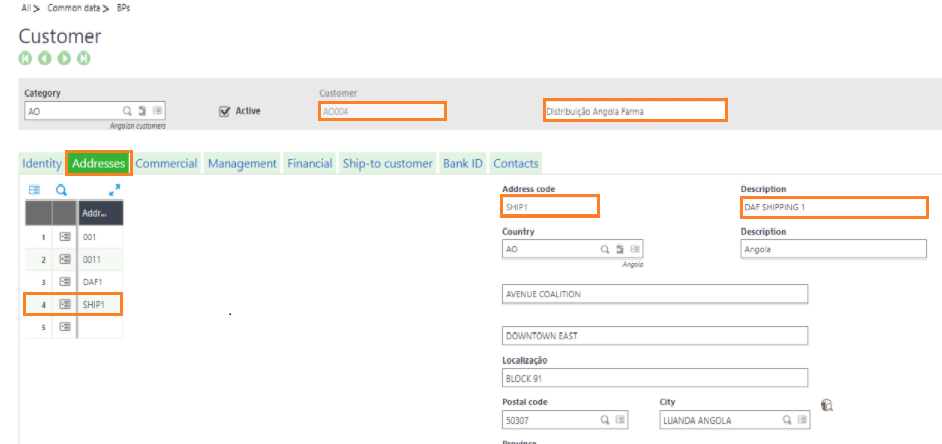
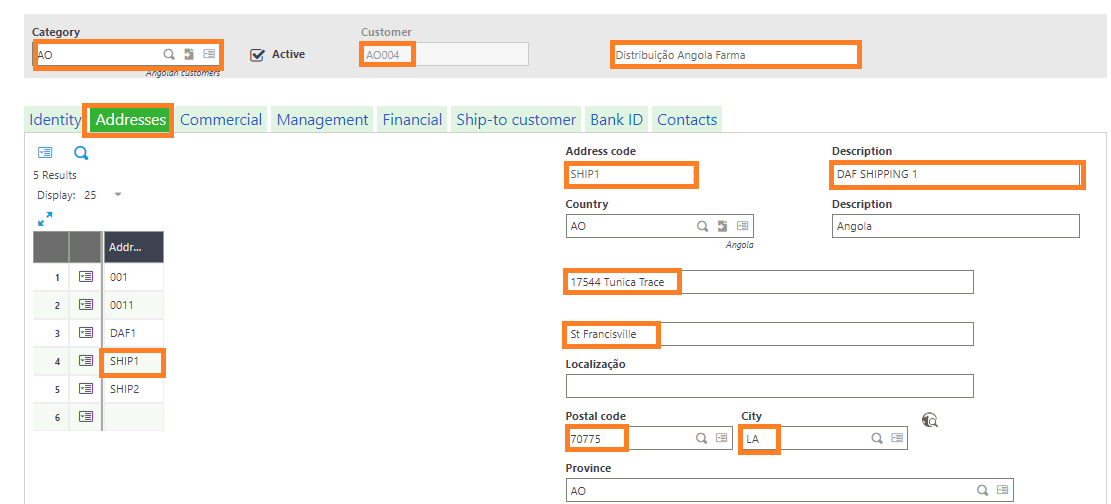
Finally, once the required details are entered, user can either Cancel, Save and Promote details to Sage. Since, our prime focus here is to learn on how to Promote Address we shall now go-ahead and Click on Promote Button. When a User clicks on Promote button, the Address will be pushed to Sage X3 under that particular Account. Refer the below image:
Editing & Updating a Shipping Address
Since we have taken a look at how a User can Default Shipping Address, we shall now take a look at how a User can update existing Shipping Address from Salesforce to Sage X3. Kindly refer the below steps to make changes in existing Shipping Address and update it from Salesforce to Sage X3.
- Firstly, open the Linked Account for which you have created and promoted Default Shipping Address.
- Secondly, click on the “Edit” button located under the action pane to make the changes as show in the below image:
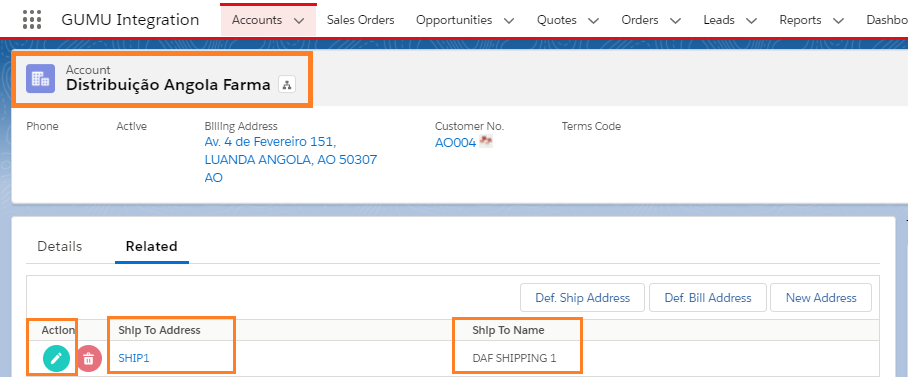
- When the User clicks on the Edit button, a pop-up window will appear. After that, the user can click on “Update” button for changes to be reflect in Sage. The changes reflect on real-time basis as show in the below image:
- Once updated, let’s check the changes in Sage to have a better understanding of real-time changes. Refer the below image to view the changes:
Note: One to the most significant point the user needs to keep in mind while making changes for Account, Addresses etc. in Salesforce is that, the Sage X3 record for that particular Account shouldn’t be Open i.e. in edit or read only mode, otherwise the real-time changes will not be reflected from Salesforce to Sage X3.
We hope you may find this blog resourceful and helpful and are able to promote the billing address record to Sage X3. If you still have concerns and need more help, please contact us at salesforce@greytrix.com.
About Us
Greytrix – a globally recognized and one of the oldest Sage Development Partner and a Salesforce Product development partner offers a wide variety of integration products and services to the end users as well as to the Partners and Sage PSG across the globe. We offer Consultation, Configuration, Training and support services in out-of-the-box functionality as well as customizations to incorporate custom business rules and functionalities that require apex code incorporation into the Salesforce platform.
Greytrix has some unique solutions for Cloud CRM such as Salesforce Sage integration for Sage X3, Sage 100 and Sage 300 (Sage Accpac). We also offer best-in-class Cloud CRM Salesforce customization and development services along with services such as Salesforce Data Migration, Integrated App development, Custom App development and Technical Support business partners and end users. Salesforce Cloud CRM integration offered by Greytrix works with Lightning web components and supports standard opportunity workflow. Greytrix GUMU™ integration for Sage ERP – Salesforce is a 5-star rated app listed on Salesforce AppExchange.
The GUMU™ Cloud framework by Greytrix forms the backbone of cloud integrations that are managed in real-time for processing and execution of application programs at the click of a button.
For more information on our Salesforce products and services, contact us at salesforce@greytrix.com. We will be glad to assist you.
Related Posts