Sage 300 ERP – Tips, Tricks and Components
Greytrix is one of the oldest Sage Development Partner of two decades and Reseller of Sage 300 ERP (formerly known as Sage Accpac ERP) and has been awarded "Sage Partner of the Year" multiple times for rendering quality services for Sage product lines both as developers and resellers. Greytrix has accumulated hundreds of man years of experience in Sage 300 ERP. In these blogs, Greytrix will endeavour to share its knowledge with regards to implementation, training, customisation, components, current technology trends and help users to understand in depth techno – functional aspects of Sage 300 ERP! Contact our team at accpac@greytrix.com
Follow us on LinkedIn Follow us on Twitter Follow us on Facebook Follow us on YouTube
Skip to content
  • Home

Default settings for Receipts in Account Receivable in Sage 300 ERP

By sageaccpac | January 27, 2014
0 Comment

There are various default settings available at the Company as well as Module level in Sage 300 ERP which makes the data entry easier and time saving.

The New Stuff : How to handle Inventory Shipment in Sage 300 ERP

In this blog we will discuss about the default settings available in Account receivable for Receipt entry where the same Bank is used to deposit Receipt for your company or Transaction Type is ‘Apply Document’. These settings are most suitable for industries where there are advance payments and the invoices are made at a later stage and then applied to these advances.
Let’s see these options which once set, can make the AR process simpler. Once these options are set, they will appear as default on the AR receipt screen.

1) For setting the default options, navigate to Account Receivable –>A/R Setup Options. Under the “Transaction” tab in “Receipt Options” you can set below defaults options.
• Default Transaction type
• Default Payment Code
• Default Bank code
• Default posting Date
• Default order of Open Documents

Ar1

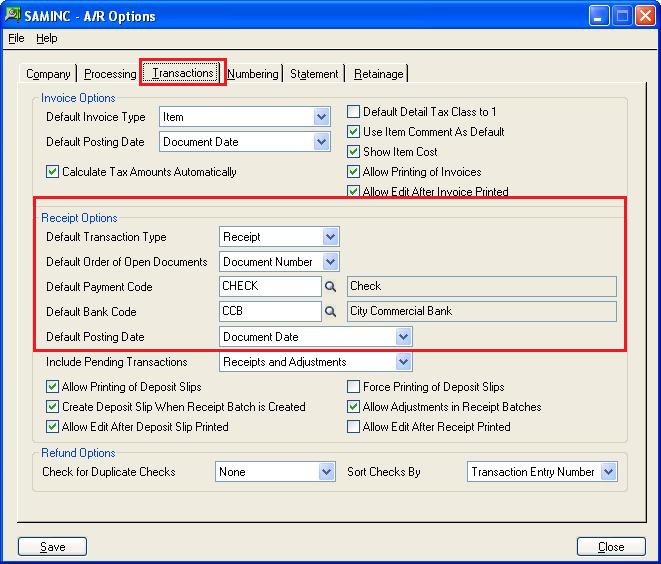
Note: You can change your choices for these options at any time, provided no other Accounts Receivable forms are in use.

2) After this setup when you will open new receipts, at that time, these default options which were set will be available on receipts with Posting Date same as the Receipt date. You can modify these default options if needed.

Ar2

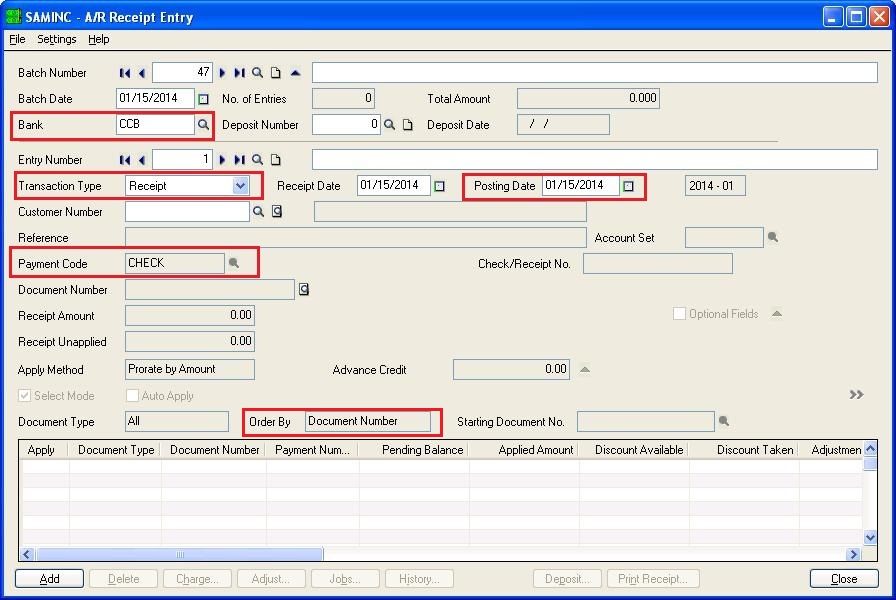
Note: If you consolidate G/L transactions, the posting date for consolidated entries is the last date of the fiscal period.

Related Posts

  • Account Receivable Option to set Default Summary/Item Invoices in Sage 300
  • Default Settings for Accounts Payable Payments in Sage 300 ERP
  • Default Create OE Invoice in Sage 300 ERP
Category: Sage 300 Tags: Account Receivable, AR Receipt, AR set up options, AR Transactions, Default bank code, Default Payment code, Default setting for Receipts, Default setting in Sage 300 ERP, Default transaction type, Sage 300 ERP
Post navigation
← How to handle Inventory Shipment in Sage 300 ERP VBA Forms Macro in Windows Taskbar →

Greytrix Websites and Blogs

  • Greytrix
  • Greytrix Africa
  • Greytrix Australia
  • Sage X3 – Tips, Tricks and Components
  • Sage 100 & 500 ERP Tips and Tricks
  • Sage CRM – Tips, Tricks and Components
  • Salesforce.com Tips and Tricks by Greytrix
  • Sage Intacct– Tips, Tricks and Components
sage crm and sage 300 integration

Categories

  • Sage 300
    • ACCPAC SDK
  • Sage 300 People
  • Sage 50 US
  • Sage Business Cloud
  • TDS
  • Uncategorized

Recent Posts

  • User Activity Report available in Sage 300 v2023.1 Release
  • Setting an Additional Cost for P/O
  • AP Payment and Credit Note creation utility
  • COM Components: Accpac FieldEdit Control
  • Control duplicate Payment entries in Account Payable.

Archives

Awards

Greytrix Top ISV Partner
Greytrix Revenue Growth Enterprise Business
Greytrix Africa Highest Revenue
Greytrix Prtner of the Year
Greytrix Partner Award
Copyright 2022
Sage 300 ERP – Tips, Tricks and Components
Iconic One Theme | Powered by Wordpress