Sage 300 ERP – Tips, Tricks and Components
Greytrix is one of the oldest Sage Development Partner of two decades and Reseller of Sage 300 ERP (formerly known as Sage Accpac ERP) and has been awarded "Sage Partner of the Year" multiple times for rendering quality services for Sage product lines both as developers and resellers. Greytrix has accumulated hundreds of man years of experience in Sage 300 ERP. In these blogs, Greytrix will endeavour to share its knowledge with regards to implementation, training, customisation, components, current technology trends and help users to understand in depth techno – functional aspects of Sage 300 ERP! Contact our team at accpac@greytrix.com
Follow us on LinkedIn Follow us on Twitter Follow us on Facebook Follow us on YouTube
Skip to content
  • Home

Creating payment batches in Sage 300 ERP

By sageaccpac | November 12, 2014
0 Comment

In this blog post, we will discuss a useful feature present in Standard Sage 300 Account Payable module; to use Create Payment Batch to generate a payment for selected vendors, whose invoices are due or who have discounts on early payment, in bulk.
Note : With create payment batch screen, you can have only one System generated batch open at time.
The New Stuff : Report not printing when printer option is set to printer in sage 300 ERP
You can generate the payment batch by following below simple steps:
1. In order to access Create payment batch screen, go to Account Payable–>A/P transactions–>Create Payment batch.
PAy1
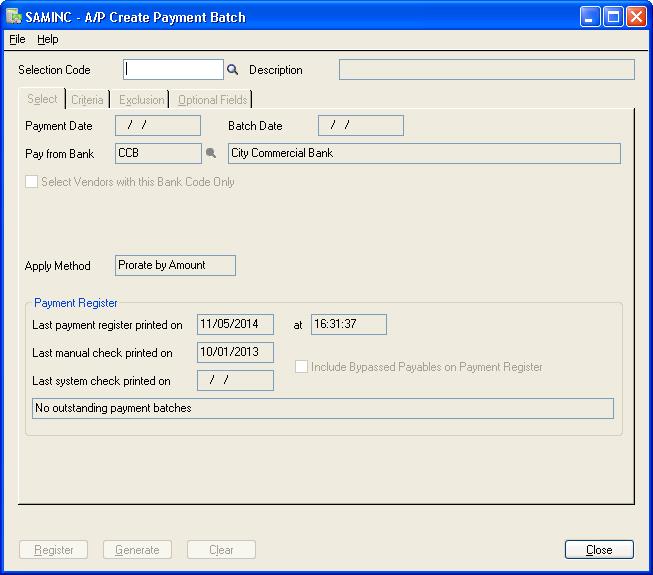
2. Here you need to select the payment selection code which will default the criteria for selecting the invoices for generating the payment batch. Payment Selection codes are defined in AP Setup–>Payment Selection screen.
3. Selection Tab: You can edit or set  the below criteria for selection in Select tab
• Payment Date
• Batch Date
• Apply Method
• Pay from Bank
• Select vendor with this bank code only: With this option checked, vendors with a predefined bank code same as selected bank code are only considered.
4. Criteria : All the defined criteria in Payment selection will be shown in this tab which can be edited later. This includes below parameters,
• Vendor selection Range
• Vendor Group
• Vendor Number
• Account set
• Vendor Amounts
• Payment Code
• Vendor optional fields (if any)
• Document selection: Invoices are filtered based on Due date, Discount date or both.
5. Exclusion: Exclusion criteria specified for the payment selection code appear as default on this tab. You can exclude additional vendors, or remove vendors from the exclusion list for a particular check run.
6. Before generating the payment batch, register it to print and view the payment register to verify the payment for invoices and avoid unwanted payments.
7. After printing the payment register, click on generate button to create payment batch.
8. You can edit the system generated payment batch using AP Payment batch list if you have checked Allow Edit of System Generated Batches option on the A/P Options screen.

Related Posts

  • Miscellaneous Payment Feature in SAGE 300 ERP
  • Migrate Sales Payment from Sage 50 US to Sage 300 ERP
  • Installing Sage Exchange in Sage 300 ERP
Category: ACCPAC SDK Sage 300 Tags: Account Payable, Create Payment Batch, Sage 300 ERP, system generated batch
Post navigation
← Report not printing when printer option is set to printer in sage 300 ERP Shipments to be Invoiced Report →

Greytrix Websites and Blogs

  • Greytrix
  • Greytrix Africa
  • Greytrix Australia
  • Sage X3 – Tips, Tricks and Components
  • Sage 100 & 500 ERP Tips and Tricks
  • Sage CRM – Tips, Tricks and Components
  • Salesforce.com Tips and Tricks by Greytrix
  • Sage Intacct– Tips, Tricks and Components
sage crm and sage 300 integration

Categories

  • Sage 300
    • ACCPAC SDK
  • Sage 300 People
  • Sage 50 US
  • Sage Business Cloud
  • TDS
  • Uncategorized

Recent Posts

  • Resolution to an Error Caused While Downgrading Sage 300 Custom Module
  • Solution for an Error While Upgrading Sage 300 Custom Module
  • Possible cause for issue: “Error code -2147221164 class not registered”
  • Possible Solution for “Cannot access database (error=49153)”
  • Error while Opening Customized Screen

Archives

Awards

Greytrix Top ISV Partner
Greytrix Revenue Growth Enterprise Business
Greytrix Africa Highest Revenue
Greytrix Prtner of the Year
Greytrix Partner Award
Copyright 2022
Sage 300 ERP – Tips, Tricks and Components
Iconic One Theme | Powered by Wordpress