Sage CRM Self Service portal is designed in such a way that we can use the Sage CRM user interface and customize it as per the requirement. Its access can be given to customer so that they can stay updated with their cases, leads, tasks or other information which we want to share with them. Also, we can control the data which needs to be shown to the customer in self-service portal.
In our previous blog, we have explained how to add Calendar control in New Self Service portal. Below is the link for your reference.
Related Post: Add Calendar control in Self Service Portal
In this blog, we will explain you how to change the date format of date fields in New Self Service Portal. The date format of date field behaves differently based on the screen type. For e.g. If you are using date field in the New record screen then with the help of jQuery you can make changes or if you have added it in the search screen then you need to make changes in the Sage CRM User configuration. We will discuss these 2 approaches separately in the below section.
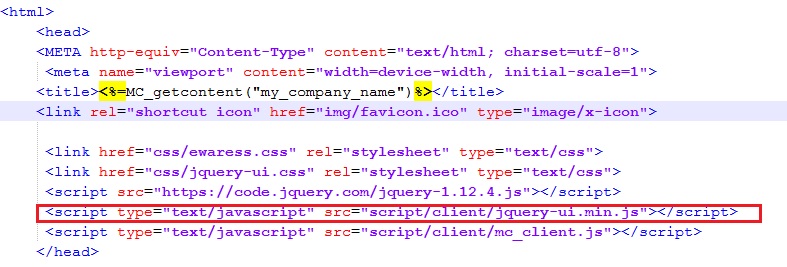
- Date field added on New Record Screen : If you have added a date field in the new record screen, then we have to make changes in the jQuery file. This jQuery file is included as a reference in the Main Page i.e. Index.asp page. Please refer below screenshot.
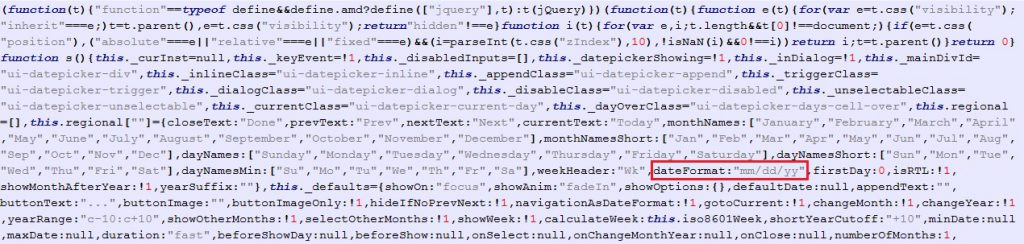
Open the “jquery-ui.min.js” file from “<CRMSelfservice Directory>\script\client\” folder (here you need to check your local machine/server directory path/folder where Self Service Portal is installed). Find the “dateFormat” parameter in this page and specify the date format as per your need. Please refer below screenshot for your reference.
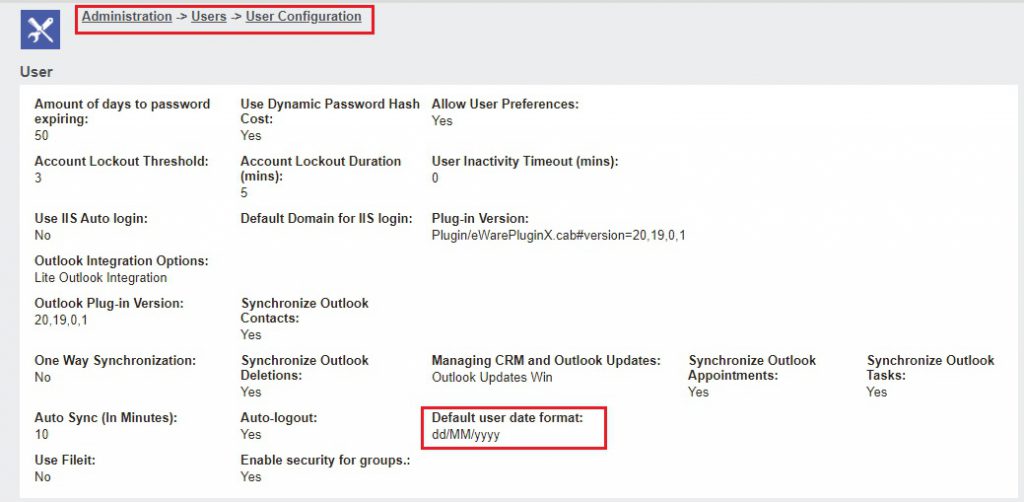
- Date field added on Search Screen: If you have added date field in search screen then it takes reference from the date format set in the User Configuration in CRM. To change the same follow below steps.
- Login to Sage CRM.
- Go to Administration -> Users -> User Configuration -> Change.
- Set the value in “Default user date format” field as per your need and save.
Once you make the above changes, you will be able to view the new format of date fields in the Self Service portal.
About Us
Greytrix – a globally recognized and one of the oldest Sage Development Partner is a one-stop solution provider for Sage ERP and Sage CRM organizational needs. Being acknowledged and rewarded for multi-man years of experience, we bring complete end-to-end assistance for your technical consultations, product customizations, data migration, system integrations, third party add-on development and implementation competence.
Greytrix helps in upgrading Sage ERP and CRM to the latest version and provides migration for Sage Intacct from Sage 300, Sage 100, Sage 50 and QuickBooks; for Sage 100, Sage 300 (Sage Accpac), Sage X3 from Sage Pro, Sage 50 US, Sage 50 CA, Sage 50 US, Sage Business Works, Sage Business Vision and QuickBooks; for Sage CRM from Salesforce | ACT! | SalesLogix | Goldmine | Sugar CRM | Maximizer
For more information on Sage ERP – CRM migration solutions, please contact us at erpmig@greytrix.com. We will like to hear from you.