We all know that whenever our Sales/Marketing personnel are on the go, it’s not always possible to stay connected to internet all the time. Also we cannot afford them using anything except SageCRM to gather details. Sage CRM offline client provides greater flexibility to Sales/Marketing people to be on site and gather all the information on the go. Once they are online they can simply synchronize the data with production CRM database. This feature of CRM has a positive impact on the performance and profitability of the organization.
GUMU Integration: Your Sage 100 ERP data anytime, anywhere over the web or mobile/tablet devices
Here is how you can implement the offline client feature.
1. Install the Solo Server.
The installation process for Solo Server is almost identical to the installation process for a typical Sage CRM installation except an additional screen displayed after the User information dialog box that prompts for the solo client license key.
2. Enable the users who must be able to work offline.
To enable users for Solo in a mixed license install, their license type must be first set to Named. The error “License type field must be set to Named User if Allow Offline Access is selected” displays if you try and enable a solo user that isn’t named.
To enable a user as a Solo Client:
1. Select Administration | Users | Solo
2. Select the Users Summary tab. A List of all users in the system is displayed.
3. Select the Change action button.
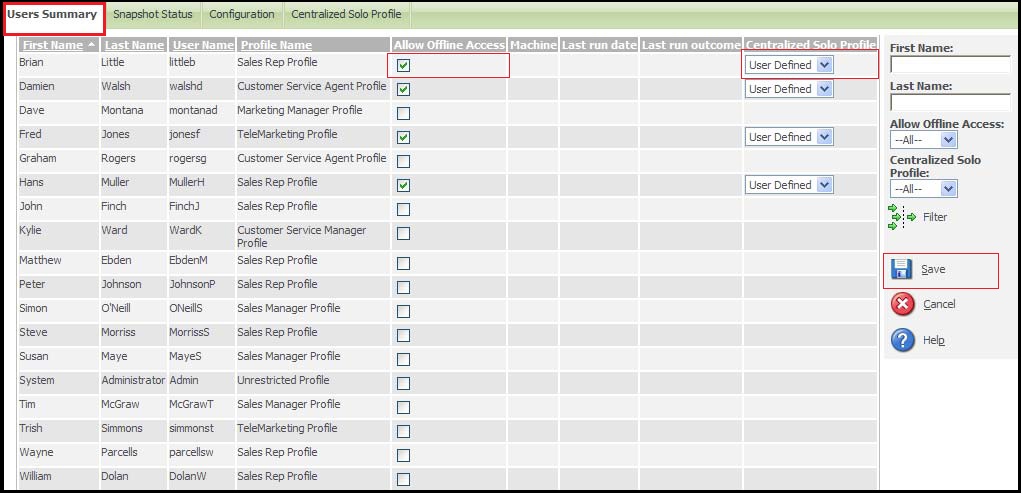
4. Select the Allow Offline Access check box for each user you want to enable as a Solo Client. When a user is enabled for offline access, a drop-down appears in the Centralized Solo Profile column. The default Centralized Solo Profile is user defined. Solo clients with user defined profiles will be able to determine what information they pull down from the server themselves by navigating to the Solo client tab in My CRM and selecting data from the options available on the My Solo contacts and Additional Solo Data panels.
5. Select the Save action button. All of the users you specified are enabled as Solo Clients. You will notice that the Allow Offline Access field in Administration | Users | Users is automatically set to Yes once you enable a user on the Users Summary Page.
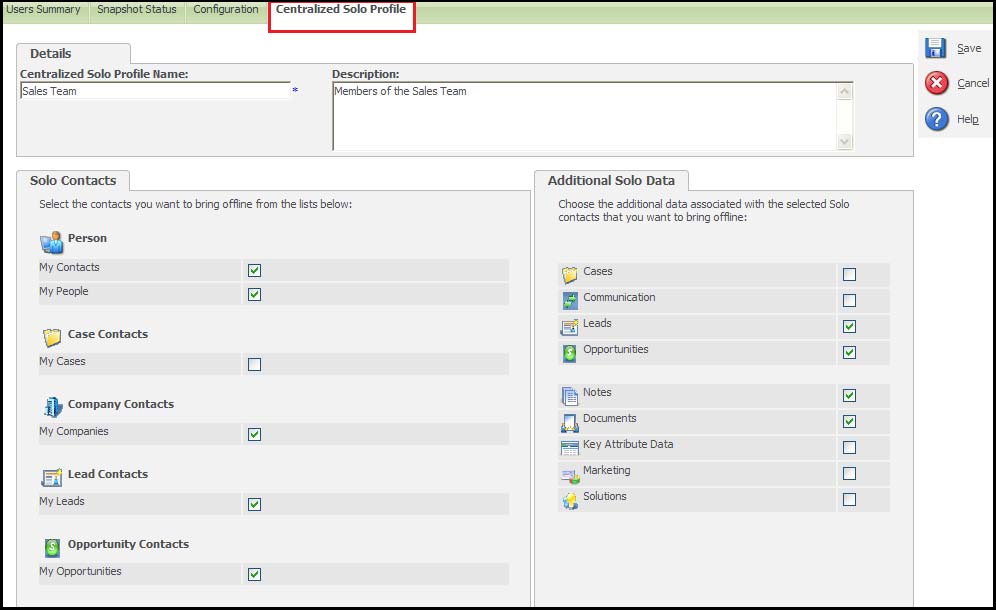
3. Set up Centralized Solo Profiles.
Select Administration | Users | Solo | Centralized Solo Profile and click the New action button. The Centralized Solo Profile Details page is displayed. After you have entered a profile name and description, you can select which data you want users with this particular profile to have offline access to. You can choose data from the Solo Contacts and Additional Solo Data panels.
4. Install, or instruct users on how to install the Solo Client on each machine requiring offline access to CRM.
a.Log onto CRM and select the Solo Client tab.
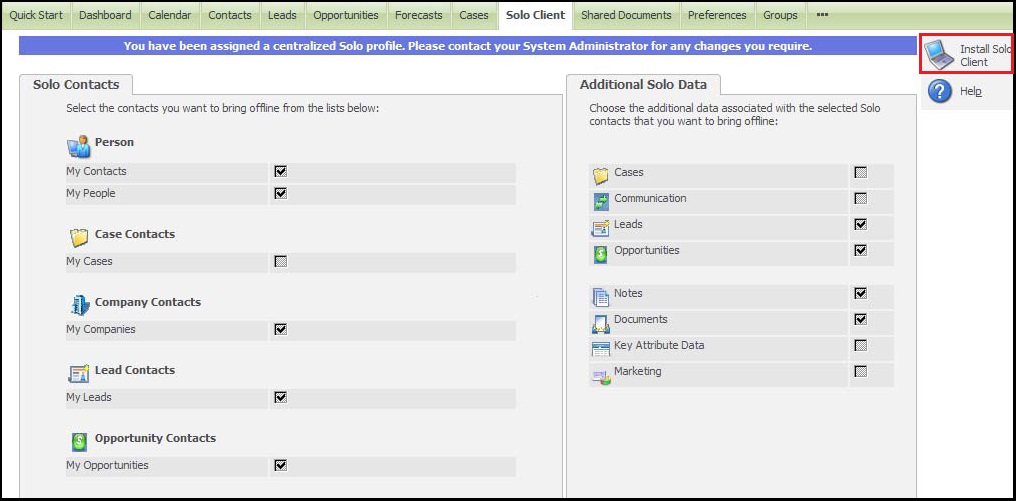
b. Select the Install Solo Client action button on the right-hand side of the screen. A Security dialog box is displayed.
c. Select Install to install the Solo Client Install Plugin.
d.Select Yes to accept the licensing agreement. The Solo Client Install dialog box is displayed.
e. Online Help will be installed on the Solo Client by default. However, if you do not want to install Online Help, you can deselect the Download Online Help option on the Solo Client Install dialog box.
f. Select the location for the Solo Client program files using the Browse button and select Next, or keep the default location by simply selecting Next.

The New Stuff: How log files are maintained in Sage CRM
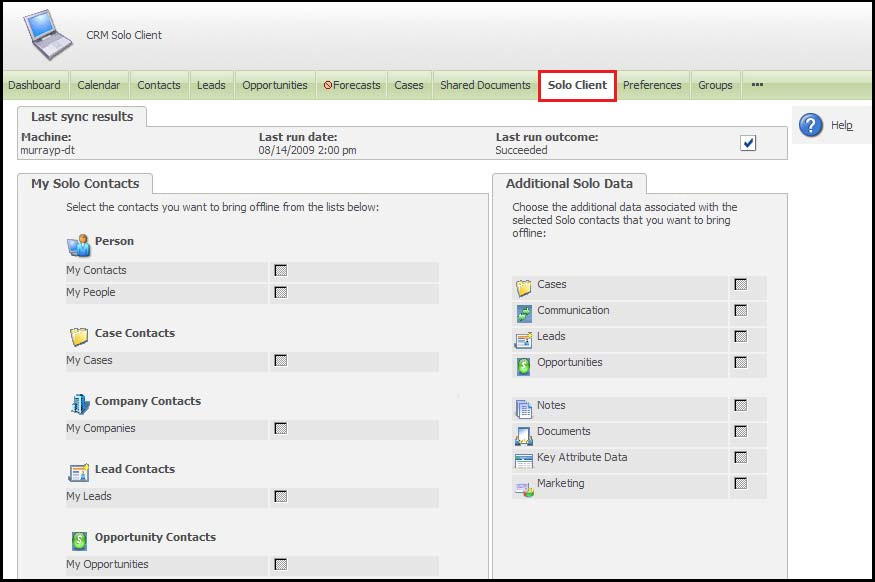
5. Instruct users on how to synchronize with the Solo Server.
1.Once the Solo Client install is completed, Login to CRM. When you log on for the first time, a system initialization is carried out.
Note: You are not synchronizing with the Solo Server at this point.

2. Once the initialization is complete, you are presented with the Solo Synch Summary screen, which informs you that you need to synchronize with the Solo Server before CRM records are available to you as part of the Solo Client installation.

3. You are logged back into the system automatically once the synchronization is complete.
The records specified in your Centralized Solo Profile are now available on the Solo Client tab.
Also Read:
1) XML based Fusion charts in COM API
2) Proxy Setting in CRM
3) Restrict Sensitive Information
4) Custom Icons for entities
5) You may need to recreate views manually – II