Dashboards make your life easier hence new versions of SageCRM are also concentrating on making them more interactive, easier to understand and develop. We can create dashboards based on all the entities on the fly.
You can also integrate web applications like Facebook, Twitter and Market Tickers etc. to access from your History (Dashboard) area.
Related Post: Market Trend Right On Your Dashboard
As you know every organization implements internet security in order to block websites under specific categories. Now there are chances that the widgets, web elements used on your dashboards might also get blocked because of this. SageCRM provides the Proxy settings to handle this scenario. When you configure these settings, CRM will refer Proxy Address parameters to bypass internet settings and access your web based applications.
You can find this feature under Administration | System | Proxy Setting section.
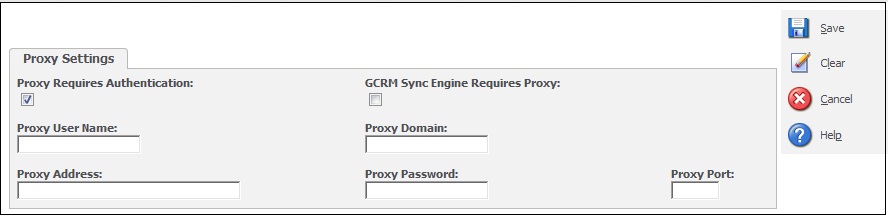
Here is what you can set.
Proxy User Name: Proxy user name. This field is required if the first check box is selected.
Proxy Domain: Proxy domain. This field is required if the first check box is Selected.
Proxy Address: Proxy address. This field is required if the first check box is Selected.
Proxy Password: Proxy password.
Proxy Port: Proxy port. (e.g. 25)
Proxy Required Authentication: Select if the proxy requires authentication
Also Read:
1) Restrict Sensitive Information
2) Custom Icons for entities
3) You may need to recreate views manually – II
4) Adding new fields on Web Order Item Entry screen
5) DOT NET API configuration and compatibility Issues