Sage CRM – Tips, Tricks and Components
Greytrix is one of the oldest Sage Development Partner of two decades for Sage CRM and has been awarded "Sage Development Partner of the Year" three times in the past years. Greytrix has been working on customization and configuration of products in Sage CRM since decades and have accumulated hundreds of man years of experience. In these blogs, Greytrix will endeavour to share its knowledge and expertise and save upto 90% of project cost for Sage CRM users by presenting a list of useful small components, tools and add-ons for Sage CRM! Contact us at sage@greytrix.com
Follow us on LinkedIn Follow us on Twitter Follow us on Facebook Follow us on YouTube
Skip to content
  • Home

Include your Company Logo in Sage CRM Reports

By greysagecrm | September 24, 2014
0 Comment

Sage CRM has reporting feature which allows one to represent data in rich graphic and interactive graphs. Reports data can be exported into PDF and Excel formats. These reports can be further customized as per business requirements.
In our previous blog, we had explained how images can be embedded into Sage CRM reports. https://www.greytrix.com/blogs/sagecrm/2013/10/07/showing-images-in-sage-crm-reports/
New Stuff: Price Calculation for Non-promoted customer in Sage CRM (prospect)
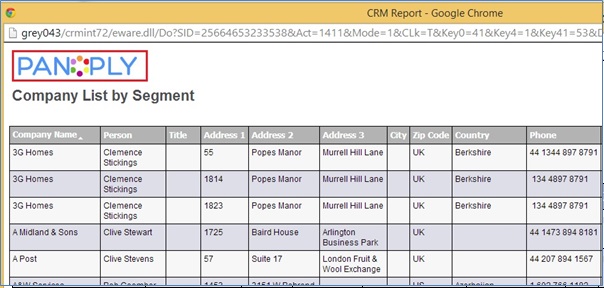
Consider you wanted to include your company logo in Sage CRM report. Currently when reports are printed in Sage CRM, you will observe that the default Panoply Logo gets displayed on the left hand side of report. Refer below screenshot.
Reports1
This image can be easily changed as per needs. You just need follow the below mentioned steps.
1) Navigate to Reports folder of Sage CRM installation directory.
<<Sage CRM Installation directory>>Program Files (x86)SageCRM<<CRM Instance>>WWWRootReports
2) You will observer logo.jpg and pdflogo.jpg files in the Reports folder. Delete both this files; Make sure you backup these files before deleting.
3) Place your company logo in the Reports folder and rename your Company logo to logo.jpg and pdflogo.jpg
4) Run IISRESET command and print the reports.
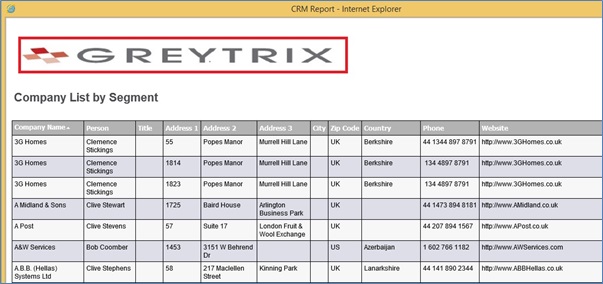
Now when you print reports in Sage CRM you will observe your logo is included in Sage CRM Reports.
Report Printed on Screen:

Reports2
Report Printed in PDF:
Reports3
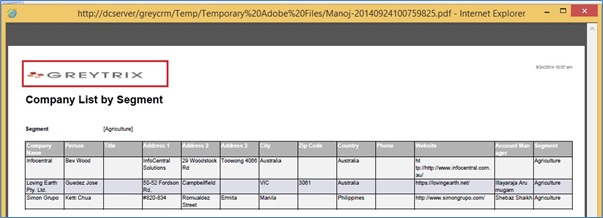
In this way one can easily include their own company logo in Sage CRM reports.

Also Read:
1) Generating simple reports in Sage CRM
2) Steps to generate complex reports in Sage CRM using Advanced Find
3) Forecasting – Reports to field in CRM
4) Opening TCP-IP port to access SLX Web Reports from outside network
5) Historical Reports – Opportunity Closing History

Related Posts

  • Sage CRM with Sage Pro Multi Company
  • Integrate Multiple Sage 500 company code with Sage CRM
  • Generating simple reports in Sage CRM
Category: CRM72 Logo Report Reports To Sage CRM Sage CRM 7.1 SP2 Sage CRM 7.2 Tags: Company, CRM7.0, Include, Logo, reports, Sage CRM, Sage CRM 7.0, Sage CRM 7.1, Sage CRM 7.2
Post navigation
← Price Calculation for Non-promoted customer in Sage CRM (prospect) GUMU for Sage CRM – QuickBooks integration – Synchronization processes →

Greytrix Website and Blogs

  • Greytrix
  • GUMU™ Cloud
  • Greytrix Africa
  • Greytrix Australia
  • Sage X3 – Tips, Tricks and Components
  • Sage 100 & 500 ERP Tips and Tricks
  • Sage 300 – Tips, Tricks and Components
  • Salesforce.com Tips and Tricks by Greytrix
  • Sage Business Cloud – Tips, Tricks and Components
sage crm integration

Recent Posts

  • Edit File without installing plugin in Sage CRM 2023 R1
  • Enhanced Email Import in Sage CRM 2023 R1
  • Narrative Summary for Company in Sage CRM 2023 R1
  • Integrate Sage CRM with Microsoft Office 365 Part using OAuth2.0
  • Sage CRM: Troubleshooting New E-mail issue

Archives

Awards

Greytrix Top ISV Partner
Greytrix Revenue Growth Enterprise Business
Greytrix Africa Highest Revenue
Greytrix Prtner of the Year
Greytrix Partner Award
Copyright 2023
Sage CRM – Tips, Tricks and Components
Iconic One Theme | Powered by Wordpress