Sage X3 uses Mongo DB as a storage database for the Administration Module. It also acts as part of the first layer of security alongside the Syracuse Component. Just like Microsoft SQL and Oracle DB; Mongo DB also needs to be backed up. In this blog we will see how to take a backup of MongoDB and how to restore the procedure.
New Stuff:- Top 3 Benefits of Greytrix Professional Services
To take the backup first need to check below pre-requisite.
- Sage X3 needs to be installed on the server with same version and patch level.
- Both the server needs to have MongoDB Compass downloaded i.e. from where the data of MongoDB will be extracted and to where it will be restored.
Below are the steps needs to be followed to export and import data from MongoDB from one server to another:
- Download the stable version MongoDb Compass as per the platforms you use.
- Run the Application file with the name “”MongoDBCompass” from the downloaded folder.
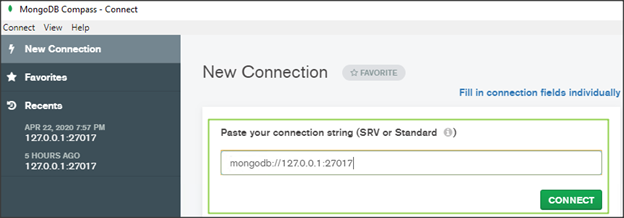
- Enter the connection string as “ mongodb://127.0.0.1:27017 ” and click on CONNECT button to connect to the link.
- After the successful connection application will take you to the home page which will show the database.
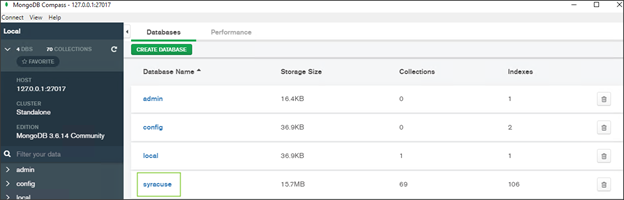
In the above screenshot you can see the “syracuse” is the one in which Sage X3 saves all the data of Administration module.
Click on Syracuse Option.
- After clicking on the syracuse database it will take you to Administration
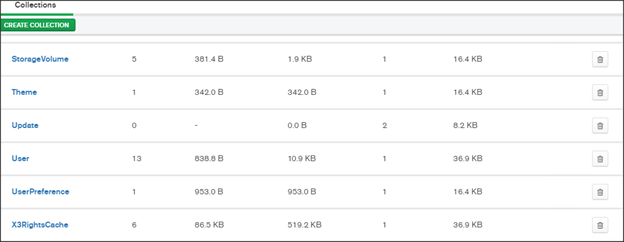
Out of all the functions the one can decide which all functions data needs to be extracted from one server and restore it in another server.
- Below we will see exporting the MongoDB data.
From the above list user can extract data of below mentioned function. (As per requirement this is just an example.)
- Groups
- Roles
Below are the steps to extract data from the function through MongoDB compass.
- Groups :
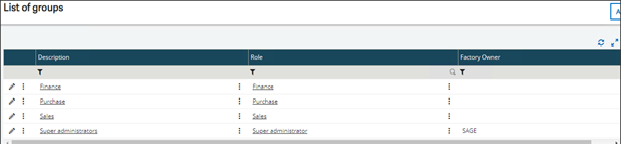
In Sage X3 currently we have 4 groups out of which 1 “Super Administrator” is the standard group which comes with the Sage X3 installation.
a. Click on Group on MongoDb compass.
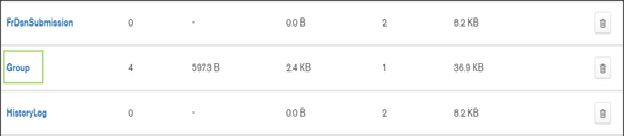
b. Once clicked it will take you to the below screen. In which this symbol is the export button through data gets extracted.

c. Click on the export button it will take to the following screen.
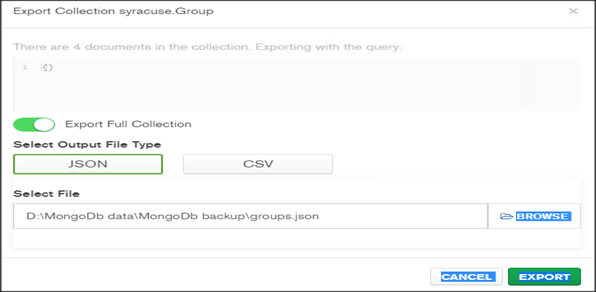
- Click on Browse and select the path where you want to store the data and name the file with .json extension. In the above image we have named the file as Groups.json.
- Once finished go back to the selected path you will see a .json file. This file has all the groups available in Sage X3.
2. Roles :
In Sage X3 currently we have 57 roles out of which 3 “Purchase, Sales, Finance” are the ones manually created rest all are the standard ones.
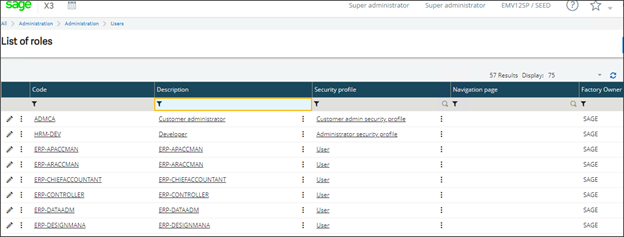
a. Click on Role

b. Once clicked it will take you to the below screen. In which this symbol is the export button through data gets extracted.
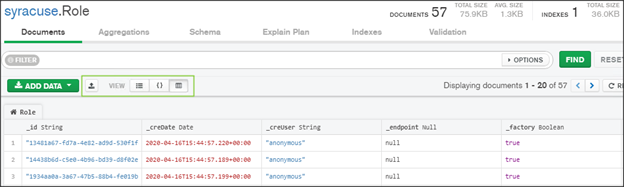
c. Click on the export button it will take to the following screen
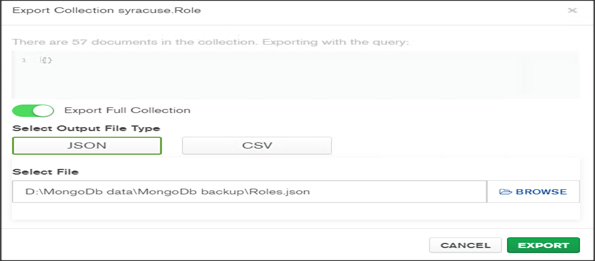
- Click on Browse and select the path where you want to store the data and name the file with .json extension. In the above image we have named the file as Roles.json.
- Once finished go back to the selected path you will see a .json file. This file has all the roles available in Sage X3.
In a same way you can export rest of the data.
Here we will see how to restore the exported .json files into another server.
Move all the exported .json files to the new server where there is already Sage X3 is installed with same version and patch level.
Note: As mentioned earlier the exported files contains all the data from their respective function even the standard data which comes automatically after the Sage X3 installation. We need to delete the standard data so that it doesn’t get duplicated after the import.
To delete the standard data open the .json file through Notepad ++, this make easier to identify and delete the data:
Once you delete the date, the .json file is ready to get imported. Below are the steps to import the extracted data:
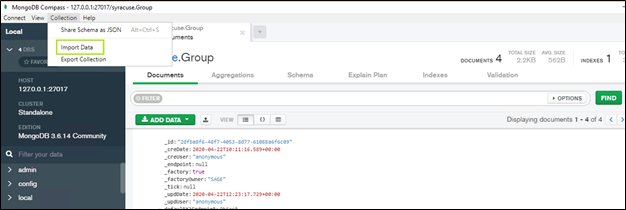
a. Open the MongoDB Compass by following the steps mentioned in point 1 mentioned above at the start.
b. Click on Syracuse database and from the following window click on Group function.
c. Click on the Import Data as highlighted in the below image.
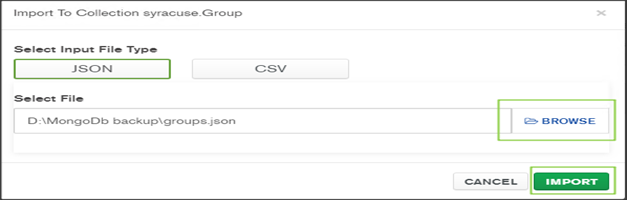
d. Click on Browse and select the json file and click on Import.
e. Now login Sage X3 and click on Groups from Administrator module there you will see new groups added.
f. Edit all the new groups added. In Endpoint section add all the folders and Save
Roles:
Even for roles we have to delete the Standard roles and import the manually created roles. Below are the steps:
a. Open the Roles.json file using Notepad ++. Identify the standard roles and delete them by selecting the lines and Save the file. All the new roles created in Sage X3 you will find it in the bottom of the json file above that line all are standard ones.
b. Now the .json file is ready to get imported next go to MongoDB compass click on Roles function going to Syracuse database and click on Import Data.

About Us
Greytrix – a globally recognized and one of the oldest Sage Development Partners is a one-stop solution provider for Sage ERP and Sage CRM organizational needs. Being acknowledged and rewarded for multi-man years of experience and expertise, we bring complete end-to-end assistance for your technical consultations, product customizations, data migration, system integrations, third-party add-on development, and implementation competence.
Greytrix has some unique integration solutions developed for Sage CRM with Sage ERPs namely Sage X3, Sage Intacct, Sage 100, Sage 500, and Sage 300. We also offer best-in-class Sage ERP and Sage CRM customization and development services to Business Partners, End Users, and Sage PSG worldwide. Greytrix helps in the migration of Sage CRM from Salesforce | ACT! | SalesLogix | Goldmine | Sugar CRM | Maximizer. Our Sage CRM Product Suite includes addons like Greytrix Business Manager, Sage CRM Project Manager, Sage CRM Resource Planner, Sage CRM Contract Manager, Sage CRM Event Manager, Sage CRM Budget Planner, Gmail Integration, Sage CRM Mobile Service Signature, Sage CRM CTI Framework.
Greytrix is a recognized Sage Champion Partner for GUMU™ Sage X3 – Sage CRM integration listed on Sage Marketplace and Sage CRM – Sage Intacct integration listed on Sage Intacct Marketplace. The GUMU™ Cloud framework by Greytrix forms the backbone of cloud integrations that are managed in real-time for the processing and execution of application programs at the click of a button.
For more information on our integration solutions, please contact us at sage@greytrix.com. We will be glad to assist you.
c.. Click on Browse and select the json file and click on Import the same way we did for groups.
d. Now login Sage X3 and navigate to roles function you will notice 3 new roles added apart from 54 roles which are standard ones.
e. Edit all the 3 newly added roles. Select badges as ERPFULL and security profile as User and click on Save.
Similarly you can import data for users also.
This is how we can extract the data from the mongodb backup database using the MongoDB Compass from one system and Import the same in to another system. This MongoDb backup and restore process is mostly used to move groups, Roles, Users, LDAP from one x3 system to another.