Printing & applying labels on the products helps user to trace the inventory. This help overall business to track in an out of the stock. In our last blog we have shown you how we have developed rejection label. This blog will help you to understand another label which is Approved Label. Whenever a company manufactured or procured some inventory from suppliers, company has to do quality process for those inventory before selling it further. So using Quality control module in Sage X3, users actually does the quality check of the inventory and segregate the stock based on the parameters. So the stock which gets approved, user apply the label which is called as Approved label where data is getting displayed from the Quality Analysis request entry of the Quality Control and PO receipt screen.
Refer below identification code for product status)
- “A “indicates acceptance status for the product.
- “Q “indicates pending validation status for the product.
- “R “indicates the Rejection status for the product.
Approved Labels will be displayed based on the Qty present in the “Quantity Qualified PAC” field of Quality Control screen.
Now let’s see how the data will be displayed from Purchase Receipt and Quality Control screen.
According to setup, once the user creates a Receipt entry from the PO with the status “Q” then only the Analysis request gets created automatically. (Refer below screenshot for more Clarification)
New Stuff: To Design the screen with the responsive screen
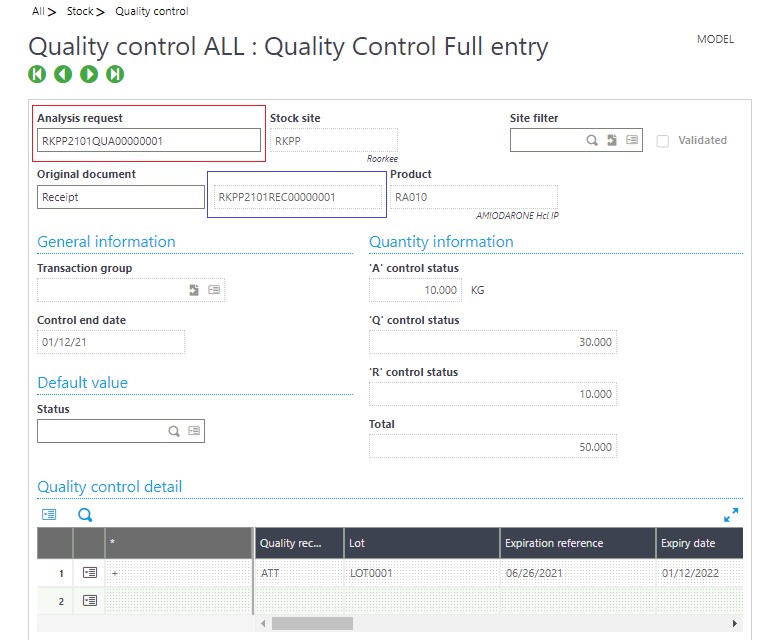
If you can see in the above screenshot, in the Quality control screen, the Analysis request has been created successfully based on the Purchase Receipt entry also we have highlighted the same Receipt number with the blue Border and the Analysis request with the Red Border for your reference.
Now as per the current client’s requirement, the “Approved label” should be printed based on the Qty Present in the “Quantity Qualified PAC” field from the detail line -> Enter Quality Control Detail -> Quantity Qualified PAC field , if 10 Qty is present in the “Quantity Qualified PAC” field then as per the qty 10 labels will be printed respectively for each Product.
And Approved Qty will be displayed based on the qty entered in the “Quantity Qualified STK” field in the Quality Control screen. Exact path for the Approved Quality is Control screen -> detail line -> Enter Quality Control Detail -> Quantity Qualified STK field.

Refer below details of some fields and mappings for each field of Approved label.
- APPROVED: Hardcoded Text.
- Product Name: – All –Stock—Quality Control –Product (need to display Product description field)
- A.R NO: – All –Stock—Quality Control –Analysis Request
- Container No: – This will be the “Quantity Qualified PAC” field value that needs to be considered here and based on the same, the number of Labels should be displayed.
- Assay: All –Stock—Quality Control –Quality control Detail-Action button—Quality control–Assay
By using the Approved label concept, the user can print labels product-wise based on the Qty present in the “Quantity Qualified PAC” field of Quality Control screen along with the exact Approved Qty for each label and above mentioned details.
About Us
Greytrix – a globally recognized and one of the oldest Sage Development Partners is a one-stop solution provider for Sage ERP and Sage CRM organizational needs. Being acknowledged and rewarded for multi-man years of experience and expertise, we bring complete end-to-end assistance for your technical consultations, product customizations, data migration, system integrations, third-party add-on development, and implementation competence.
Greytrix has some unique integration solutions developed for Sage CRM with Sage ERPs namely Sage X3, Sage Intacct, Sage 100, Sage 500, and Sage 300. We also offer best-in-class Sage ERP and Sage CRM customization and development services to Business Partners, End Users, and Sage PSG worldwide. Greytrix helps in the migration of Sage CRM from Salesforce | ACT! | SalesLogix | Goldmine | Sugar CRM | Maximizer. Our Sage CRM Product Suite includes addons like Greytrix Business Manager, Sage CRM Project Manager, Sage CRM Resource Planner, Sage CRM Contract Manager, Sage CRM Event Manager, Sage CRM Budget Planner, Gmail Integration, Sage CRM Mobile Service Signature, Sage CRM CTI Framework.
Greytrix is a recognized Sage Champion Partner for GUMU™ Sage X3 – Sage CRM integration listed on Sage Marketplace and Sage CRM – Sage Intacct integration listed on Sage Intacct Marketplace. The GUMU™ Cloud framework by Greytrix forms the backbone of cloud integrations that are managed in real-time for the processing and execution of application programs at the click of a button.
For more information on our integration solutions, please contact us at sage@greytrix.com. We will be glad to assist you.