Sage Enterprise Intelligence empowers business users, managers, and executives to produce and analyse business reports, dashboards, and views.
In SEI data models, we can add fact table and other tables as well and we can add columns from that tables in data models as a dimension or a measure in dashboard and views. But sometimes we require different value rather than the value of existing columns so for that we need to create a new calculated column to fetch the required value.
Following are steps to add calculated column in data model of SEI.
- For adding calculated column, in data model screen of SEI there are two methods to add calculated column as follows:
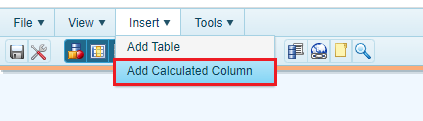
- There is an Insert button in above row of SEI data model screen. Click on Insert button as shown in figure 1. There are two buttons for adding table and second one is ‘Add calculated column’. You have click on this button to add a column.
- Second method to add calculated column is clicking on already given add calculated column icon in second row of data model screen as shown in figure 2.
2. After clicking on Add calculated column button using any of the above method, one new column is added to the data model fields as a last field. If you want to add new column in between any field of data model then first you need to select the field and then you have to click on Add Calculated Column button. It will display new field after the existing field which you wanted to add next of it as shown in figure 3.
3. As shown in figure 3, New calculated column is added in your data model, you can change Column heading for that field. You can set visibility level and format for that field. Format can be Number, Percentage or currency. In format you can set decimal places, leading zeros, symbols and negative format as well. Also, you can choose column type for calculated field such as Dimension Key, Dimension Data, Measure Data, Measure Calculated and Description Data. Also, you can set description field, description format, sort order and in advanced you can choose datatype for that calculated field.
4. Now main thing is to do a calculation to display value of that field. For this we need to create formula or need to write code in SQL Script Builder.
5. For writing script, we need to click on calculation field from that new field. After clicking on that, it will open SQL script builder as shown in below figure 4.
For example, if you want to display month name as January rather than 1. Then you need to write a script for that and after validating script you can use that new field in dashboard and views as shown in figure 5. It will display January rather than 1, February rather than 2 using other fields or using functions.
By following above steps, you can create new calculated field rather than existing table fields from data models in SEI dashboard and views.
We may add calculated columns for necessary data to SEI views and dashboards by doing the above steps.
About Us
Greytrix – a globally recognized and one of the oldest Sage Development Partners is a one-stop solution provider for Sage ERP and Sage CRM organizational needs. Being acknowledged and rewarded for multi-man years of experience and expertise, we bring complete end-to-end assistance for your technical consultations, product customizations, data migration, system integrations, third-party add-on development, and implementation competence.
Greytrix has some unique integration solutions developed for Sage CRM with Sage ERPs namely Sage X3, Sage Intacct, Sage 100, Sage 500, and Sage 300. We also offer best-in-class Sage ERP and Sage CRM customization and development services to Business Partners, End Users, and Sage PSG worldwide. Greytrix helps in the migration of Sage CRM from Salesforce | ACT! | SalesLogix | Goldmine | Sugar CRM | Maximizer. Our Sage CRM Product Suite includes addons like Greytrix Business Manager, Sage CRM Project Manager, Sage CRM Resource Planner, Sage CRM Contract Manager, Sage CRM Event Manager, Sage CRM Budget Planner, Gmail Integration, Sage CRM Mobile Service Signature, Sage CRM CTI Framework.
Greytrix is a recognized Sage Champion Partner for GUMU™ Sage X3 – Sage CRM integration listed on Sage Marketplace and Sage CRM – Sage Intacct integration listed on Sage Intacct Marketplace. The GUMU™ Cloud framework by Greytrix forms the backbone of cloud integrations that are managed in real-time for the processing and execution of application programs at the click of a button.
For more information on our integration solutions, please contact us at sage@greytrix.com. We will be glad to assist you.