In Sage X3, when we add a field with dimensions, it will display a description only for the first field/dimension, while the others remain blank, as shown in the following figure. Here, we’ll explore a step-by-step guide on how to change the headings of dimension fields in Sage X3, utilizing local menus and evaluated titles.
New Stuff : How to add a field in data model designer in SEI


Step 1: Creating Local Menu – Message
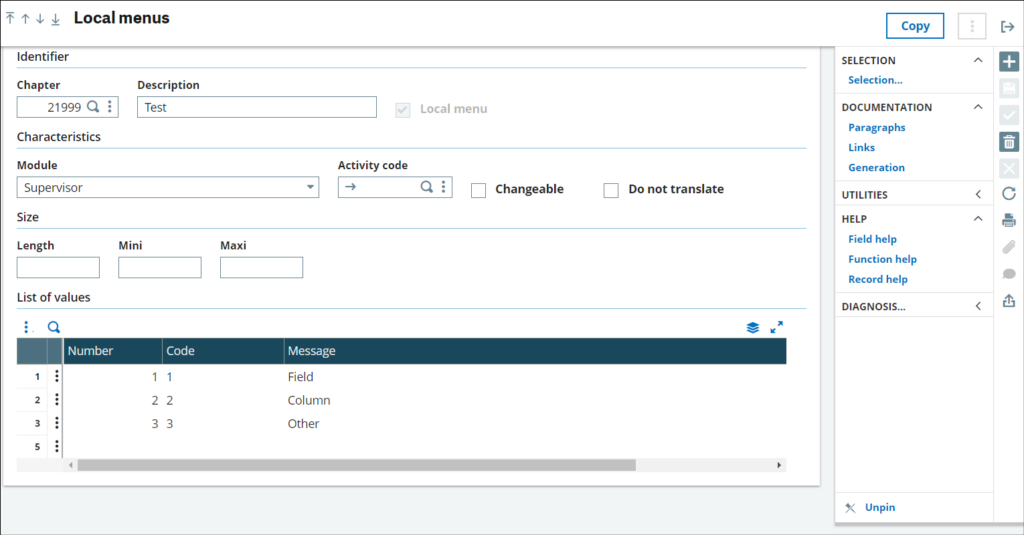
The first step involves creating a Local Menu – Message corresponding to the number of dimensions you want to assign headings to.
For instance, if you have a field named ‘ZTEST’ with three dimensions, you’ll need to create a Local Menu – Message with three values, each representing a dimension header.

Step 2: Modifying Field Descriptions
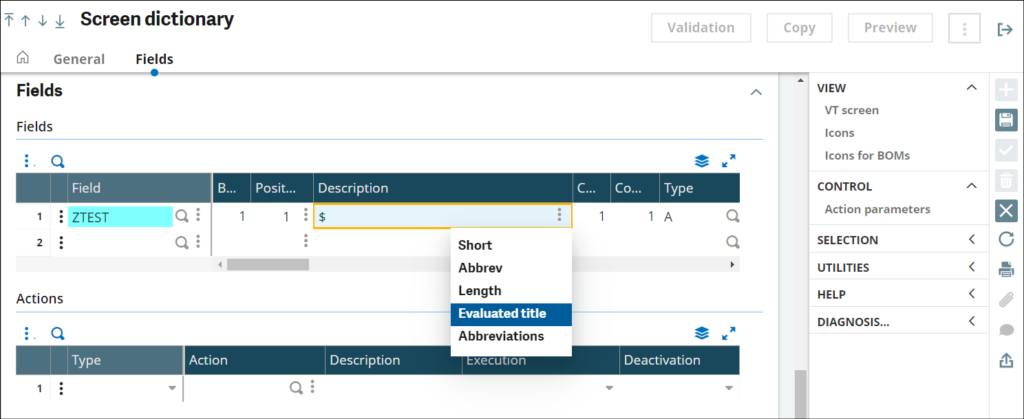
Navigate to the development screen and select the dimension field whose heading you want to change. Replace the description with a ‘$’.

Step 3: Setting Evaluated Title
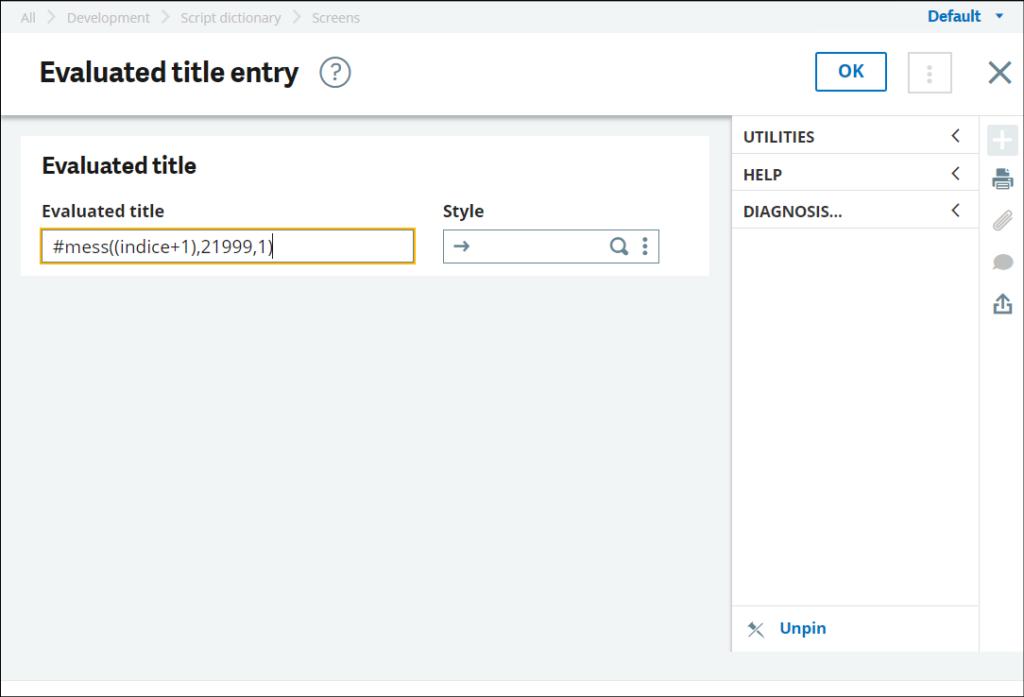
After changing the description to ‘$’, click on the three dots next to the field and select the ‘Evaluated title’ option. This action will open a new screen where you can enter a formula in the ‘Evaluated title’ field.

Formula Example:
#mess(Local Menu Code, Local Menu Chapter, 1)In the formula, the mess function is used to print the title. It takes three parameters:
- The Local Menu Code.
- The Local Menu Chapter.
- A value (0 or 1) to access the Adonix message file or otherwise.
For instance, if we have a formula like #mess((indice+1), 21999, 1), the first parameter (indice+1) will iterate through all Local Menu Codes, the second parameter (21999) assigns the Local Menu Chapter, and the third parameter (1) denotes the currently selected language.

Step 4: Saving and Previewing Changes
After adding the formula, click ‘OK’ and save the changes. Validate your screen, then navigate to the Window menu and preview your screen. You should now see the different title headers for dimensions as per the Local Menu – Message values set earlier.

By following these steps, you can effectively customize the headings of dimension fields in Sage X3, ensuring clarity and ease of use for users interacting with your system. This simple customization can significantly improve the user experience and streamline data management processes.
About Us
Greytrix – a globally recognized and one of the oldest Sage Development Partners is a one-stop solution provider for Sage ERP and Sage CRM organizational needs. Being acknowledged and rewarded for multi-man years of experience and expertise, we bring complete end-to-end assistance for your technical consultations, product customizations, data migration, system integrations, third-party add-on development, and implementation competence.
Greytrix has some unique integration solutions developed for Sage CRM with Sage ERPs namely Sage X3, Sage Intacct, Sage 100, Sage 500, and Sage 300. We also offer best-in-class Sage ERP and Sage CRM customization and development services to Business Partners, End Users, and Sage PSG worldwide. Greytrix helps in the migration of Sage CRM from Salesforce | ACT! | SalesLogix | Goldmine | Sugar CRM | Maximizer. Our Sage CRM Product Suite includes addons like Greytrix Business Manager, Sage CRM Project Manager, Sage CRM Resource Planner, Sage CRM Contract Manager, Sage CRM Event Manager, Sage CRM Budget Planner, Gmail Integration, Sage CRM Mobile Service Signature, Sage CRM CTI Framework.
Greytrix is a recognized Sage Champion Partner for GUMU™ Sage X3 – Sage CRM integration listed on Sage Marketplace and Sage CRM – Sage Intacct integration listed on Sage Intacct Marketplace. The GUMU™ Cloud framework by Greytrix forms the backbone of cloud integrations that are managed in real-time for the processing and execution of application programs at the click of a button.
For more information on our integration solutions, please contact us at sage@greytrix.com. We will be glad to assist you.

