The Signature Workflow is a feature provided by Sage that enables automatic signatures for records that are either modified or created by the first-level user defined in the Assignment rule. Once the user signs the record, the status changes to “Signed” for that user, and the record is then passed on to the next level of users for signature, as defined in the Assignment rule.
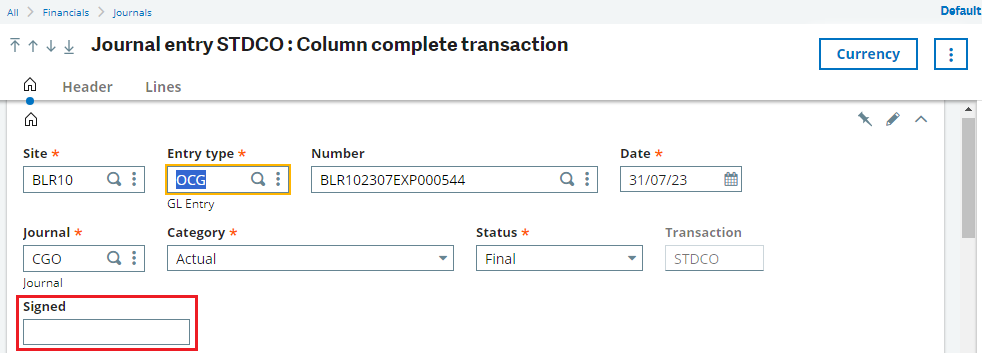
For one of our clients, we have configured a Signature Workflow for the Journal Entry screen in Sage X3. This workflow allows approval by any user defined in the Assignment rule. To achieve this, we introduced a field labeled ZAPPFLG (Signed) within the Journal Entry header screen. We then implemented the corresponding code in the SPEGAS script. Upon approval, the ZAPPFLG field is updated with a value from the local menu 280, where the values signify: 1: No, 2: In part, 3: In full, 4: Not managed, 5: Automatic.
Note: The Local Menu description may change based on the patch of X3.
New Stuff: Validation on Company name and GST number fields
Follow the below steps to achieve the above requirement :
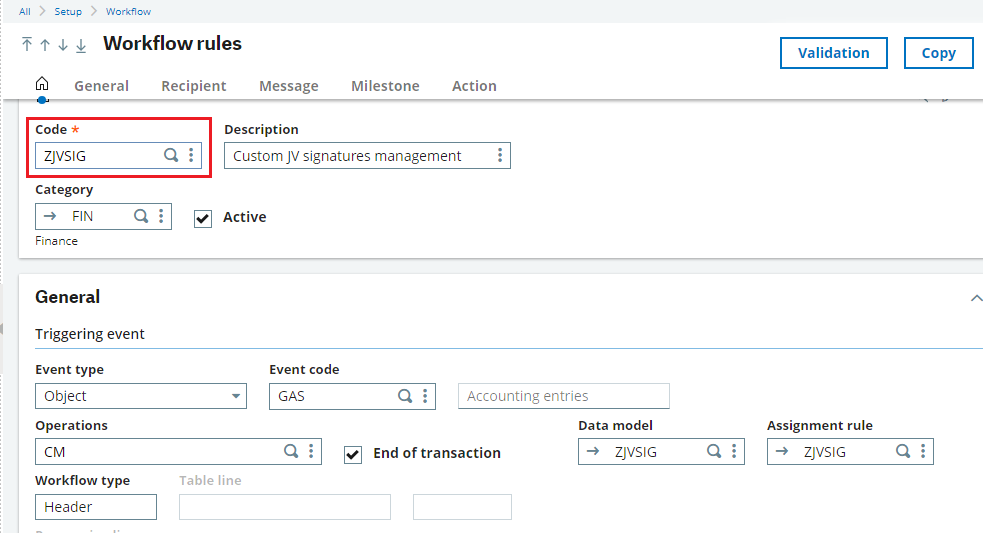
Create the main Workflow for Custom JV signatures management.
Step 1:
-All -> Setup -> Workflow -> Workflow Rules
-Create a Workflow rule with code ZJVSIG (Create the duplicate of any standard workflow Ex: POHSIG and change required details) as below:
Step 2:
-Create a Data Model with Template Code: ZJVSIG (Journal Entry)
-In the Links tab -> Main table as GACCENTRY.

Step 3:
-Create an Assignment Rule with ZJVSIG (Custom Journal Entry Assignment rule).
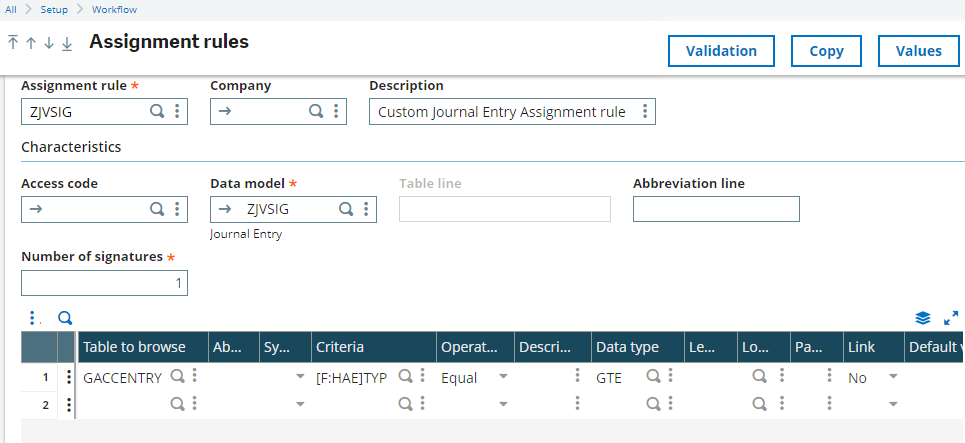
-Data Model as ZJVSIG.
-Click on values and assign the Assignment Rule as ZJVSIG.
-Keep the number of users for approval in the Number of Signatures field.
-Add the [F:HAE]TYP in the Criteria field for the JV type condition.
-In the Values section input the user’s codes.
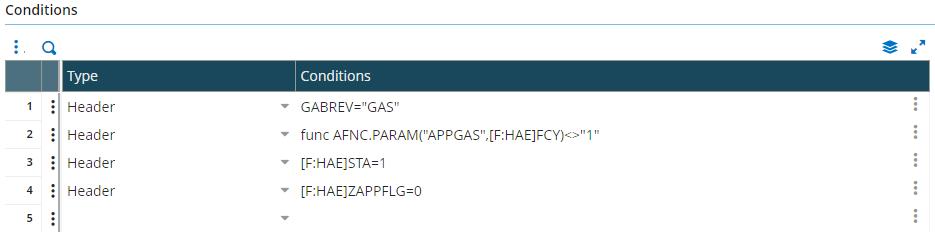
Step 4:
-Add the below header conditions for the workflow to be triggered.
Step 5:
-Add Recipients in the Recipient tab and select “Yes” in the Send mail field and “With signature” in Milestone field. (Added condition “1=2” as the client doesn’t want to send mail to any user.)
Step 6:
-Set below in the Message Tab:
-Select Any in the Management section
-Check Return Icon
-Enter the return function as SPCE
Step 7:
-Add below in the Context field of the Milestone Tab:
–[F:HAE]TYP
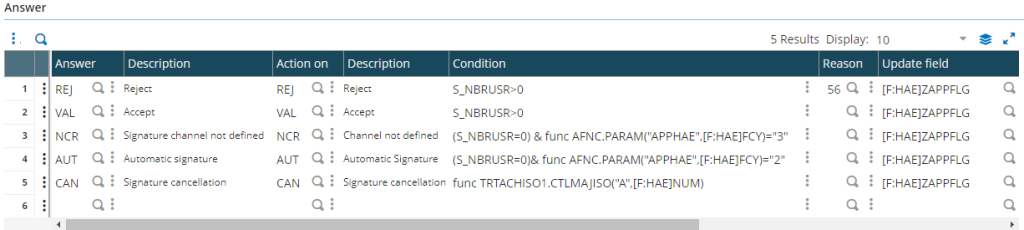
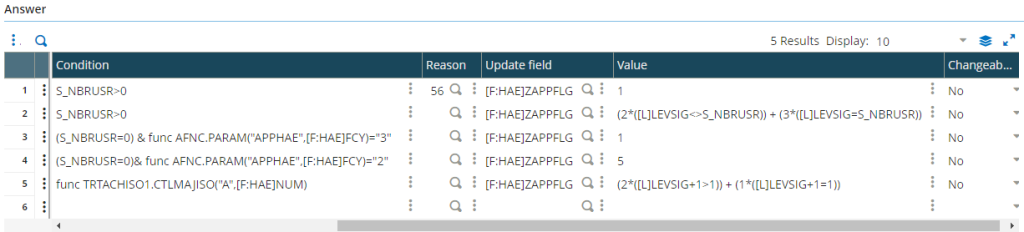
-Add the below details in the Answers of Milestone:
Create a workflow for Purchase Price No rule notification.
Step 1 :
Create a Workflow rule with ZJVHSIGNCR (Create the duplicate of any standard workflow Ex: POHSIGNCR and change the required details)
-Event code as ZJVSIG
-Set the below conditions in the header:
S_ABREV=”GAS”
[F:HAE]ZAPPFLG=1
Create a workflow for Custom JV signature.
Step 1:
Create a Workflow rule with ZJVSIGVAL (Create the duplicate of any standard workflow Ex: POHSIGVAL and change the required details)
-Event code as ZJVSIG
-Set the below conditions in the header:
S_ABREV=”GAS”
[F:HAE]ZAPPFLG=2
Creating a workflow for Custom JV Signature notification.
Step 1:
-Create a Workflow rule with ZJVSIGNOT(Create the duplicate of any standard workflow Ex: POHSIGNOT and change required details)
-Keep the event type as Signature.
-Event code ZJVSIG, which is the main workflow code.
-Operations as VAL for Accept.
-Set the below conditions in the header:
S_ABREV=”GAS”
[F:HAE]ZAPPFLG=1
Creating a workflow for Custom JV rejection.
Step 1:
-Create a Workflow rule with ZJVSIGREJ(Create the duplicate of any standard workflow Ex: POHSIGREJ and change required details)
-Keep the event type as Signature.
-Event code ZJVSIG, which is the main workflow code.
-Operations as REJ for Accept.
-Set the below conditions in the header:
S_ABREV=”GAS”
Creating a workflow for Custom JV signature cancellation.
Step 1:
-Create a Workflow rule with ZJVSIGCAN(Create the duplicate of any standard workflow Ex: POHSIGCAN and change required details)
-Keep the event type as Miscellaneous.
-Event code CAN, which is the main workflow code.
-Set the below conditions in the header:
[F:AWS]ABROBJ=”GAS”
We’ve added the 4GL code in SPEGAS scripts to set the ZAPPFLG fields as blank in case of entry creation and modification.
About Us
Greytrix – a globally recognized and one of the oldest Sage Development Partners is a one-stop solution provider for Sage ERP and Sage CRM organizational needs. Being acknowledged and rewarded for multi-man years of experience and expertise, we bring complete end-to-end assistance for your technical consultations, product customizations, data migration, system integrations, third-party add-on development, and implementation competence.
Greytrix has some unique integration solutions developed for Sage CRM with Sage ERPs namely Sage X3, Sage Intacct, Sage 100, Sage 500, and Sage 300. We also offer best-in-class Sage ERP and Sage CRM customization and development services to Business Partners, End Users, and Sage PSG worldwide. Greytrix helps in the migration of Sage CRM from Salesforce | ACT! | SalesLogix | Goldmine | Sugar CRM | Maximizer. Our Sage CRM Product Suite includes addons like Greytrix Business Manager, Sage CRM Project Manager, Sage CRM Resource Planner, Sage CRM Contract Manager, Sage CRM Event Manager, Sage CRM Budget Planner, Gmail Integration, Sage CRM Mobile Service Signature, Sage CRM CTI Framework.
Greytrix is a recognized Sage Champion Partner for GUMU™ Sage X3 – Sage CRM integration listed on Sage Marketplace and Sage CRM – Sage Intacct integration listed on Sage Intacct Marketplace. The GUMU™ Cloud framework by Greytrix forms the backbone of cloud integrations that are managed in real-time for the processing and execution of application programs at the click of a button.
For more information on our integration solutions, please contact us at sage@greytrix.com. We will be glad to assist you.