There are many situations where user need to set up the important information or messages for specific customer in ERP. Now Sage X3 is also provide the provision of setting up the messages or notes for specific customer which will further reflect in to sales document.
Today in this blog we will discuss how user can setup the messages/notes for specific customer.
New Stuff: – Manual Remittance Entry in Sage X3
Navigate to below path to setup a notes in customer screen:
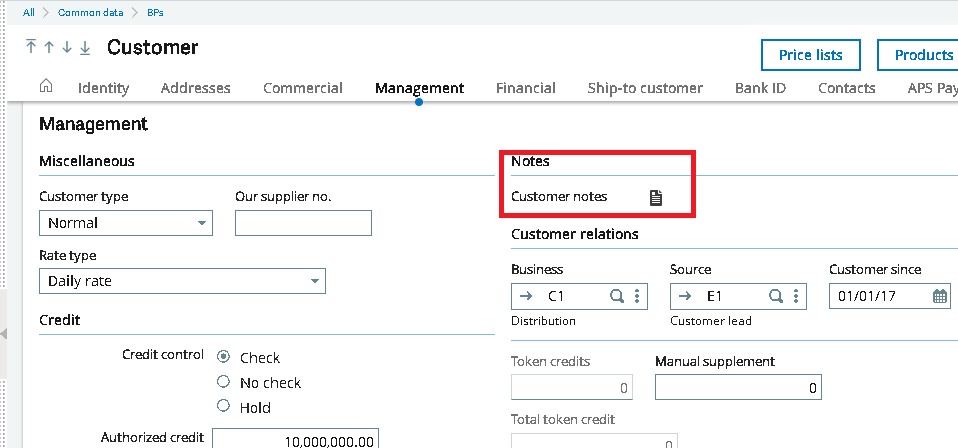
Common Data >> BP’s >> Customers >> management Tab. In the management tab you can see the notes section and Customer notes icon.
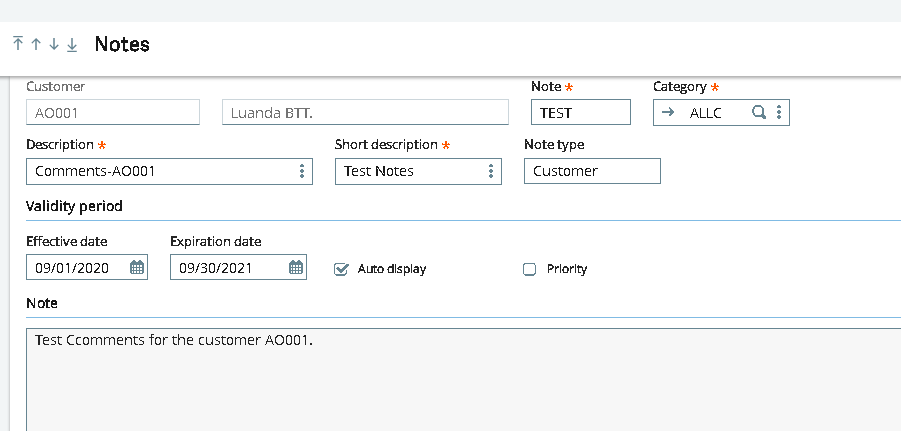
Once you click on Customer notes icon the system will redirect you to the Notes screen where you can mentioned all the details such as Description, Short description and Comment under the section of Notes. You can also set the start and end date i.e. Validity period of the particular notes.
Kindly check below screenshot for detail view.
Basically this function can be accessed from the Products, Suppliers, Prospects and Customers management functions.
You can use the notes function to enter information related to the product, supplier, prospect or customer as a note. This information is displayed or inquired from the functions that have been selected at the Note category level.
User can create multiple notes for the same product, supplier, prospect, customer, and indicate if they must be displayed as a priority.
Let us see the use / function of all the fields present:
- Note: – This is basically use to enter mentioned the Note code which will further use to identify the notes.
- Category: – Use this function to set up and maintain note categories for products (including product-sites), customers, suppliers, prospects, or customer relations. When creating a note, this note is assigned a category that determines in which functions this note will be available. These functions may belong to the Purchasing, Sales, Customer relation and Production module
- Description and Short description: – This is use to add the particular description. For both the field there is a Translation option is present form the Actions menu in order to open the Line Translation function.
- Effective Date: – This field use to determine from which date the note can be access in the function selected in the category. By default it is the system date. If this field is blank, the note takes effect the same day it is created.
- Expiration date: – This field use to determine till when this note will be available. By default, the expiry date corresponds to the default system date + 1 year. If this field is blank, the note does not expire.
- Auto Display: – User can specify if the note must be displayed automatically by using the option Auto display. This option helps user to display the notes automatically during the data entry.
- Priority: – This field is use to assign the note as a priority.
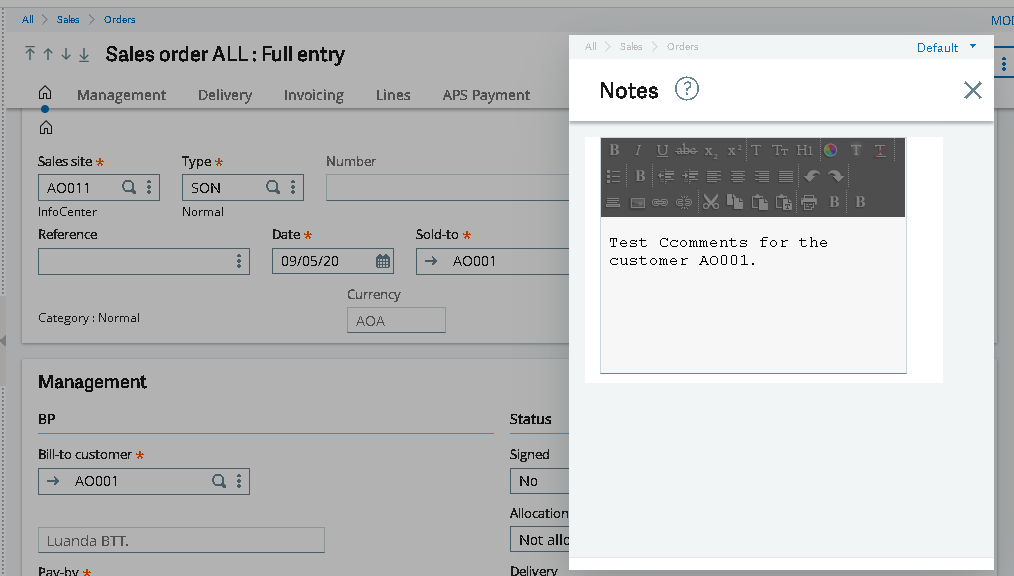
As per the mentioned above in the category section we have created this particular notes with category “ALLC” and we assigned all the modules for this category. So during further data entry if user wants to create the sales order then this created notes will be pop up once user enters the Customer in the sales order transaction. You see below screenshot for details.
This is how user can setup the comments for specific customer in Sage X3. This will helps user to easily maintain the important notes / Message for customers. This feature is very user-friendly and it is introduced updated version of Sage X3 i.e. in V12.
This is how user can setup the comments for specific customer in Sage X3. This will helps user to easily maintain the important notes / Message for customers. This feature is very user-friendly and it is introduced updated version of Sage X3 i.e. in V12.


