In accounting and finance, handling invoices and payments is part of the daily routine—but it’s also one of the most important tasks for keeping books accurate. Sometimes, businesses face situations where small amounts need to be written off, whether due to bad debts, rounding differences, or even over-payments. Knowing how to record these write-offs correctly during payment entry in Sage X3 helps ensure your financial records stay clean and reliable. Below are five practical steps and best practices to manage write-offs effectively.
The first step is to set up a Payment attribute. This will define how the amount should be posted to the general ledger and ensure everything flows correctly in the accounts.
1. Go to Setup > A/P-A/R Accounting > Payment Attributes.
2. Create a new Payment Attribute and set the code as “WOFF” (short for Write -off small balances). Use the account structure Account ⇿ BP. This setup ensures that the write-off amount is posted to a designated GL account through the Accounting code, rather than going directly to the bank account.
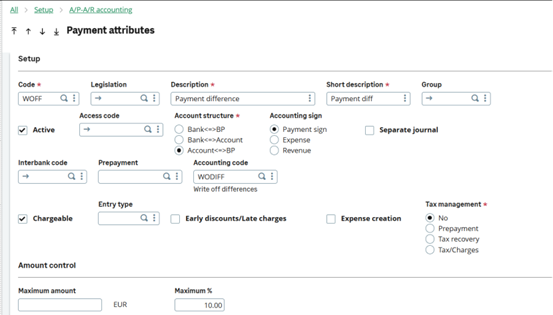
3. From the Accounting code field, you can jump to the Payment Attribute Accounting Code setup. Create a new code called WODIFF and link it to the GL account you want to use for tracking over-payments and underpayments.

Example 1: Writing off a balance
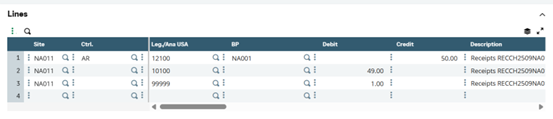
Let’s say a customer makes a payment that’s slightly less than the invoice amount, leaving behind a small balance we don’t plan to collect. For instance, the invoice is for $50, but the customer only pays $49. In this case, we’ll write off the remaining $1.$49
When entering the payment transaction:
The REC line should reflect the actual payment received ($49).
For the write-off, enter the details as follows:
- Attribute Code: WOFF
- Invoice Type: CSINV
- Document: Customer’s Invoice
- Amount: 1.00 (the balance being written off)

4. After posting the transaction, review the accounting document. You should see the customer’s account credited with the remaining invoice balance, while the underpayment is recorded in the designated GL account rather than the cash account.
Example 2: Correcting an Over-payment
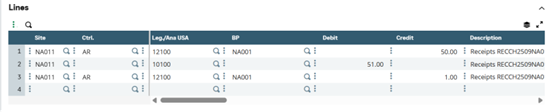
After posting the transaction, review the accounting document. The AR balance will be credited with $50, fully clearing the invoice. The cash account will show a debit of $51 (the total payment received), and the extra $1 will be credited to the designated GL account for over–payments.
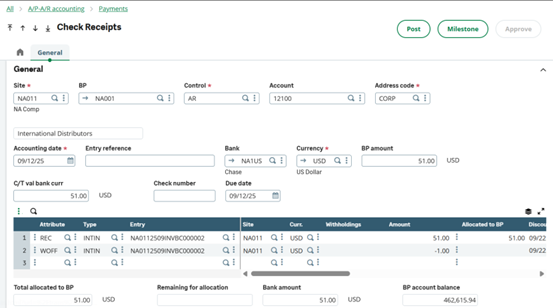
Now, let’s look at a case where a customer pays more than the invoice amount, leaving a small extra balance that we won’t be refunding. For example, the invoice is $50, but the customer paid $51. In this case, we’ll record the extra $1 as an over-payment so it doesn’t appear on the customer’s aging report.When entering the payment transaction, The REC line should reflect the full amount received ($51).For the over-payment, enter the details as follows:
- Attribute Code: WOFF
- Invoice Type: CSINV
- Document: Customer’s Invoice
- Amount: 1.00 (the over-payment amount)
After posting the transaction, review the accounting document. The AR balance will be credited with $50, fully clearing the invoice. The cash account will show a debit of $51 (the total payment received), and the extra $1 will be credited to the designated GL account for over-payments.
Effectively managing write-offs and over-payments in Sage X3 ensures that financial records remain accurate and up to date. By correctly recording these transactions, businesses can maintain clean ledgers, avoid reconciliation issues, and gain a clearer view of their true receivables and payables. Leveraging Sage X3’s functionalities not only simplifies the process but also strengthens financial control and compliance, ultimately supporting better decision-making and healthier cash flow management.