Put-away Plan or Storage Plan is a functionality to plan stock change from dock location category to another location or internal location.
Sage X3 offers flexibility to manage default location for a product within site for different operations. For instance, if a product exists in multiple locations of the site and for each operations (receipts, shipments, picking etc) has to be carried from different location, then we can add a default location for that particular operations.
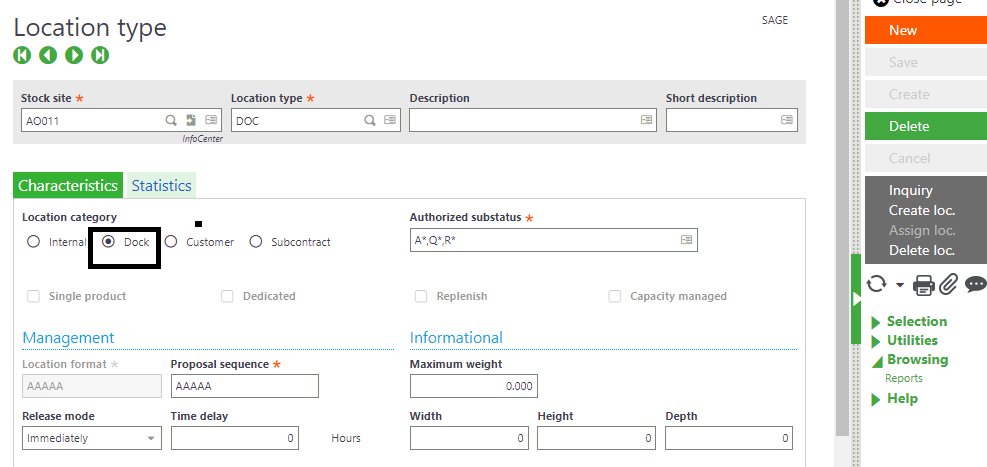
There are multiple location categories in Sage X3:
- Internal.
- Dock – awaiting storage.
- Customer.
- Subcontract .
Internal: Internal location category is used for normal locations.
Dock – awaiting storage : The Dock location category is used to receive a location to a dock. It is possible to enter location without specifying the lot, sub-lot and its serial number.
Customer: Customer location category is used to managed the location of BP’s and also to manage the loan of goods to a specific BP.
Subcontract: Subcontract location category is used to manage the products in the subcontracting locations.
In Sage X3, we may find difficulty of displaying data in lines grid in Storage plan screen. For displaying data in lines grid. There is a functionality in Sage X3 to set this.
Search data and check is it coming in the lines grid in Put-away plan screen. As all mandatory data is entered in the fields , when click on magnifying glass of ‘from entry’ fields. No data is coming in the grid on click of search button. Refer below screen shot:
To solve this, follow below steps:
Step1: Create a location for the particular site and set its location category to ‘Dock’.
Navigate to : Common data -> Product Tables -> Location Types
Step2: Now create Purchase Receipt or Miscellaneous Receipt and select this location in the lines grid.
Navigate to: Purchasing → Receipt -> Receipts
Step3:
Now, Navigate to: Stock -> Internal transactions -> Put-away plan
Enter all the mandatory fields , enter this transaction number in ‘From entry’ and ‘To entry’. Then click on Search button.
As we can see in the above screen shot, data is coming in the lines grid.
Note: This screen will also help us to transfer stock from one location to another location within the sites or warehouses. Also data will not come in put-away plan / storage plan screen if we select location whose location category is internal . In this we cannot transfer stock which is in internal location to dock location. Only those stock which is in dock location will get transferred to internal locations.
By setting all the above parameters, the data will automatically come in the Put-away/ Storage Plan screen.
About Us
Greytrix – a globally recognized and one of the oldest Sage Development Partners is a one-stop solution provider for Sage ERP and Sage CRM organizational needs. Being acknowledged and rewarded for multi-man years of experience and expertise, we bring complete end-to-end assistance for your technical consultations, product customizations, data migration, system integrations, third-party add-on development, and implementation competence.
Greytrix has some unique integration solutions developed for Sage CRM with Sage ERPs namely Sage X3, Sage Intacct, Sage 100, Sage 500, and Sage 300. We also offer best-in-class Sage ERP and Sage CRM customization and development services to Business Partners, End Users, and Sage PSG worldwide. Greytrix helps in the migration of Sage CRM from Salesforce | ACT! | SalesLogix | Goldmine | Sugar CRM | Maximizer. Our Sage CRM Product Suite includes addons like Greytrix Business Manager, Sage CRM Project Manager, Sage CRM Resource Planner, Sage CRM Contract Manager, Sage CRM Event Manager, Sage CRM Budget Planner, Gmail Integration, Sage CRM Mobile Service Signature, Sage CRM CTI Framework.
Greytrix is a recognized Sage Champion Partner for GUMU™ Sage X3 – Sage CRM integration listed on Sage Marketplace and Sage CRM – Sage Intacct integration listed on Sage Intacct Marketplace. The GUMU™ Cloud framework by Greytrix forms the backbone of cloud integrations that are managed in real-time for the processing and execution of application programs at the click of a button.
For more information on our integration solutions, please contact us at sage@greytrix.com. We will be glad to assist you.