Sage X3 provides various features of displaying transactions through different ways of navigating them, sometimes by jump to options or by menu items and many more.
These process flows are widely used for because they eliminate the need to go the site map every time to access a function. Instead, it helps the user to access the functions, reports, inquiries, etc. directly from the landing pages itself.
Consider an example of creating a sales process from sales quote to sales invoice creation. All the three screen will be accessed from a single navigating screen which will be created by following the below steps.Now, let us learn how to create the flow in the process.
Navigate to All ->Setup -> Interactive Dashboard ->Processes and create a process as shown below.
Go to “Drawing” section of the process screen and start creating the process.
The process screen provides various features to add objects to the flow such as text, shapes, emoticons, etc. and also import images from the system you want. As shown in the below figure we are adding simple circular object and giving color to it.
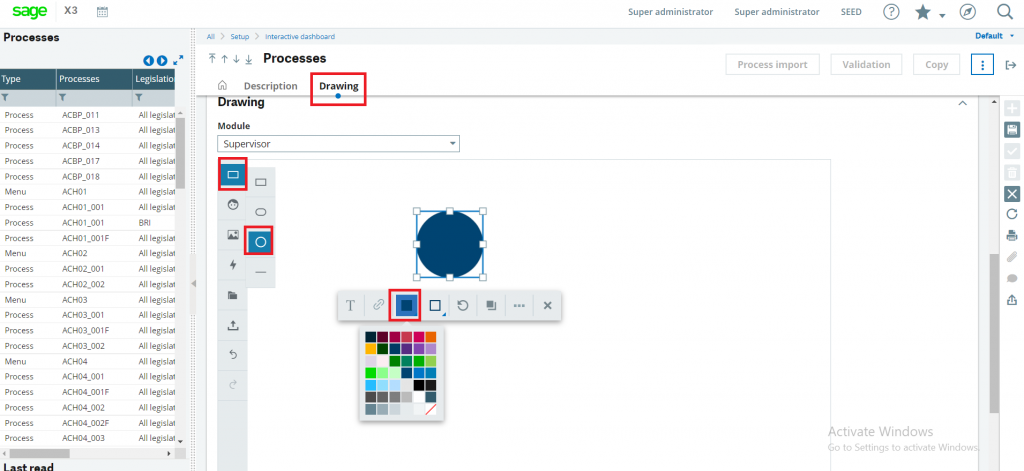
Double click on the circular object you will be able to enter text, here we are adding text as “Sales Quote” in the object.
Next, for opening the sales quote screen, we need to link the sales quote function to the object so that after clicking on the “Sales Quote object” we will be redirected to the sales quote screen. Select Type as “ERP link” and for selecting the function, click on 3 dots marked in the right of function field as shown in below figure.
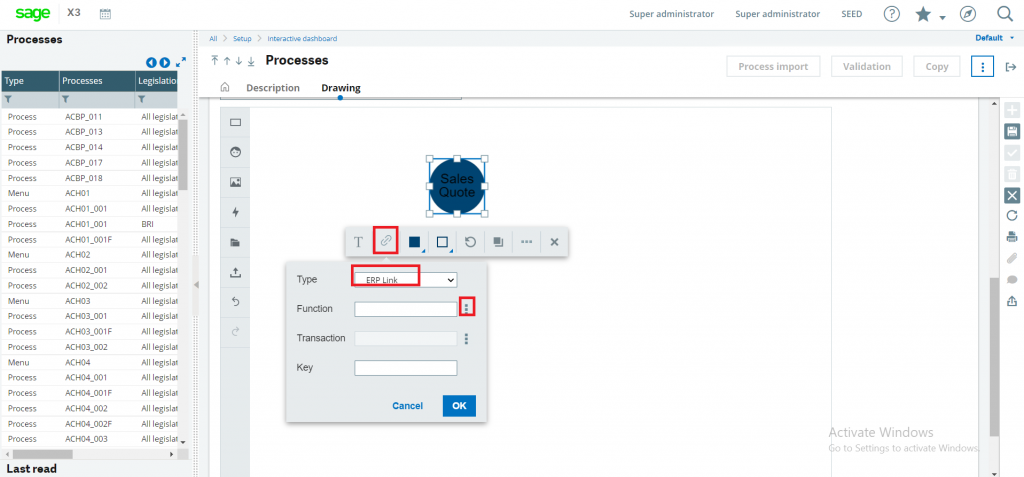
Note : Do not fill the “Function” and “Transaction” fields manually as the X3 would not recognize until its selected from the “3 dots” as mentioned in above figure.
Now, select the “3 dots” and the selection screen will open for function code as well as transaction name, once selected hit on “OK” as shown in below figure.
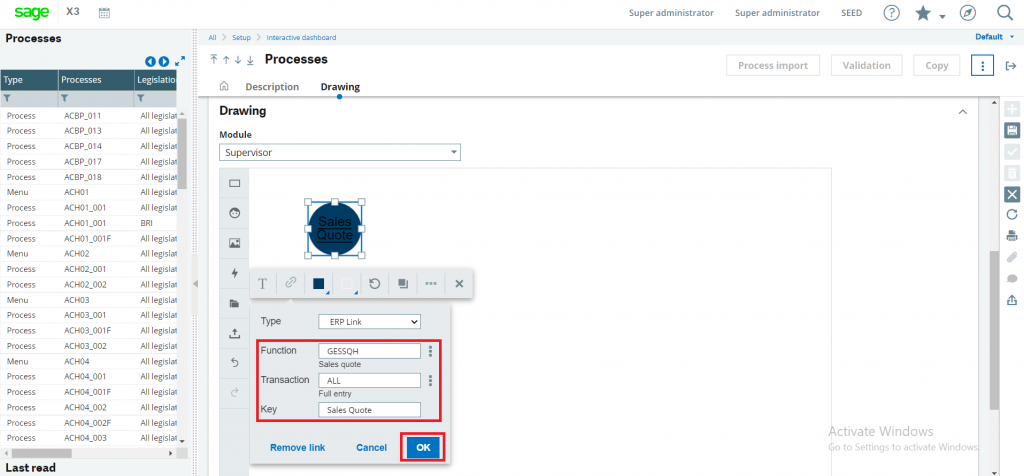
Similarly, we can do the same for “Sales order” and “Sales Invoice” screens with new objects.
Click on “Save” and then hit on “Validation” button after adding sales order and sales invoice objects.
For adding this process in the landing pages, we need to create a new menu item as shown below.
Navigate to All -> Administration -> Authoring -> Pages -> Home Pages
Create landing page as shown below and select menu item code created in the “Gadget” field of Configuration tab in landing page screen.
After saving the landing page as shown above, you will be able to see your process flow as shown in below figure.
After clicking on “Sales quote” object, the user will be redirected to the sales quote screen with the transaction name defined instantly without using the site map for accessing the function and similarly for all other transactions.
This blog helps in creating process flows in Sage X3 V12.
About Us
Greytrix – a globally recognized and one of the oldest Sage Development Partners is a one-stop solution provider for Sage ERP and Sage CRM organizational needs. Being acknowledged and rewarded for multi-man years of experience and expertise, we bring complete end-to-end assistance for your technical consultations, product customizations, data migration, system integrations, third-party add-on development, and implementation competence.
Greytrix has some unique integration solutions developed for Sage CRM with Sage ERPs namely Sage X3, Sage Intacct, Sage 100, Sage 500, and Sage 300. We also offer best-in-class Sage ERP and Sage CRM customization and development services to Business Partners, End Users, and Sage PSG worldwide. Greytrix helps in the migration of Sage CRM from Salesforce | ACT! | SalesLogix | Goldmine | Sugar CRM | Maximizer. Our Sage CRM Product Suite includes addons like Greytrix Business Manager, Sage CRM Project Manager, Sage CRM Resource Planner, Sage CRM Contract Manager, Sage CRM Event Manager, Sage CRM Budget Planner, Gmail Integration, Sage CRM Mobile Service Signature, Sage CRM CTI Framework.
Greytrix is a recognized Sage Champion Partner for GUMU™ Sage X3 – Sage CRM integration listed on Sage Marketplace and Sage CRM – Sage Intacct integration listed on Sage Intacct Marketplace. The GUMU™ Cloud framework by Greytrix forms the backbone of cloud integrations that are managed in real-time for the processing and execution of application programs at the click of a button.
For more information on our integration solutions, please contact us at sage@greytrix.com. We will be glad to assist you.