Introduction:
Setting up intercompany transactions in Sage X3 means setting your system to correctly handle and track transactions between different companies in your organization. This setup ensures that all financial data is combined accurately, while each company’s accounts are managed properly.
To do this, you will define relationships between the companies involved, set up the right accounts for transactions, create rules for how transactions should be processed, and establish reporting tools to monitor and balance transactions between companies. Sage X3 offers tools to simplify this process, helping organizations manage intercompany transactions smoothly and maintain financial records across all their companies.
Key Steps to set-up Intercompany Transactions:
STEP 1:
To set up intercompany transactions in Sage X3, you will use the intercompany function. This involves configuring your system so that different companies within your organization can accurately record and manage transactions between each other. It ensures that financial data is consolidated correctly and that each company’s accounts are handled properly. This setup also includes defining how transactions should flow between companies and ensuring you have the tools to monitor and reconcile these transactions efficiently. Sage X3 provides specific features to streamline this process, making it easier to manage and maintain accurate financial records across all companies involved.
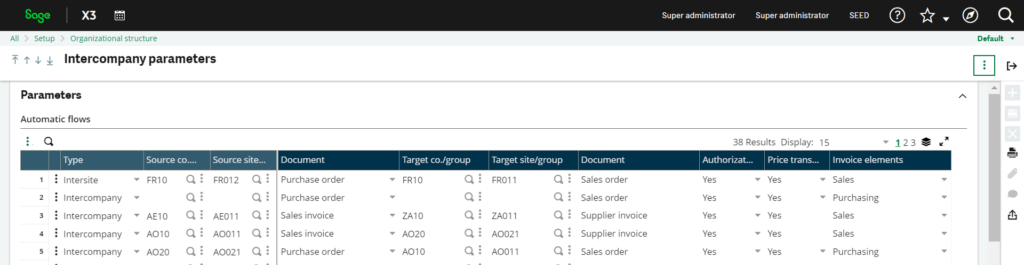
Fig.1: Intercompany Parameters
STEP 2:
To set up the process, first, create a warehouse where goods are stored and treat it like a vendor (Supplier). Next, designate your own site as the customer. Lastly, ensure that the supplier you established earlier is set as the main supplier for this part. This sequence enables smooth tracking of goods, ensuring clear roles for vendors and customers while maintaining consistency in supply management.
This is your supplier screen (Vendor):

Fig.2: Supplier screen (Vendor)
In the bottom left corner of the screenshot, there are fields where you specify which site is associated with the supplier code you created. It is recommended to use the same code for both the supplier and the site for clarity. This practice simplifies tracking and management, ensuring that the relationship between the supplier and the site is easily understood and managed within your system.
This is your customer screen
This is the ship-to address for this customer:
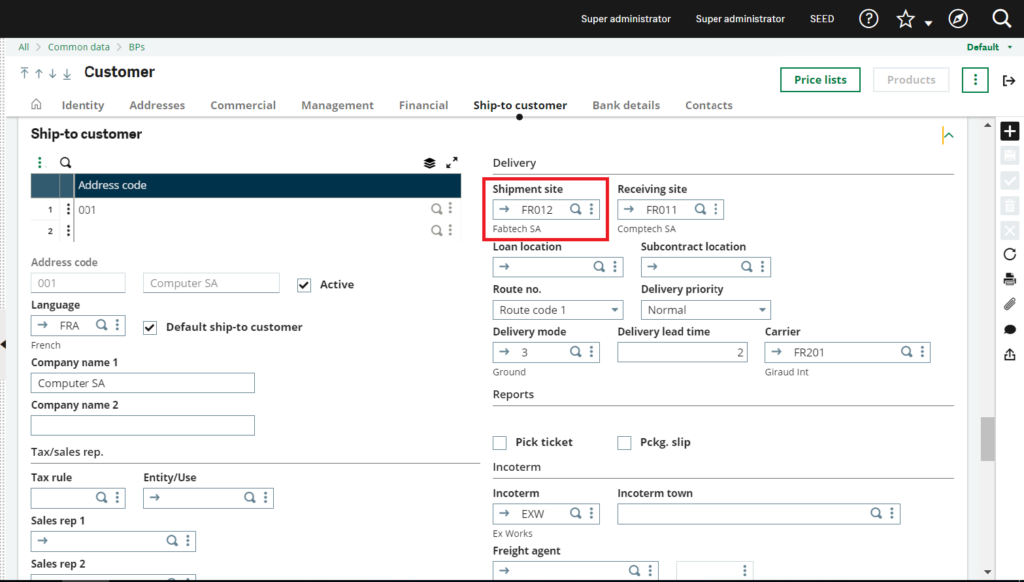
Fig.3: Customer screen
This is the address where goods are delivered to for this customer. Also, remember that the site where goods are shipped from should match the supplier site you set up earlier. This is the specific part number along with the vendor/Supplier associated with it.
STEP 3:
Ensure that there is a price set for the purchase order (PO), otherwise, it won’t be created successfully.
STEP 4:
First, enter the customer’s purchase order (PO). To ensure our current inventory, we will generate a purchase order (PO) for the items and bring them into our warehouse first.
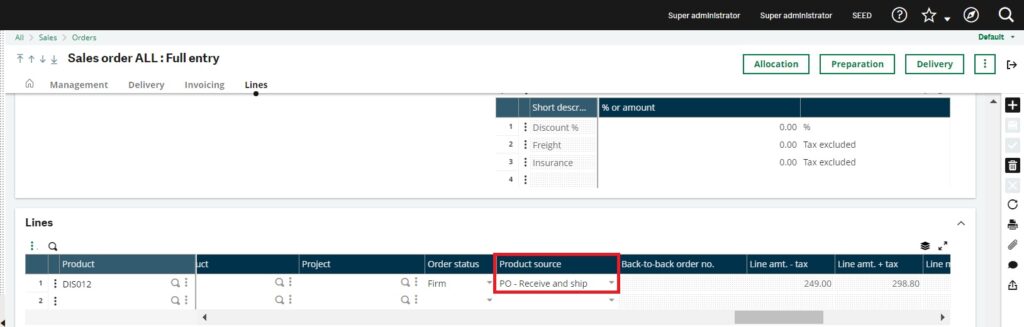
Fig.4: Source for delivery
In the sales order (SO) line, there is a field called “Source for delivery” that controls this process. Instead of using our current stock, we will choose “PO – receive and ship.” This means we will receive the goods into our warehouse first and then ship them to our customer accordingly.
STEP 5:
When setting up your system, ensure that you do not automatically allocate quantities at the line level. If you do, the system will assume that you want to use existing stock for the order.
STEP 6:
Once you have reached this stage, simply click the “back-to-back” button on the right side of the sales order (SO) screen. After clicking it, a log will appear showing the transactions that were generated.
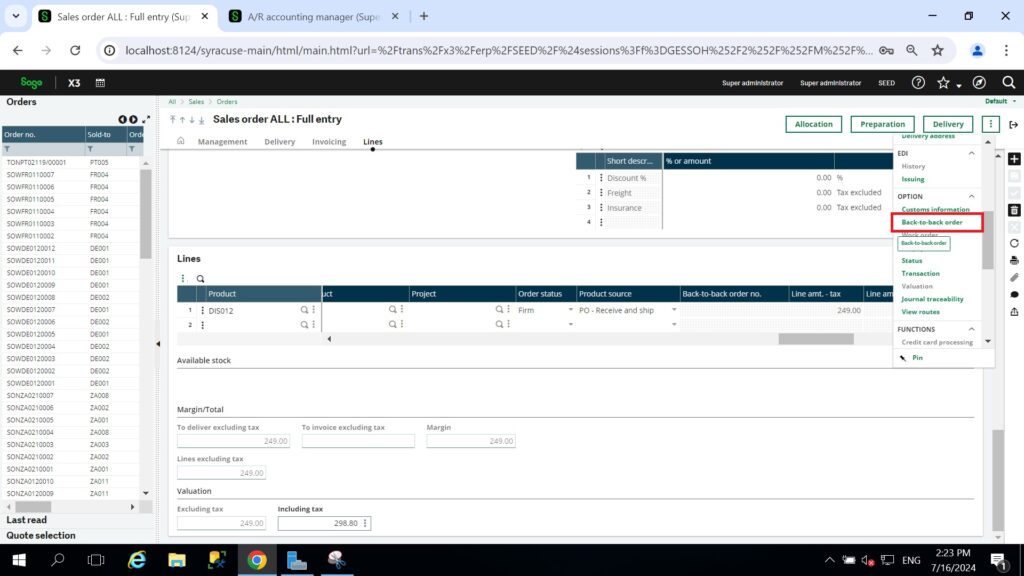
Fig.5: back-to-back
This log confirms that we have generated a purchase order (PO) from the sales order (SO). In Sage X3’s setup, the PO that is automatically created also generates a corresponding sales order at the supplier’s site. This ensures that the supplier’s warehouse can process, pack, and ship the items based on a document linked directly to the PO.
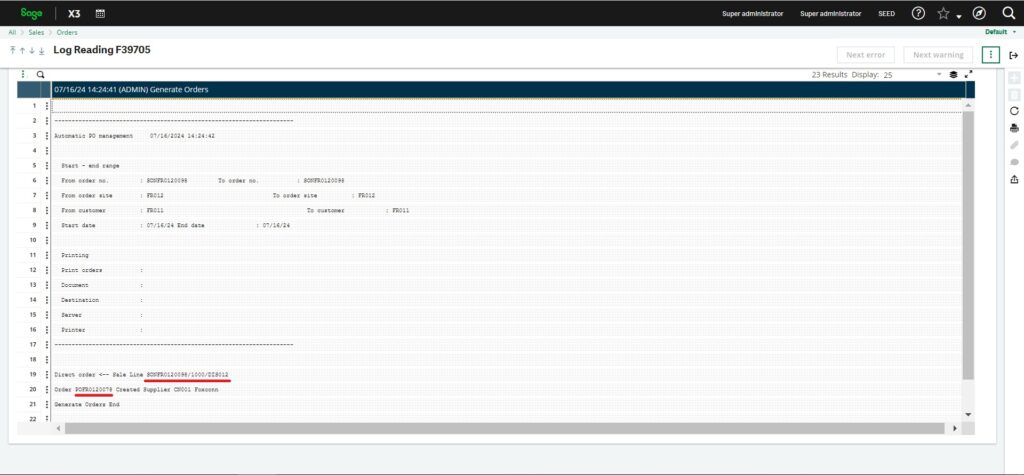
Fig. 6: Log Reading
Setting up intercompany transactions in Sage X3 ensures seamless handling of transactions between entities, consolidates financial data accurately, and maintains separate accounting. Key steps include defining relationships, setting up accounts, establishing rules, and using reporting for effective monitoring and reconciliation. Sage X3 tools simplify management, ensuring precise financial records across entities, enhancing visibility, compliance, and operational integration.