In Sage X3, Enterprise Planning is a key ERP screen that displays work-in-progress (WIP) events and Material Requirements Planning (MRP) suggestions to help businesses manage demand, plan production, and optimize purchasing. This interactive screen acts as a “to-do list” for planners, showing events like customer orders and supplier requirements, and generating suggestions for work orders, purchase orders, and transfers based on defined parameters. Users can filter these suggestions for specific departments, such as buyers or production planners, to create a tailored view of their planning needs.
It operates by temporarily extracting data from a table and presenting it on the screen in a grid. The grid displays the default number of lines as defined in the standard form.
When working with work order creation in Sage X3 ERP, especially through the Enterprise Planning (Planning Workbench), users often encounter situations where the system either fails to generate work orders without clear visibility into the reason, or generates them successfully without displaying the work order number. Fortunately, Sage X3 provides a built-in mechanism to capture detailed execution logs using the Update Summary Log (TRACE) option.
This blog explains how to enable and use this feature effectively.
Why Enable Logs in Enterprise Planning?
By default, the Planning Workbench may not display detailed error messages during Plan/Release actions. Enabling the trace log helps you:
• Capture detailed system processing during work order creation
• Identify configuration issues (routing, dates, versions, etc.)
• Debug failures in automatic work order generation
• Improve troubleshooting efficiency
Follow the steps below to enable the log file (TRACE) in the Planning Workbench in Sage X3 ERP –
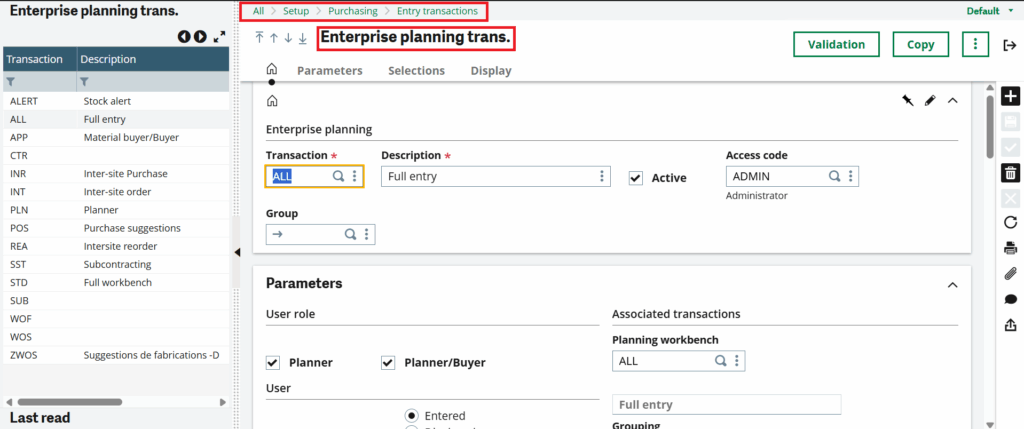
Step 01 – Navigate to Enterprise planning Entry Transaction Setup
Go to: Setup → Manufacturing → Entry Transactions → Enterprise Planning
Step 02 – Select the Relevant Entry Transaction: Choose the entry transaction code used in your Enterprise Planning screen, as logging is controlled at the transaction level in Sage X3 ERP; refer to the screenshot below for guidance.
New Stuff: Site-Specific Invoicing in Sage X3
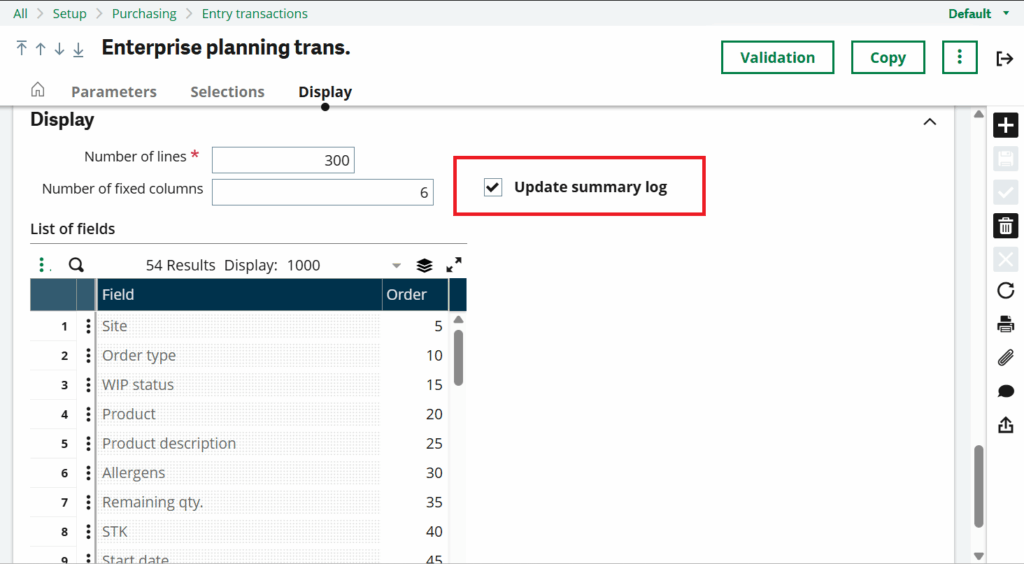
Step 03 – Enable the TRACE Option. Refer to the screenshot below for guidance.
• Navigate to Block 3 Display
• Locate the field: Update Summary Log (TRACE)
• Set the value to: Yes
Step 04 – Save the Configuration
• Click Validation to save the changes.
Step 05 – Go to the Enterprise Planning screen and generate the work order; the log file will be generated automatically and will display the work order number in Sage X3 ERP—refer to the screenshot below for reference.

Enabling the Update Summary Log (TRACE) in the Planning Workbench entry transaction is a simple yet powerful way to gain visibility into work order creation in Sage X3.
Instead of relying on limited on-screen messages, you can leverage detailed logs to:
• Diagnose issues faster
• Understand system behavior
• Ensure accurate work order generation
If you frequently work with Enterprise Planning, this small configuration can significantly improve your debugging and support process.