Sage X3 provides us a functionality to print labels and barcodes using ZPL printer. ZPL stands for zebra programming language and using this language we can design the layouts of labels and embedded barcodes. In this blog we will see how the ZPL setup is configured in Sage X3. Below are steps to configure ZPL.
Steps:
Create a layout of document (.pat file) using zebra programming language.X3 Zebra Printing uses a ZPL Pattern file to determine the layout of the output. The information can be plain text, static text, formula based on X3 fields, barcode based on X3 fields or the data of X3 fields.
After creating this .pat file, locate it to PAT sub-directory of sage X3. For example if we are configuring in SEED folder (D:\Sage\X3V12\folders\SEED\PAT).

Navigate: Development -> Script dictionary -> ZPL reports.
Enter the setup code and description. Enter the ‘file template’ field, here we have to enter the name of .pat file which is placed in PAT folder. To import the contents of the .PAT file, click on the File template’s Actions icon and select “New model version” – the Version number will be displayed and the internal counter will be incremented so the next import will have a distinct Version Number.
Please note that the Pattern will not be used until the ZPL Definition has been Saved, so make a small change to the Description such as adding a space so that the Save action is available – if an earlier Version exists, that will be used instead.
The runtime selection criteria set up in Report Parameters, as described later, are used to select the data to be included in the Report.
In the above case, ARZIMP.PARAM(“commandedeb”) function provides a link the value specified in that Parameter at run-time – in this case, as defined in Report Parameters within Dictionary > Script dictionary > Reports
ZPL Patterns have three main sections, Header, Detail/Line and Footer/Tail.
Please check that the .PAT has been imported correctly. Click the Action icon of the Template file field and select “View template” action. Check that Header, Lines and Base have ZPL commands in them – if all three tabs are not populated, this implies that the sections are not defined properly and should be reviewed.
There is an ‘expression’ tab in ZPL report screen. As shown below here we can add the execution condition and the expression as required.
Creating a ZPL Report
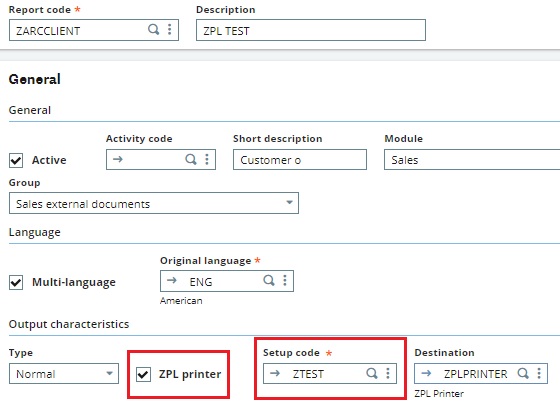
After setting up the ZPL Printer to hold the ZPL Pattern, an X3 Report should be set up to run the ZPL Printer Report. This is done in Development > Script Dictionary > Reports.
This is where the ZPL Printer is associated with an X3 Report, the ZPLPRINTER Destination and Report Parameters which select the data to be output.On ticking the “ZPL printer” field, the “Parameter Code” field becomes active and this is where the ZPL Printer’s Code is entered.
Specify the Zebra Printer’s Code in the “Destination” field.
On the Parameter definitions tab, specify the parameters which will be used by the ZPL Printer.
Hence after creating the ZPL report when we will print our ZPL report we will get the output as the layout is designed with ZPL language.
About Us
Greytrix – a globally recognized and one of the oldest Sage Development Partners is a one-stop solution provider for Sage ERP and Sage CRM organizational needs. Being acknowledged and rewarded for multi-man years of experience and expertise, we bring complete end-to-end assistance for your technical consultations, product customizations, data migration, system integrations, third-party add-on development, and implementation competence.
Greytrix has some unique integration solutions developed for Sage CRM with Sage ERPs namely Sage X3, Sage Intacct, Sage 100, Sage 500, and Sage 300. We also offer best-in-class Sage ERP and Sage CRM customization and development services to Business Partners, End Users, and Sage PSG worldwide. Greytrix helps in the migration of Sage CRM from Salesforce | ACT! | SalesLogix | Goldmine | Sugar CRM | Maximizer. Our Sage CRM Product Suite includes addons like Greytrix Business Manager, Sage CRM Project Manager, Sage CRM Resource Planner, Sage CRM Contract Manager, Sage CRM Event Manager, Sage CRM Budget Planner, Gmail Integration, Sage CRM Mobile Service Signature, Sage CRM CTI Framework.
Greytrix is a recognized Sage Champion Partner for GUMU™ Sage X3 – Sage CRM integration listed on Sage Marketplace and Sage CRM – Sage Intacct integration listed on Sage Intacct Marketplace. The GUMU™ Cloud framework by Greytrix forms the backbone of cloud integrations that are managed in real-time for the processing and execution of application programs at the click of a button.
For more information on our integration solutions, please contact us at sage@greytrix.com. We will be glad to assist you.