Workbooks are powerful tools that allow you to manipulate and analyse data in a variety of ways. One of the ways that workbooks can be made even more powerful is through the use of global variables and global selection page variables.
Selection pages are a powerful tool in workbooks that can be used for more than just filtering data. In addition to their filtering capabilities, selection pages can also be used as a function within workbooks. By using global variables and global selection page variables, you can create functions that take advantage of the data contained within your selection pages. This allows you to create dynamic and flexible workbooks that can adapt to changing data and user needs.
Follow the below steps to create a Workbook:
- Right-click in an empty space in the Workbooks tab and select New Workbook.
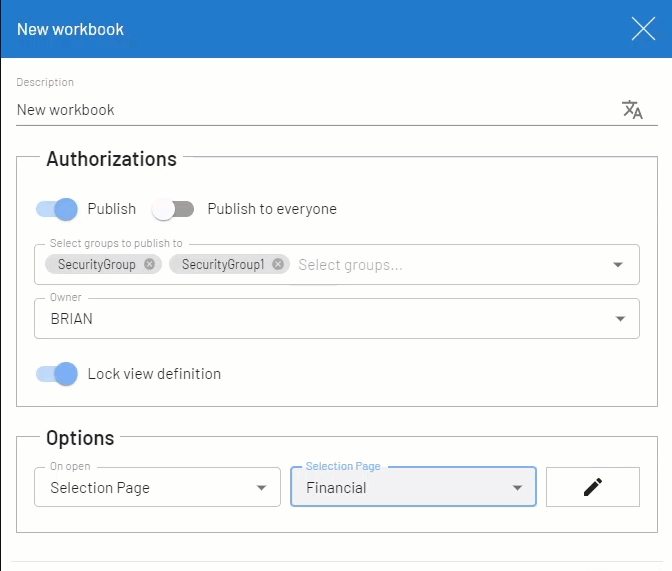
2. In the New Workbook dialogue box, select the required authorizations and options.

| Setting | Description |
| Authorizations | |
| Description | Enter a meaningful description for the workbook. |
| Publish | Use the toggle to publish the workbook for other users.The second toggle allows you an option to publish to everyone or for specific people.You can even set an owner from drop down list. The owner would have full access to the workbook. The default owner will be the current user. |
| Lock View Definition | Only the owner or the user with administrator flag will have the rights to modify it. |
| Options | |
| Options | Allows you to open a selection page before opening the workbook. None: No selection page is chosen.Selection Page: Opens the selection page before opening the workbook. The workbook data can only be retrieved once the criteria of the selection page is entered. Select a global selection page from the list. |
3. Click Save. The new workbook is displayed in edit mode.
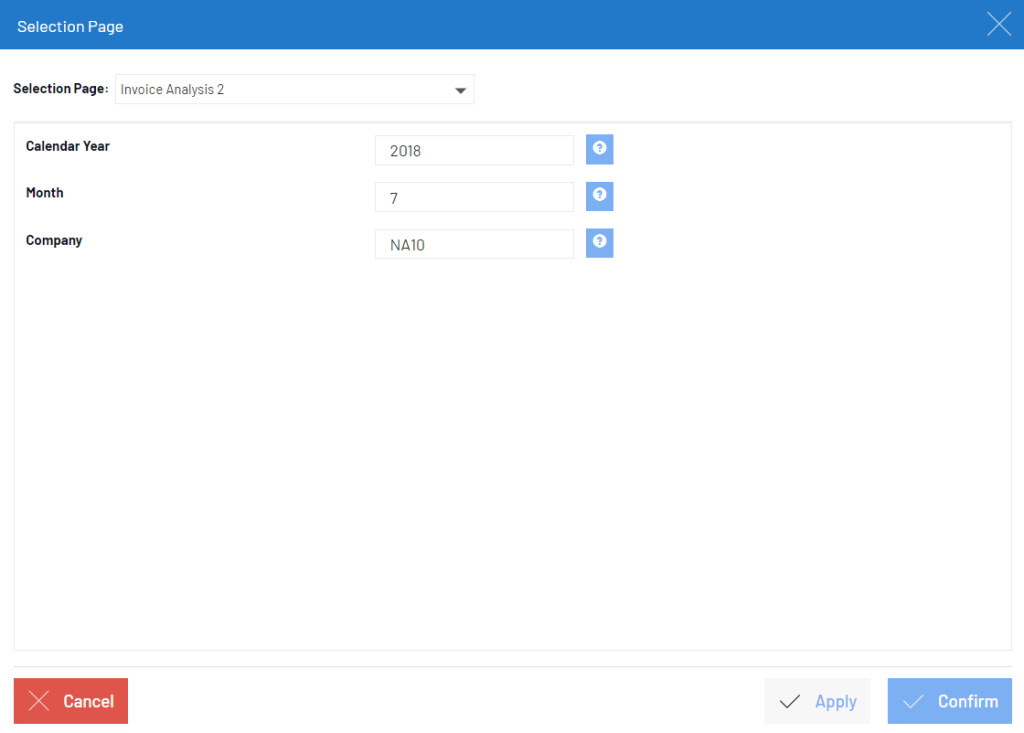
4. If you chose a selection page in Step 2, the Selection Page dialog box is displayed.
a) Enter the selection page values or use the prompt icon to select them from the list.
b) Click Confirm. The new workbook is displayed in Edit mode.

Workbooks in SEI can provide valuable insights and data visualization for businesses. By the following steps outlined in the guide, users can successfully incorporate this feature of Workbooks and take advantage of its benefits.
About Us
Greytrix – a globally recognized Premier Sage Gold Development Partner is a one-stop solution provider for Sage ERP and Sage CRM needs. Being recognized and rewarded for multi-man years of experience, we bring complete end-to-end assistance for your technical consultations, product customizations, data migration, system integrations, third-party add-on development and implementation expertise.
Greytrix caters to a wide range of Sage X3 (Sage Enterprise Management) offerings – a Sage Business Cloud Solution. Our unique GUMU™ integrations include Sage X3 for Sage CRM, Salesforce.com and Magento eCommerce along with Implementation and Technical Support worldwide for Sage X3 (Sage Enterprise Management). Currently we are Sage X3 Implementation Partner in East Africa, Middles East, Australia, Asia. We also offer best-in-class Sage X3 customization and development services, integrated applications such as POS | WMS | Payment Gateway | Shipping System | Business Intelligence | eCommerce and have developed add-ons such as Catch – Weight and Letter of Credit for Sage X3 to Sage business partners, end users and Sage PSG worldwide.
Greytrix is a recognized Sage Rockstar ISV Partner for GUMU™ Sage X3 – Sage CRM integration also listed on Sage Marketplace; GUMU™ integration for Sage X3 – Salesforce is a 5-star app listed on Salesforce AppExchange.
For more information on Sage X3 Integration and Services, please contact us at x3@greytrix.com. We will be glad to assist you.

