
In any enterprise resource planning (ERP) system, managing customer payments and allocating them to specific orders is crucial for streamlining accounting processes and ensuring that your financial records remain accurate. Sage X3, a leading ERP solution, provides an efficient and effective way to manage customer payments and allocate them to orders. In this step-by-step guide, we’ll walk through how to create payments, check for accounting holds, and allocate customer payments to specific sales orders within Sage X3.
1. Creating a Payment for the Customer
The first step in the customer allocation process is creating a payment for the customer. In Sage X3, this is done via the Payment/Receipt Entry screen. This is where you can specify the payment details, including the amount and customer information.
Path: A/P-A/R Accounting > Payments > Payment/Receipt entry
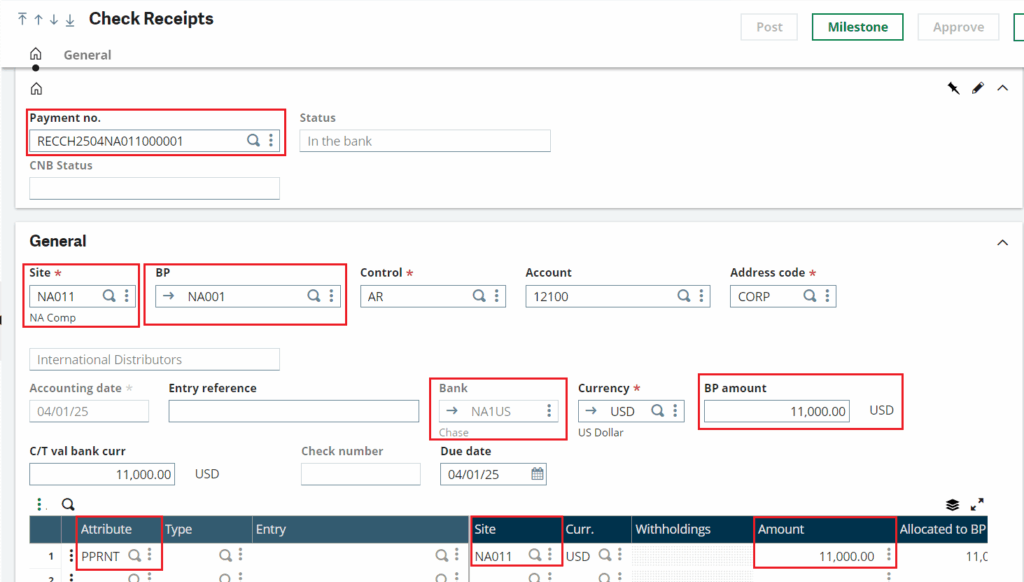
Fig 1: Payment receipt entry
For example, let’s consider the following data for the customer:
- Customer: NA001
- Amount: 11,000 USD
- Site: NA011
You can choose to either settle an outstanding order or allocate the payment as a prepayment for future orders. Once the payment entry is created, you’re ready to proceed to the next step, where the payment will be linked to specific sales orders.
2. Checking for Accounting Holds
Before moving forward with the payment allocation, it’s essential to ensure that there are no holds on the customer account or payment. These holds can sometimes prevent the allocation process from completing smoothly.
Path: Usage > Batch server > Accounting tasks
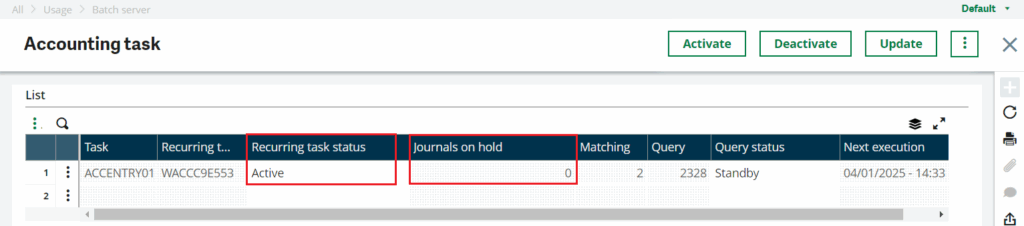
Fig 2: Accounting task
In Sage X3, you can quickly check for accounting holds by reviewing the Accounting Task screen. If there are any holds, the system will notify you, and you may need to consult with the Batch Server or resolve any outstanding issues. This verification step ensures a seamless payment process and prevents discrepancies in your financial records.
Path: Administration > Endpoints > Batch server.

Fig 3: Batch server
3. Entering Customer Allocation Data
Once the payment is created and any accounting holds are resolved, it’s time to allocate the payment. Navigate to the Customer Allocation screen in Sage X3. Here’s what you need to do:
- Site: Select the appropriate site where the transaction is being processed.
- Customer: Choose the customer (e.g., NA001) whose payment you’re allocating.
- Company: Specify the company associated with the transaction.
Path: A/P-A/R Accounting > Open items > Customer allocations.
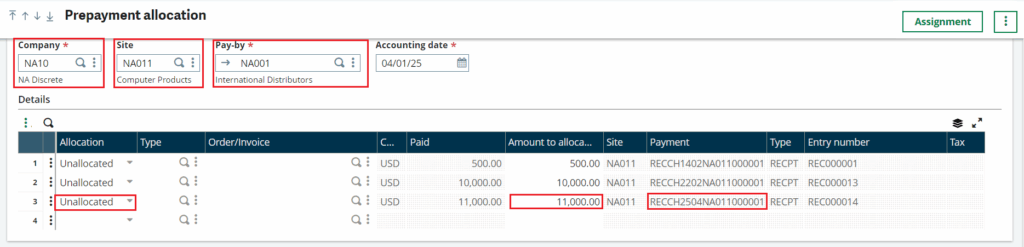
Fig 4: Customer allocation
After entering this data, the system will display the payment details and show you a line item with the created receipt. This is where you can review and confirm the payment details before proceeding with the allocation.
4. Creating a Sales Order (if Needed)
In some instances, there may not be a sales order created yet. If that’s the case, you can easily create a Sales Order in Sage X3 and then add it to the Customer Allocation screen. This integration ensures that any prepayments or allocations are directly tied to a newly created sales order in real time.
Path: Sales > Orders > Orders
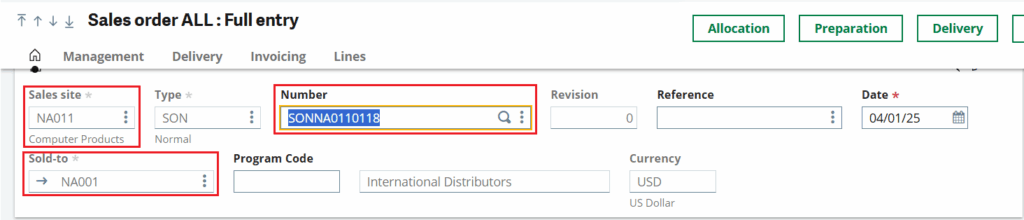
Fig 5: Sales order
Creating a sales order ensures that you have the appropriate documentation in place for the allocation, streamlining the order fulfillment process.
5. Allocating Payment to a Specific Order
Path: A/P-A/R Accounting > Open items > Customer allocations.
Once the sales order is created (if needed), it’s time to allocate the payment to a specific sales order. This step is straightforward in Sage X3:
- Select the Order: From the dropdown menu on the Customer Allocation screen, select the sales order you want to apply the payment to.
- Enter the Amount: Specify the amount to be allocated to that order.
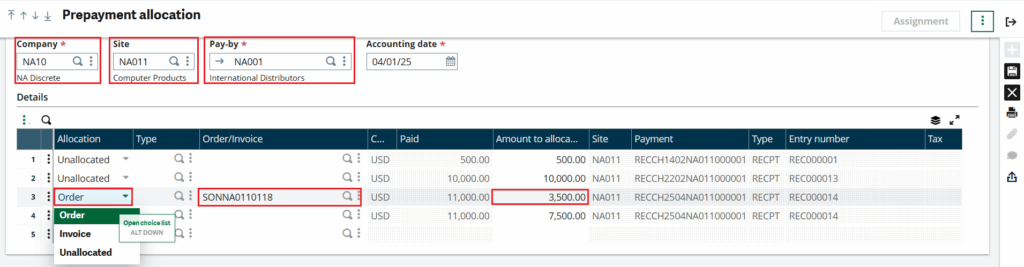
Fig 6: Payment allocation
By completing this step, Sage X3 will generate a Prepayment for the sales order. This ensures that the payment is accurately applied to the order and available for use during order fulfillment.
6. Generating Prepayment for the Order
Path: Sales > Orders > Orders > Click on three dots > Select Prepayment.
After the payment is allocated, Sage X3 will automatically generate the prepayment for the sales order based on the amount entered. This prepayment is essential for funding the order and ensuring that the payment is linked correctly.
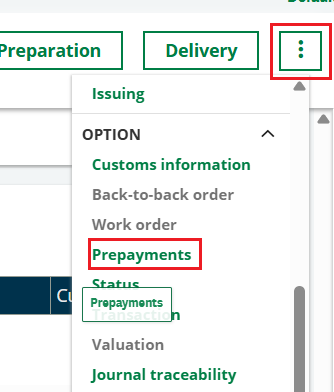
Fig 7: Path to Prepayment on sales order
By doing this, the sales order is now funded, and the prepayment is ready for processing. This step saves time by automating the application of payments to orders.
7. Verifying the Allocation
Once the payment is successfully allocated to the sales order, it’s important to verify that everything is correct. Here are two places to check in Sage X3:
- Sales Order Prepayment Section: Navigate to the Prepayment section within the Sales Order screen. Here, you can confirm that the allocated amount is correctly reflected.
Path: Sales > Orders > Orders > Click on three dots > Select Prepayment.
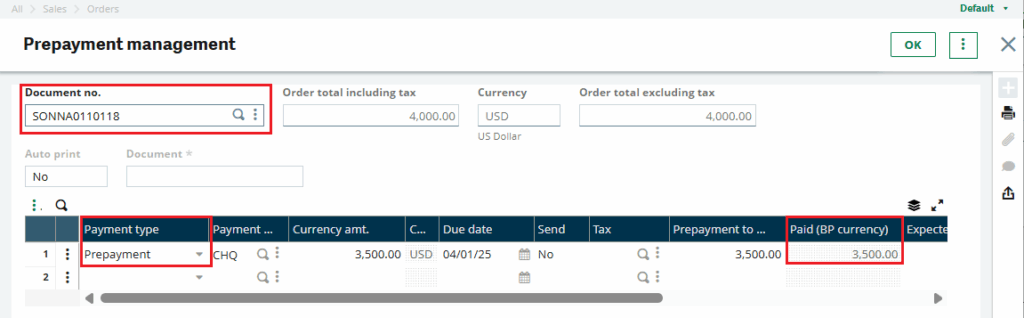
Fig 8: Prepayment screen
- Payment Screen: Additionally, check the Payment screen to ensure that the sales order is linked with the allocated prepayment amount.
Path: A/P-A/R Accounting > Payments > Payment/Receipt entry
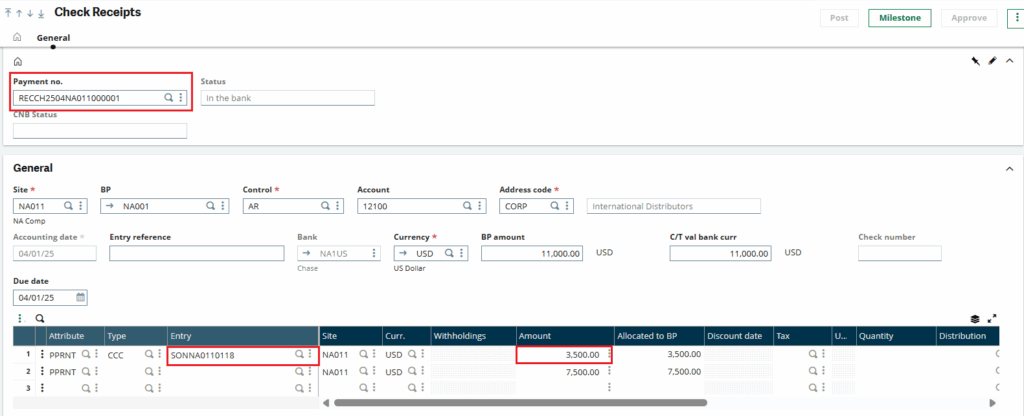
Fig 9: Payment screen
Thus, we checked how Effectively managing customer allocations in Sage X3 ensures accurate financial tracking and smooth order processing. By following the step-by-step process—from creating payments and checking for accounting holds to allocating payments and verifying prepayments—you can maintain clear financial records and enhance customer satisfaction.