In many manufacturing industries, products do not have a consistent or fixed weight. Although they are processed and tracked in standard units such as pieces, bags, boxes, or pallets, their true cost, material consumption, and sales value are determined by the actual weight.
This is where Greytrix’s Catch Weight Management becomes essential for achieving accuracy, compliance, and profitability in the manufacturing process.
To effectively manage variable-weight products in manufacturing, the first and most important step is configuring the Product Master correctly.
Navigate to: Common Data > Products > Products
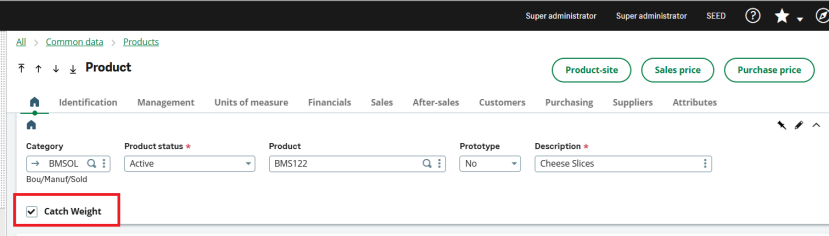
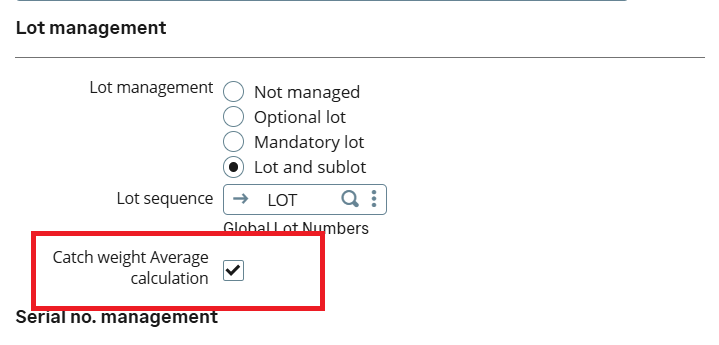
In order to track the weight of the product, the product should be lot managed or lot and sub lot.
As shown in the below screenshot, the Catch weight average calculation flag is checked then the system will take average weight of the LOT as the issued weight in delivery for catch weight items.
If we keep it unchecked then the system will allow user to enter the weight for each case in the lot manually.
Once the Catch Weight flag is enabled in the Product Master, the next step is to define the catch weight parameters under the Units of Measure section.
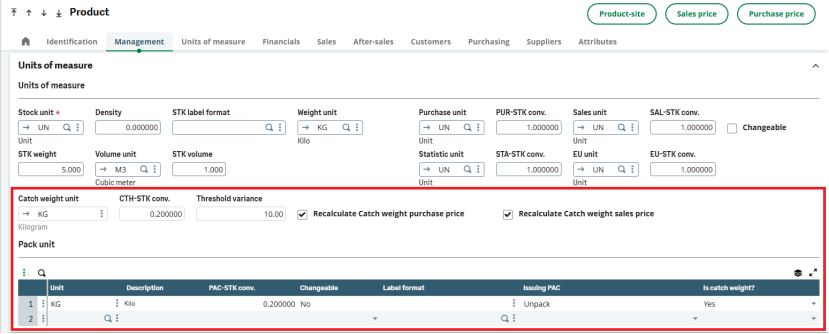
Catch Weight Unit: This defines the unit used to record the actual weight of the product.
Catch Weight to Stock Conversion (CTH-STK Conv.): This specifies the conversion factor between the stock unit and the catch weight unit.
Threshold Variance: This sets the allowable tolerance for weight variation.
Recalculate Catch Weight Purchase Price: When enabled, Sage X3 automatically recalculates the purchase price based on the actual received weight instead of the standard quantity.
Recalculate Catch Weight Sales Price: This ensures that sales pricing is recalculated based on the actual delivered weight.
Pack Unit with Catch Weight: This defines how the product is packed and issued in catch weight units.
With the Product Master setup now complete, let’s move on to the manufacturing flow to see how catch weight is applied in real production scenarios.
Note: Before proceeding with the manufacturing flow, ensure that the product Bill of Materials (BOM) and Routing with operations have already been created for the catch weight–enabled product.
Once the BOM and routing are defined, the next step in the manufacturing flow is to create the Work Order.
Navigate to : Manufacturing > Planning > Work order
As shown in below screenshot, We have created a Work order with the catch weight enabled product.
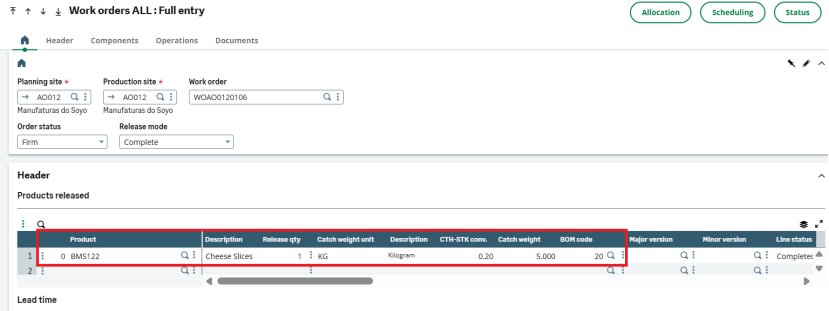
We have defined the operations for this product.

After each operations we capture the weight of finished goods.
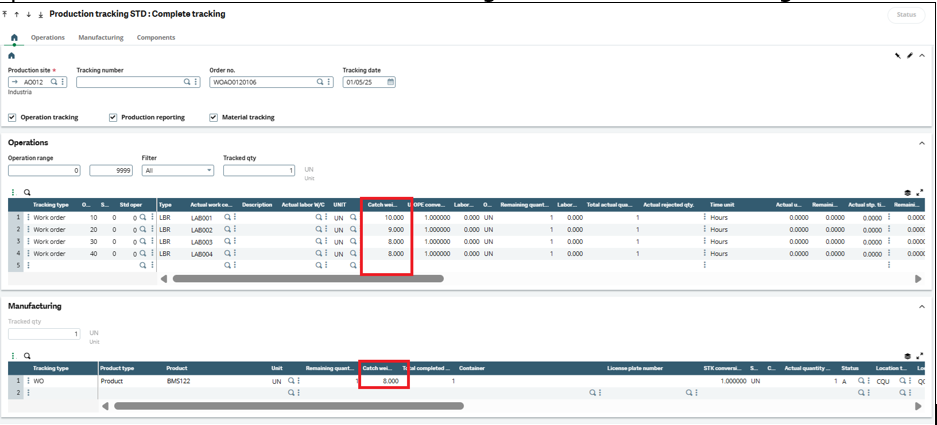
Using same work order, let’s create the production tracking.
Navigate to : Manufacturing > Production Tracking > Production tracking
As shown in below screenshot, we have capture the catch weight at each operation as well as the final catch weight in the manufacturing tab.
With this, the manufacturing process is completed, and the product is now accurately managed using catch weight.
Catch weight ensures that manufacturing transactions reflect actual production weight rather than assumed standards, enabling accurate consumption tracking, cost calculation, and variance control for variable-weight products.